Showing posts with label Nicole by OPI. Show all posts

Sunday, April 11, 2021

Yellow, Green, and Blue Dotticure

 Today I have a nail art manicure to share:

Yellow, Green, and Blue Dotticure

This yellow, green, and blue dotticure was really quick and easy to do. I just alternated some blue and green holographic polishes as my base colours, and then added dots of various sizes and colours with a dotting tool. The overall look was very whimsical - it was a lot of fun to wear!

Below, I have a shot of the polishes that I used o create this mani:

Yellow, Green, and Blue Dotticure - Polishes Used

polishes used

I used 3 polishes to create this manicure. The base colours were two different holographic polishes from Cirque Colors, 'Emerald' and 'Sapphire'. These polishes were both originally released in Cirque Colors' 'Facets 2018 Collection', which was themed around various precious gemstones. The third polish was a bright yellow that I used for the dot design. It is called 'Hit the Lights' and it was part of Nicole by OPI's collaboration collection with Selena Gomez, which was released way back in January 2013!

I have so many nostalgic feelings around the (now retired) Nicole by OPI line! I remember how OPI saved the majority of their fun, bright, and bold shades and formulations for this line. It was so much fun to browse through them in the drug stores!

Below, I have some additional shots of the manicure.
Yellow, Green, and Blue Dotticure - Additional Shots

Thursday, March 5, 2020

Mani Refresh: Holo-Glitter Topped Pink Shimmer Nails


I wanted to refresh my mani from the last post, so I decided to top them with a holographic bar glitter polish, to give a bit of a princessy-vibed mani!  The polishes I used were Nicole by OPI's 'You're an Angel', and Kleancolor's 'Starry Night'. For bottle shots, you can see 'You're an angel' here, and 'Starry Night' here.

This combination was certainly fun to wear and look at - even for such a simple manicure! Plus, it was a really great way to refresh a manicure that I had reached the point of boredom with. The pink polish that serves at the base polish in this manicure, had been my previous manicure. I wanted a bit of a change, but I wasn't keen on completely removing my nailpolish and starting over, either. I decided to just add a coat of the glitter to revitalize the mani without doing a lot of work!

Sunday, March 1, 2020

Swatch: Nicole by OPI 'You're an Angel'

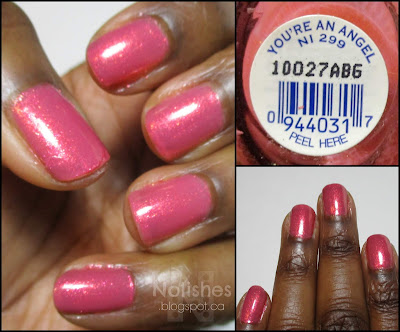
Swatch of Nicole by OPI 'You're an Angel', a warm-toned, golden-pink shimmer polish

Today I have an 'Oldie but Goodie' nail polish swatch to share. This manicure features Nicole by OPI's 'You're an Angel'. 'You're an Angel' is a medium-toned, golden-pink shimmer polish which is so unbelievably beautiful both in the bottle and on the nail, that it took quite a few tries to get a semi-accurate photo - and even so, the pictures in this post aren't really doing the polish complete justice. The polish appears much warmer, and reflects a bit more golden-pink in person. I think a lot of the difference comes down to my ambient lighting being warmer than the lighting I use for my pictures.

I really used to love the Nicole by OPI brand. They carried a lot of fun, youthful, and trendy polishes that were great quality, and readily available at pretty much any drugstore. You could really count on NOPI to find something somewhat unique, innovative, and original, or just plain gorgeous! And they did so many fun collabs: Modern Family, Gossip Girl, The Kardashians, Justin Bieber, Selena Gomez, Carrie Underwood, etc... They were so culturally relevant! I really miss that line! 

If they ever decide to bring back the NOPI line, the only thing I think I would appreciate them changing is the awkward bottle shape! It is super cute to look at, but it's just a bit of a pain to store!

A collage featuring a couple additional manicure shots, and a label shot of Nicole by OPI 'You're an Angel'

Sunday, December 16, 2018

Ice Crystal Mani using Nicole by OPI 'Rich in Spirit' and China Glaze 'Snow Globe'

Today I have another 'Project Polish' manicure to share. This mani uses 2 of my 'Project Polish' polishes: Nicole by OPI 'Rich in Spirit' and China Glaze 'Snow Globe'. I'm calling it the 'Ice Crystal' Mani:

Manicure using Nicole by OPI 'Rich in Spirit' and China glaze 'Snow Globe'

Polishes Used
Stamping Plate Used
Nicole by OPI 'Rich in Spirit'
Bundle Monster Winter Kingdom -
China Glaze 'Snow Globe'
Plate BM-XL485
Konad white stamping polish (not shown)


I really like how this manicure turned out. The overall effect is very Icy and Wintry. It was a nice change to do a seasonal manicure in December that is winter-themed as opposed to holiday themed. Below I have a few additional shots of the manicure that show a bit more of the details of the stamped images.

Ice Crystal Mani - Thumb Close-up

Ice Crystal Mani - Ring, Middle, and Index fingers
The more I use 'Rich in Spirit' the more I appreciate it's beauty and versatility. It really is just a cool toned silver, so it works in so many different applications - pretty much anywhere that I would typically use a silver polish. With that in mind, one of my most used polishes is Sally Hansen 'Silver Sweep', mainly because I use it a lot for stamping. Hmmm, this is now giving me the idea to experiment with using 'Rich in Spirit' as a stamping polish.  Stay tuned to see how that works out in a future post!

Sunday, December 9, 2018

Reveal Mani with Multi-Coloured Shatter Base

Today I have what I like to call a 'Reveal Mani' to share. I use the term reveal mani, to describe a manicure where I start with a base decorated with an abstract print or pattern, and then stamp a negative space image over it to reveal the patterned base as abstract patterned shapes.


For this manicure, I started with a white base and then used 3 different shatter polishes in turquoise, gold, and blue, to create a multi-coloured abstract look. Then, to add a bit of sparkle, I added a holographic glitter polish to my ring finger. Below I have a picture of the base before the stamping.


I stamped over this base using black stamping polish and 2 different negative space images form Messy Mansion's Lily Anna Plate LA07. Overall, I really like how the circle and square pattern on my index and middle fingers turned out, but I had a little bit of trouble with the star image. Images with lots of negative space can be tricky to pick up since there's so much more area to fill with polish, which increases the chances of not picking all of it up cleanly. I wasn't in the mood to try multiple times to ensure perfect image transfers, so I just left well enough alone.  For the most part, the star images look pretty good, but they are not as clean and crisp as I would like.

Polishes Used

Polishes Used
China Glaze 'White on White'
OPI 'Turquoise Shatter'
Nicolie by OPI 'Gold Texture'
OPI 'Blue Shatter'
Maniology 'Straight Up Black' Stamping Polish
Urban Outfitters 'Afterhours'
Plate Used: Lily Anna Plate LA07

Below, I have a cool close-up shot of the Holographic glitter polish that I used, 'Afterhours'. The lighting and angles that I used for the manicure photos above didn't capture the beauty of the polish, so I wanted to share a photo that did.  

Close shot of 'Afterhours'

Wednesday, December 5, 2018

Glitter Mani using Nicole by OPI 'Rich in Spirit'

Today I have a quick glitter mani to share using one of my 'Project Polish' polishes: Nicole by OPI's 'Rich in Spirit', and a glitter polish that I'm thinking of adding to the project: 


The glitter is called 'Paparazzi', and it's by Claire's Cosmetics, from their Splatter Effect Collection. I used the teal version of this polish called  'Flashing Lights' in my 'Blue and White Splatter Manicure'. 

Polishes Used: 'Paparazzi' and 'Rich in Spirit'
For a simple gliter mani, I kind of like the way the colours work together!

Thursday, November 29, 2018

Spotlight on 'Project Polish' Polishes: Nicole by OPI 'Rich in Spirit'

Today's spotlight on my 'Project Polish' polishes, is on 'Rich in Spirit' from Nicole by OPI's Spring 2011 'Liquid Metals' 4-pc collection:

Swatch

In the picture above, the colour looks a bit like a typical metallic silver polish, however, the polish is actually a gorgeous light steel-blue shimmery metallic foil. It is quite unique to my collection in that I don't have very many (if any) pastel metallic polishes. I have a blue metallic foil from the Sally Hansen 'Color Foils' collection, but the blue is more saturated.

Even though this was from a Spring collection, I can see this as a great winter colour as well, since it's so reminiscent of ice. I'm really looking forward to getting a chance to get a lot of use from it this winter and during the holidays!

Swatch of the polish, and a bottle shot of the label

Sunday, November 25, 2018

Spotlight on 'Project Polish' Polishes: Nicole by OPI 'Nicole... Spotted!'

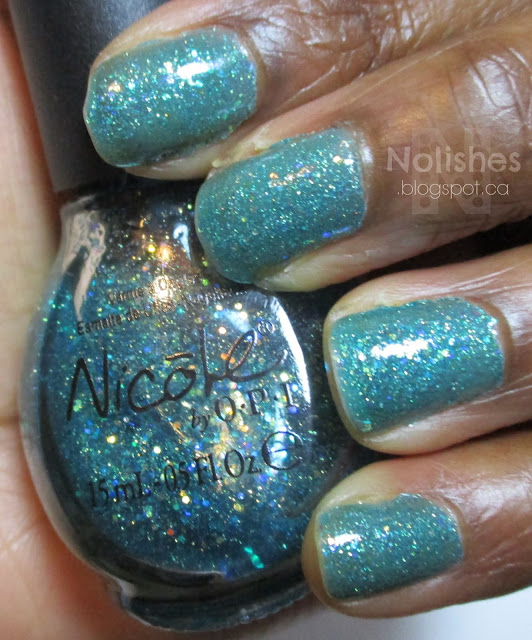
The featured polish for today's 'Project Polish' spotlight is Nicole by OPI's 'Nicole... Spotted!', a teal jelly polish loaded with yellow, green, and blue metallic glitters, as well as what appear to be gold micro glitters. It was released in 2010 as part of the 4 piece 'Gossip Girl' collection, a cross-promotion with the television show 'Gossip Girl', which was quite popular at the time.

The silver and white glitter polish that I used in my Remembrance Day Mani - 2018, 'Scandal, Secrets & Sparkle', was also from the 'Gossip Girl' collection. That polish is also in the project, and since I previously did a swatch post about it, I went back and added the 'Spotlight' label to that post so that it will be included in this series. Here's a swatch of 'Nicole... Spotted!':

From the 2010 Nicole by OPI 'Gossip Girl' collection,

First of all, this polish has held up relatively well over the years. The consistency of the polish may possibly be a touch thicker than it was originally, but it still spreads really easily, and required 2 coats to opacity.

Secondly, I was quite impressed with how chip resistant, and long lasting this polish was on me! This polish was so durable that I wore it for a few days with virtually no signs of wear. However the flip side of that coin is that the polish was also quite tedious to remove. Even though there is a lot of glitter, I chose not to wear a peel-off base coat... I don't think that I'll make that same mistake again! Unless of course I'm planning for a situation where I might not be able to do my nails for a while, and need a super durable polish to get me through most of that time.  

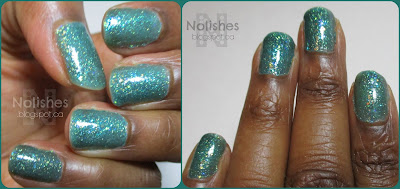
I'll end today's post with a couple extra shots of the swatch:

From the 2010 Nicole by OPI 'Gossip Girl' collection,

Tuesday, November 20, 2018

Blue and Green Chunky Glitter Mani using Revlon 'Tantalize', and Nicole by OPI 'Honey-Dew You Love Me?'

Today I have another Project Polish manicure to share with you:

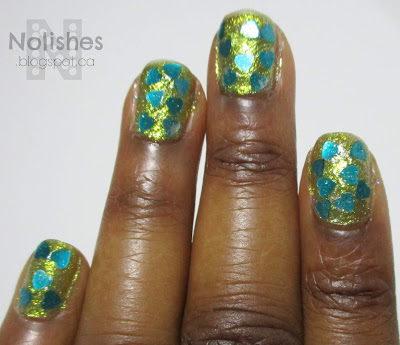
Mani using chunky teal heart glitters over a chartreuse sparkly base


Polishes Used
Revlon Brilliant Strength 'Tantalize' (120)
Nicole by OPI 'Honey-Dew You Love Me?'

The Project Polish selection was Nicole by OPI 'Honey-Dew You Love Me?' This polish is a chunky matte teal heart glitter in a clear base with subtle holographic micro-glitters, and here it is used over Revlon Brilliant Strength 'Tantalize'  - colour number 120.  I did a swatch of this colour for yesterday's post.

Revlon Brilliant Strength 'Tantalize' (colour 120), and Nicole by OPI 'Honey-Dew You Love Me?'
Polishes Used

I remember being so excited about 'Honey-Dew...', and other polishes like it, back when I bought it years ago in the early days of my polish collecting. I used a different version of this polish with reddish-orange hearts for my Coral Compilation Mani a few years ago. I also have other colours and shapes of chunky glitter toppers that I haven't worn in a while.

Truthfully, my tastes have changed a lot since I first eagerly bought these chunky glitter topper polishes. When I first started collecting polishes, I wasn't really into nail stamping or nail art, so Chunky glitters and crackle polishes (which were really big at the time) were my go-to way of combining colours on my nails. Now that I have other ways of mixing and matching different colours in my collection, as well as adding shapes, patterns, and images to my nails, I hardly ever reach for these chunky glitters any more.

I may have to put put them all into a future 'Project Polish' once this one is over.

Over all, I think this mani turned out to be fun and colourful, and it was also quite nostalgic to wear a polish that I truly adored ages ago!

Wednesday, November 14, 2018

Project Polish

In my Blue and Gold Manicure using Quo by Orly 'Celestial Star' post, I mentioned that I wanted to do a 'Project Polish': A deliberate attempt to use up particular nail polishes over a period time by using them frequently and consistently until they are gone.

In that post I explained that when I was going through my collection, I noticed some glitter and special effect polishes that seemed to be drying up in the bottles. I decided that I wanted to try to use them up as soon as possible, in order to avoid them becoming unusable before I had even gotten a chance to get my money's worth.

I finally got around to photographing and listing all of the polishes that I wanted to include in the project. First here are the pictures:

16 polishes that I will try to use up


I'm starting to realize that creme polishes seem to hold up better over time, as all of these polishes that I found that seem to be evaporating away, are glitter and shimmer heavy polishes. I'm glad that they still look relatively good. Some need to be thinned out with lacquer thinner, and some of the glitters may actually even perform better as the base has shrunk away - hopefully this should lead to denser glitter coverage during application.

In addition to the 'Blue and Gold' manicure that I discussed earlier, I have already managed to do two other manicures using some of these polishes. I used Gone Wishin' in my 'Purple and Silver Negative Space Stamping Glitter Mani', and I used 'Scandal, Secrets & Sparkle' for my 'Remembrance Day Manicure - 2018'.

Here's a list of the names of the polishes above that I want to use up as part of the project (the grid of names is in the same order as the pictures in the collage):

China Glaze
I love Your Guts
Kleancolor
Starry Night
OPI
Glow Up Already!
Nicole by OPI
Nicole... Spotted!
Nicole by OPI
Honey-Dew You Love Me?
Quo by Orly
Turquoise Moonlight
China Glaze
Water You Waiting For?
Quo by Orly
Celestial Star
Nicole by OPI
Rich in Spirit
Claire's Cosmetics
Flashing Lights
China Glaze
Liquid Crystal
Nicole by OPI
Gone Wishin'
China Glaze
All Wrapped Up
Quo by Orly
Night Sky
China Glaze
Snow Globe
Nicole by OPI
Scandals, Secrets & Sparkle

Now, I've never done a 'Project Polish' before, so this will definitely be a new and interesting experience for me.  Since I love nail stamping, my approach will be to use one of these 16 polishes as the base for a nail stamping design for each of my manicures. Three of the polishes are technically toppers ('Honey-Dew You Love Me?', 'Flashing Lights', and 'Snow Globe'), so there's also an option of doubling up for each manicure: using one of the polishes as a base, and then one of the toppers to complete the look. The best thing about this approach is that I will still be able to use all of my other polishes along with these ones, so I'm not limited to just 16 polishes.

I think the most challenging polish to work with will be China Glaze's 'I Love Your Guts', a frosty semi-matte red textured polish with black micro-glitters from their 2014 Halloween collection 'Apocalypse of Colour'.  I previously used it for my 'Halloween Themed Test Mani', and my 'Red and Black Tree Mani'.  Since the polish already makes quite a statement on it's own, my first instinct is to use it for Halloween-type designs, but I'm going to have to try to rethink that now that Halloween is over.

I've decided that I don't want to come up with an arbitrary deadline for using up the polishes. I can commit to trying to use them for every manicure, and to trying to do my nails more frequently, as needed. I don't want to commit to changing my nail polish every day (as many other 'Project Polishers' suggest), as I typically spend a lot of time planning and executing my nail art, and I like being able to wear each manicure for a few days, in order to decrease the total amount of time I spend doing my nails on a weekly basis. Also, I think forcing myself to do my nails everyday would eventually feel like a chore.

Now that I am in a nail polish collection culling frame of mind, I'm starting to notice some other polishes that I would like to add to the project. I may make this project on-going, and as certain polishes are used up, I may add others to replace them. We'll see how this goes...

Sunday, November 11, 2018

Remembrance Day Manicure - 2018

Today is remembrance day in Canada. This remembrance day in particular is quite special, in that Novermber 11th, 2018 is the 100th anniversary since the end of the first world war. Today, I have a remembrance day manicure to share:

red white and black poppy themed manicure for remembrance day


Polishes Used
Stamping Plates Used
OPI 'My Wishlist is You'
Messy Mansion Plate MM78XL
Wet n' Wild Wildshine 'Black Crème'
Clear Jelly Stamper Stamping Plate:
Nicole by OPI 'Scandal, Secrets...
   'True North Strong' Plate CjSLC-08
          & Sparkle'


I really like the completed manicure. It is very understated, and tasteful. Here is a shot of the polishes that I used to create the manicure:

opi 'My Wishlist is You', Nicole by OPI 'Scandals, Secrets, and Sparkle', Wet and Wild Wildshine 'Black Creme'


Here's a link to the last Remembrance day Manicure that I did, back in 2014.  And below are additional shots of this years manicure.
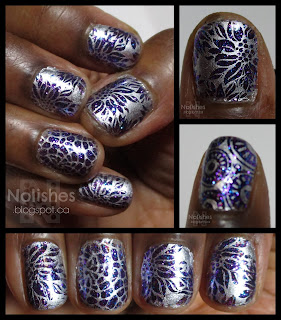
red white and black manicure

Monday, November 5, 2018

Purple and Silver Negative Space Stamping Glitter Mani

Today I have a glitter manicure to share, stamped with a silver negative space stamping image, resulting in a final look made up of full nail glitter patterns on a silver background:

Purple and Silver Negative Space Stamping Glitter Mani using Nicole by OPI 'Gone Wishin'', and Sally Hansen 'Silver Sweep'

I like the finished result - very blingy, but also very wearable on my short nails. Since I used a micro-glitter polish for the base of the manicure, I made sure to use a peel off base coat to make the manicure easier to remove when the time comes (OPI 'Glitter Off' base coat). 

Sally Hansen Insta-Dri - Silver Sweep, and Nicole by OPI Gone Wishin'
Polishes Used

Polishes Used
Nicole by OPI Gone Wishin'
Sally Hansen Insta-Dri 'Silver Sweep'
Stamping Plate Used
Lina Nail Art Supplies 'Totally Negative' 01

Gone Wishin' is one of the polishes I want to use up as part of an upcoming 'Project Polish' challenge that I mentioned earlier in my 'Blue and Gold Manicure using Quo by Orly 'Celestial Star' post. This is a great manicure for using up a glitter polish because I had to do a full manicure (2 coats, all nails) as the base to stamp over.  Gone Wishin' is a mix of blue and purple micro-glitters, but since it's hard to see that in the picture above, I've included some additional bottle shots below.

Close up shots of Nicole by OPI Gone Wishin' Nail Polish showing the Blue and Purple glitter mix.

I painted the nails on both of my hands slightly differently for this manicure. On my left hand, I used a circular themed full nail stamping image from the Lina Nail Art Supplies 'Totally Negative - 01' plate for all nails except for my ring finger. On my right hand, I used a floral themed full nail stamping image from the same plate for all nails except for my ring finger. For my ring fingers, I chose a separate image that allowed more of the glitter to shine through, and stamped it on both fingers as an accent. I've included some additional shots of the manicure below showing these details.

Collage of pictures of the nail stamping manicure.

As I mentioned earlier, I hope to be using Gone Wishin' a lot more in the coming months, and so far, I'd say I'm off to a good start!  

Wednesday, October 24, 2018

Autumn Leaves Mani using China Glaze 'Aut-umm I Need That'

I recently purchased China Glaze's 'Aut-umm I Need That' from the Fall 2018 'Ready to Wear' collection. I normally am not drawn to brown polishes, but Aut-umm...'s beautiful shimmer that seems to reflect all of the greens, oranges, reds and golds of the changing fall leaves, caught my eye, and compelled me to purchase it!  Not only that, I also decided that I simply must do a 'fall leaves' manicure using this polish as soon as possible!

This manicure is the result:

Brown manicure using advanced stamping technique to apply coloured leave decals to accent some of the fingers. Amber coloured gems are used on accents for the other fingers.
Autumn Leaves Mani
I used 'Aut-umm I Need That' as the base colour for all of my nails, and then I used bundle monster plate BM-S321 (from the 'Botanicals Collection') to create fall leaf decals using the advanced stamping technique. The leaves are outlined in gold, and then filled in with various autumn colours.

First, here's a close up bottle shot of 'Aut-umm I Need That' which shows the beautiful shimmer:

Close up Bottle shot of China Glaze 'Aut-umm I Need That', nail polish


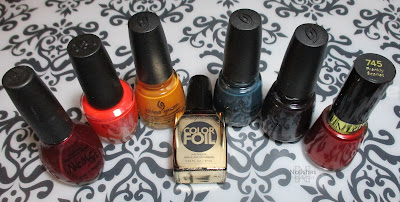
And here's a shot of all seven polishes I used to create this manicure:

Nicole by OPI 'Boys 'N Berry', OPI 'Atomic Orange', China Glaze 'Accent Piece', Sally Hansen 'Liquid Gold', China Glaze 'Baroqe Jungle', China Glaze 'Aut-umm I Need That', Revlon 'Frankly Scarlet'
Polishes Used

Polishes Used
Nicole by OPI 'Boys 'N Berry'
OPI 'Atomic Orange'
China Glaze 'Accent Piece'
Sally Hansen Color Foil 'Liquid Gold'
China Glaze 'Baroque Jungle'
China Glaze 'Aut-umm I Need That'
Revlon 'Frankly Scarlet' (745)

 I'm so happy with the way the manicure turned out! After applying the 6 leaf decals I created to 3 fingers on each hand, I applied amber coloured nail gems to the other two fingers to accent the look. Below I have included a couple of shots of my left hand.


Just for fun, I've included a link to my 'Fall Colours Mani' from 2014 where I used the 'Leadlight Technique to colour in a full nail stamping image from a different bundle monster plate, BM-H11.

Sunday, September 13, 2015

Coral Compilation Mani


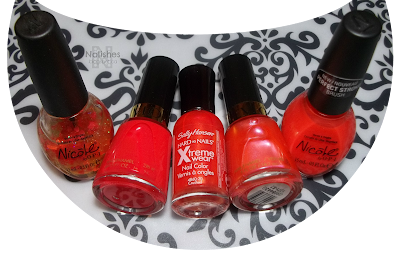
For this manicure, I picked out a bunch of coral polishes that are all similar in tone but have different finishes, and put them together for a subtle skittles mani. I used 'Sally Hansen's 'Crushed', a metallic finish polish, on my thumb and ring finger; 'Hello World', a jelly finish polish from Nicole by OPI on my index finger; 'Kiss Me Coral', a frost finish polish by Revlon, on my middle finger which was then covered with a chunky red heart glitter polish called 'Have a Heart' from Nicole by OPI; and finally, on my pinky I used a crème polish from Revlon called 'Craving Coral'.

Nicole by OPI ‘Have a Heart’, Revlon ‘Craving Coral’, Sally Hansen Xtreme Wear ‘Crushed’, Revlon ‘Kiss me Coral’, and Nicole by OPI ‘Hello World’

Polishes Used
Nicole by OPI ‘Have a Heart’
Revlon ‘Craving Coral’
Sally Hansen Xtreme Wear ‘Crushed’
Revlon ‘Kiss me Coral’
Nicole by OPI ‘Hello World’

I haven't been doing a lot of nail stamping or designs lately, so I've been trying to do a lot of interesting combinations to add some element of fun into my manicures! I found this to be an interesting way do a monochromatic look but still have some subtle visual interest. 

It's also really nice that I got a chance to use some of my older polishes for this manicure. I love going back and rediscovering over-looked gems from my collection.
Sunday, August 2, 2015

Neutral Manicure with a Twist


Manicure featuring a neutral polish on all fingers except the ring finger, which is painted with a gold glitter textured polish. There is some nail stamping on the middle finger, and dotting on the thumb.

This manicure was designed around two polishes from the Nicole by OPI Carrie Underwood line of nail polishes. The colours were 'Southern Charm', a magnificent pinky-tan neutral shade, and 'Carrie'd Away' a slightly textured gold glitter polish. These polishes were released in early 2014. I think I bought them sometime around last summer, but I'm only getting around to trying them out now!

Polishes Used
                         Plate Used
Nicole By OPI ‘Southern Charm’

OPI ‘Midnight in Moscow’
Pueen Buffet Leisure Collection:
OPI ‘Chick Flick Cherry’
PUEEN97
Nicole By OPI ‘Carrie’d Away’


Nicole By OPI ‘Southern Charm’, OPI ‘Midnight in Moscow’, OPI ‘Chick Flick Cherry’, and Nicole By OPI ‘Carrie’d Away’

Design-wise, I kind of just threw this look together. After painting my nails with the two main polishes, I decided I had to add a little more visual interest to the look, so I added the stamping and colouring on my middle finger, and the dotting on my thumb. 

Overall, I like the finished look. It's not one of my favourite manicures ever, but I do think it turned out OK. Also, I was really impressed by 'Southern Charm'.  This turned out to be an extremely natural looking neutral shade for me, as the colour is quite close to the colour of my natural nail bed. It's so fantastic! 

Collage featuring extra shots of the manicure

Friday, July 31, 2015

OPI 'Centennial Celebration'

My last post featured 'Visions of Georgia Green', one of the two new additions to OPI's Coca Cola themed collection of polishes. Today's post is on 'Centennial Celebration', the other new addition to the line up.

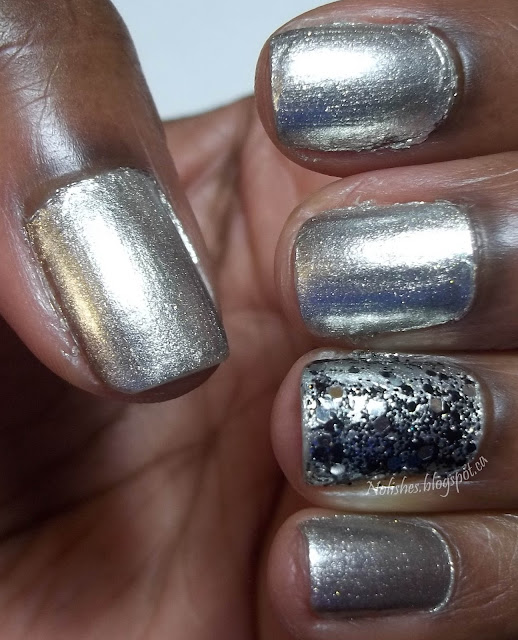
Basic manicure featuring OPI's 'Centennial Celebration', and an accent nail (ring finger) with black and silver glitter.

Both polishes were made to celebrate the 100th anniversary of the Coca Cola bottle. 'Visions of Georgia Green' was a take on the green glass soft drink bottle, while this one appears to be a take on the classic clear, colourless bottle.
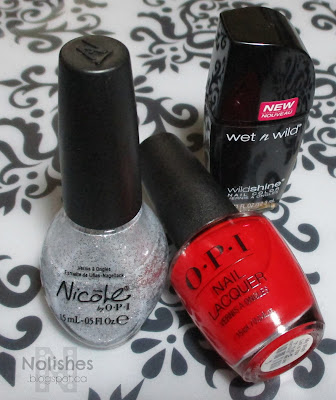
L.A. Girl Glitter Addict ‘Uninhibited’, Nicole by OPI ‘Make U Smile’, and OPI ‘Centennial Celebration’

Polishes Used
L.A. Girl Glitter Addict ‘Uninhibited’
Nicole by OPI ‘Make U Smile’
OPI ‘Centennial Celebration’

At first glance, I was going to pass on buying 'Centennial Celebration' because I already have a lot of silver polishes. However, I purchased 'Visions of Georgia Green', and I loved it so much that I decided to go back and give this polish a try as well. The thing I realized with 'Visions...' is that it wasn't just the colour of the polish that made it special, it was the texture and consistency as well.

These polishes are glass-themed, so they attempt to characterize certain elements of glass such as its translucence, its reflective nature, and its sparkle. Accordingly, the polishes are semi-translucent, metallic, and contain micro-glitter particles. 

In addition to the cool textural properties of 'Centennial Celebration', this particular shade of silver is a little different as well. There is a slight gold tint to this silver which adds a little warmth, and also makes it seem more luxurious.

All in all, I really like this polish, and I'm glad that I decided to give it a try!

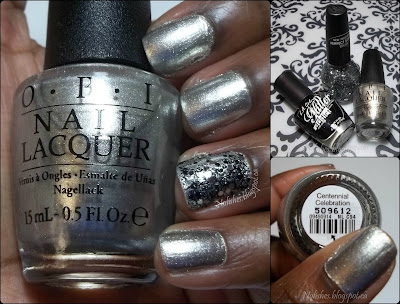
Collage featuring extra shots of the manicure, and polishes

Saturday, July 4, 2015

Independence Day Nails!

Happy Independence Day, to those of you in or from the USA!

Today, I have a 4th of July inspired manicure to share:

Nail stamping manicure in red white and blue with glitter, and stamped Independence Day themed designs

Polishes Used
Plates Used
Nicole by OPI ‘Make U Smile’

OPI ‘Color so Hot it Berns’

China Glaze ‘White on White’
Bundle Monster BM-H25
Nicole by OPI ‘It’s up to You’

Sally Hansen ‘Silver Sweep’


Nicole by OPI ‘Make U Smile’, OPI ‘Color so Hot it Berns’, China Glaze ‘White on White’, Nicole by OPI ‘It’s up to You’ and Sally Hansen Xtreme Wear ‘Silver Sweep’

I really like how this manicure turned out! I've really been trying to tone my designs down lately. I find that it's more of a challenge to communicate a theme with as few elements as possible, so it has been really fun trying to meet that challenge by keeping my stamping manicures more simple and streamlined.

Now, that's not to say that I will never again do manicures which use a lot of patterns, techniques, or colours - because those are certainly a lot of fun to do too! But for now, I'm enjoying this more edited approach.

Collage of Nail stamping manicure in red white and blue with glitter, and stamped Independence Day themed designs

Anyways, that's it for today. Thanks for stopping by!