Showing posts with label Konad. Show all posts

Sunday, December 16, 2018

Ice Crystal Mani using Nicole by OPI 'Rich in Spirit' and China Glaze 'Snow Globe'

Today I have another 'Project Polish' manicure to share. This mani uses 2 of my 'Project Polish' polishes: Nicole by OPI 'Rich in Spirit' and China Glaze 'Snow Globe'. I'm calling it the 'Ice Crystal' Mani:

Manicure using Nicole by OPI 'Rich in Spirit' and China glaze 'Snow Globe'

Polishes Used
Stamping Plate Used
Nicole by OPI 'Rich in Spirit'
Bundle Monster Winter Kingdom -
China Glaze 'Snow Globe'
Plate BM-XL485
Konad white stamping polish (not shown)


I really like how this manicure turned out. The overall effect is very Icy and Wintry. It was a nice change to do a seasonal manicure in December that is winter-themed as opposed to holiday themed. Below I have a few additional shots of the manicure that show a bit more of the details of the stamped images.

Ice Crystal Mani - Thumb Close-up

Ice Crystal Mani - Ring, Middle, and Index fingers
The more I use 'Rich in Spirit' the more I appreciate it's beauty and versatility. It really is just a cool toned silver, so it works in so many different applications - pretty much anywhere that I would typically use a silver polish. With that in mind, one of my most used polishes is Sally Hansen 'Silver Sweep', mainly because I use it a lot for stamping. Hmmm, this is now giving me the idea to experiment with using 'Rich in Spirit' as a stamping polish.  Stay tuned to see how that works out in a future post!

Wednesday, October 31, 2018

Halloween Day Manicure featuring OPI 'Today I Accomplished Zero'

My manicure for Halloween was OK, but I was a little disappointed with it overall. I left everything to the last minute this year, so I didn't have much time to do my nails after getting everything ready, and packing my Halloween treat bags for shelling out. As a result, I had to rush through this manicure:

Halloween images stamped in white over OPI Today I Accomplished Zero nail polish

The manicure is cute, but I didn't have the time to re-do any wonky stamping image transfers, and/or fix any stamping errors. I also would have really liked to find a way to add some 'Wow! factor'.


Polishes Used
Konad Special Polish - White
OPI 'Today I Accomplished Zero'
The featured polish in this manicure was OPI 'Today I Accomplished Zero' from the Summer 2014 'Coca Cola' collection. It's funny that I was able to use 2 different polishes from that collection for both of my Halloween manicures this year. Here's a link to my previous 'Sparkly Halloween Jack-o-Lantern Mani', featuring OPI's 'Orange You Fantastic!' from the same collection.

My favourite parts of the manicure were the adorable 'scary cute' images on the thumb nails. The ghost image is from Bunny Nails plate HD-C, and the mummy image if from Überchic Beauty plate Halloween-03.  The remaining images from the manicure were stamped from Überchic Beauty Plate Halloween-04. Here's a close up shot of my thumb nails:

Halloween nails featuring OPI 'Today I Accomplished Zero'

Have a safe and happy Halloween!!!

Sunday, October 14, 2018

Red, White, Blue and Gold Plaid Manicure

This manicure was my attempt at recreating more of a traditional plaid using Red, White, Navy Blue, and Gold polishes:


In the past, I've done pink plaid in my 'Pink and White Pink Ribbon Mani', and yellow plaid in my 'Clueless Inspired Manicure'. I really liked those manicures, but since I have never done a plaid manicure using more traditional colours, I decided to give that a try.

For this manicure, I used the following polishes:

OPI 'Incognito in Sausalito', Sally Hansen Color Foil 'Liquid Gold', OPI 'Dutch Tulips', and Konad Special Nail Polish - White
Polishes Used

Polishes Used
Stamping Plates Used
OPI 'Incognito in Sausalito'
Moyou London Hipster Collection - 05
Sally Hansen Color Foil 'Liquid Gold'
Moyou London Hipster Collection - 06
OPI 'Dutch Tulips'
Clear Jelly Stamper Stamping Plate:
Konad Special Nail Polish - White
             'Got Plaid?' Plate CjS-56

The stamping on my index finger came out a little wonky, but overall, I really like the way the manicure turned out! In addition to the polishes mentioned, I also topped the look off with a matte topcoat (Essie's 'Matte about You') in order to make the finished result appear a bit more fabric like.

Wednesday, August 5, 2015

Cute Monster Mani

Today I have a cute monster manicure to share.

 Nail stamping manicure featuring a pastel neon yellow base manicure embellished with a dark grey and white leopard print on the ring finger, and a cute grey cartoon monster on the middle finger.

Polishes Used
Plate Used
OPI ‘Nein! Nein! Nein! OK Fine!’

China Glaze ‘Pelican Gray’
Konad M11 (cute monster image)
Quo by Orly ‘Limelight’
Konad M57 (leopard print pattern)
China Glaze ‘White on White’

Konad Special Polish in Black


The Konad M11 plate that I used to stamp the monster image featured in this manicure has been around for quite some time, however I just bought it on sale recently. I just couldn't resist the adorable cartoon images on it! 

OPI ‘Nein! Nein! Nein! OK Fine!’, China Glaze ‘Pelican Gray’, Quo by Orly ‘Limelight’, China Glaze ‘White on White’, and Konad Special Polish in Black

I really love the colour combination of nail polishes that I used for this manicure - it's nothing super complicated, but I just think the bottles look so good lined up together!

The base polish I used is 'Limelight' from Shopper's Drug Mart's store brand of polishes 'Quo by Orly'. It's a neon pastel yellow polish, and I absolutely adore this shade! After choosing such a bright base colour, I wanted to tone the look down a bit, so I used black, white and a couple shades of gray for all of my embellishments. For the dark grey leopard spots, I used ‘Nein! Nein! Nein! OK Fine!’ from OPI's fall 2012 Germany collection. I dotted the inside of the leopard spots with China Glaze's 'White on White' (core collection). The monster is coloured in with China Glaze's 'Pelican Gray', from their Spring 2011 'Anchor's Away' collection. The monster's black outline was done with Konad Special Polish in Black.

I really like how this manicure turned out! It's so bright, whimsical, and cute - perfect for summer!

Wednesday, June 10, 2015

Black and Silver Simple Stamped Mani

Nail Stamping Manicure using silver glitter polish base stamped with black floral patterns on 2 accent nails (middle and ring fingers)

Polishes Used
Plate Used
Nicole by OPI 'Scandal Secrets & Sparkle'
Messy Mansion Leadlight Lacquer A03
Konad Special Polish in Black


Today I have a very simple nail stamping manicure to share. I modified my last nail look by adding a few stamping details as accents.

Overall, I like the way that the black details completely refresh the look by adding a bit of sophisticated edginess! 
Scandal Secrets & Sparkle Nicole by OPI and Konad Special Polish in Black
Polishes Used

Saturday, May 30, 2015

Vintage floral print mani

Today I have a quick and easy vintage-looking floral print nail-stamping manicure to share with you:


The base colour is OPI's 'Hands off my Kielbasa' from the Spring 2013 Euro Centrale Collection. I recently purchased this polish on clearance at a beauty supply store. It's a shimmery bronzy-pinky-tan colour, and I have nothing like it in my collection. It's not the type of colour that I would usually gravitate towards, but for the price, I thought I would give it a try. It's a very neutral, understated look on me, so it probably is going to get most of its use as a base for nail art.

For this manicure I paired '...Kielbasa' with a black polish using a floral print stamping image. The end result reminds me of a vintage, ornately-patterned, silk curtain or wallpaper!


Polishes Used
Plate Used
OPI ‘Hands off my Kielbasa!’
Messy Mansion MM46 ‘Flowers Theme’
Konad Special Polish in Black


If I had to do it again, the only thing that I would change about this look would be to add some sort of black or predominantly black accent nail - just to spice up the look a little!

Friday, May 29, 2015

Pastel Neon Paisley Skittles Mani

In my last post, I did a simple manicure using 'Hot-Hot-Hot Pants' one of the colours from the Color Club 'Poptastic Pastel Neons' collection. For this manicure, I decided to use the remaining colours that I owned from the collection to create this paisley-printed skittles mani:

Nail stamping manicure featuring light pink, yellow, green and blue pastel neon polishes, stamped with white paisley print

In my last post, I mentioned an embellishment idea that I had, to use with these bright pastel colours. The idea was to stamp over them with white stamping polish, as I have done in this manicure. White seems to be the perfect colour for combining with these 'Pastel Neon' colours - it keeps the look fun and light and doesn't overpower the already eye-catching colours.

Originally, I was thinking about using simple white stripes for the stamping image, however, I've already used my stripe plates for a few manicures, while so many other plates in my collection have gone unused. So I decided to try something else. I chose my paisley-themed Messy Mansion plate mainly because I just recently purchased it and was excited to give it a try!

Color Club ‘Feathered Hair out to There', Color Club ‘Disco’s not Dead’, Color Club ‘Under the Blacklight’, Color Club ‘Til the Record Stops’, Color Club ‘Meet me at the Rink’, and Konad Special Polish in White

Polishes Used
Plate Used
Color Club ‘Feathered Hair out to There’       

Color Club ‘Disco’s not Dead’

Color Club ‘Under the Blacklight’
Messy Mansion  MM48 ‘Paisley Theme’
Color Club ‘Til the Record Stops’

Color Club ‘Meet me at the Rink’

Konad Special Polish in White


I like the end result, but the only problem is that there isn't a lot of contrast with the delicate white lines of the paisley print stamped over the yellow and light green shades, so it's hard to see the details of the stamped image. In retrospect, a stamping image with thicker lines would have probably worked a little better. Polka dots would have been lovely as well!

Tuesday, May 5, 2015

Cinco de Mayo Manicure 2015

Today I have a Cinco de Mayo manicure to share!

Nail stamping manicure featuring white base stamped in copper with Mexican themed images. The ring finger accent nail features a copper base topped with a white and silver micro-glitter mix, an emerald green glitter polish, a red glitter polish, and then stamped stamped with the words 'Viva Mexico' in white.
Cinco de Mayo Manicure
I kind of did this one in a rush, so there are so many things that I would change about it if I had to do it again! I do like the overall look though, and it also inspired another manicure idea which I hope to do shortly. Here are the polishes that I used to create this look:

Polishes Used:
Plates Used:
China Glaze ‘White on White’
Cheeky Jumbo Plate 1 ‘Viva Mexico’
L.A. Girl Glitter Addict ‘Animate’

Konad Special Polish ‘White’

L.A. Girl Glitter Addict ‘Purge’

China Glaze ‘The Outer Edge’

Essie ‘Penny Talk’


China Glaze ‘White on White’, L.A. Girl Glitter Addict ‘Animate’, Konad Special Polish ‘White’, L.A. Girl Glitter Addict ‘Purge’, China Glaze ‘The Outer Edge’, and Essie ‘Penny Talk’
Polishes Used
I absolutely love this Cheeky Beauty 'Viva Mexico' plate! The designs are so bold and intricate, and they look fantastic stamped on the nail. I really love how the white and copper stamping of the full nail images from this plate turned out. However, I would have loved to be able to spend a little more time designing the accent nail.

I ended up using 'Penny Talk' as a copper base coat,  and then topping it with three different glitters: 'The Outer Edge', a white and silver micro-glitter polish; 'Animate', a red glitter; and 'Purge', an emerald green glitter. I then covered everything with some top coat, and then stamped the script images. I like the idea of using the different glitters, but the way I used them, the individual glitter polishes get lost in the mix, and even worse, 'The Outer Edge', the most delicate glitter of the bunch, can barely be seen!

 I realized after the fact that I could have done a three colour glitter gradient to help the glitters really stand out, and also to be a little more reminiscent of the Mexican Flag. Then I could have stamped over the white part in the centre with the writing in black. I also don't think I would go with the copper base if I had to do it again. Here are some close-up shots of the accent nails:

Right and left ring finger accent nails featuring a copper base topped with a white and silver micro-glitter mix, an emerald green glitter polish, a red glitter polish, and then stamped stamped with the words 'Viva Mexico' (left), and 'Fiesta' (right) in white.
Accent Nails
The best thing about a manicure that doesn't turn out the way you had hoped, is that it is so easy to take what you learned and apply it to the next one!

Thursday, April 23, 2015

Happy Belated Earth Day!

Yesterday, I didn't get a chance to put up an earth day manicure, because I really wanted to try out my new peel-off base coat. So today, I have a belated Earth Day mani to share with you!

Earth Day inspired manicure made using a light blue base polish, stamped with black map imagery on the pinky, middle and index fingers. The thumb and ring finger are stamped with green continent images.
Earth Day Mani

Polishes Used
Plate Used
Wet n Wild Wildshine ‘Putting on Airs’
Moyou London Scholar Collection - 07
Konad Special Polish in Black

Sally Hansen Insta-Dri 'I-rush Luck'


Wet n Wild Wildshine 'Putting on Airs', Sally Hansen Insta-Dri 'I-rush Luck', and Konad Special Polish in Black
Polishes Used

I really like how this manicure turned out! The colours are perfect, and I love the images from the Moyou Scholar plate. I honestly couldn't stop staring at my nails all day! I love how the map imagery on the pinky, middle and index fingers look exactly like a page out of an atlas, while the thumb and ring fingers look exactly like little globes. I love when a manicure is both quick and easy to do, but the end result is so cute, and memorable!

This is also my first time using one of the new reformulated and redesigned Wet n Wild Wildshine polishes. I really like the look of the new bottles - such a great improvement! I was also pretty happy with the formula of this polish. It was just a touch on the thick side, but not to the point where it caused any problems. In fact, I'm hoping that the thickness would make these polishes good for stamping!

Monday, March 30, 2015

Crackle Polish Challenge #20 - Blue Crackle Dotticure

2015 Crackle Polish Challenge Manicure #20

Featured crackle application:
Using crackle polish for a dotted manicure

Featured crackle polish:
OPI 'Blue Shatter'
Manicure using a dotting tool to create dots in 2 sizes and 2 colours. The larger dots were made using blue crackle polish to give an interesting effect, and the smaller dots were made with black polish.
Blue Crackle Dotticure
Polishes Used:
Konad Special Polish in Black
OPI 'Blue Shatter'
Essie 'Rock the Boat'
Konad Special Polish in Black, OPI 'Blue Polish', and Essie 'Rock the Boat'

I'm really pleased with the way this dotted crackle effect turned out! The cracks on the blue shimmery dots kind of resemble the edges of the facets on the surface of a cut blue sapphire. It's like there are small gemstones all over my nail!

The only thing I was a little disappointed with is that I had trouble getting the crackle polish to work on 2 of my nails. The very first attempt with crackle dotting was done on the 3 fingers prominently displayed in the picture above. I was originally going to do something else with my other two fingers, but changed my mind (more on that later). When I went back to dot the remaining 2 fingers, for some reason, I couldn't get the polish to crack any more! I even went back and started from scratch 3 separate times, but could not recreate the effect.

When I first tried it, I didn't put much thought into it - I was experimenting, so I didn't pay too much attention to my technique. I just put a small blob of polish on the back of a piece of plastic, and started dotting. It worked fine. When It came out beautifully, and I later decided that wanted to continue doing it, I just could not recreate the results.  It was so frustrating! I may have to try again with a different polish. Here are some additional shots of the manicure:

Manicure using a dotting tool to create dots in 2 sizes and 2 colours. The larger dots were made using blue crackle polish to give an interesting effect, and the smaller dots were made with black polish.

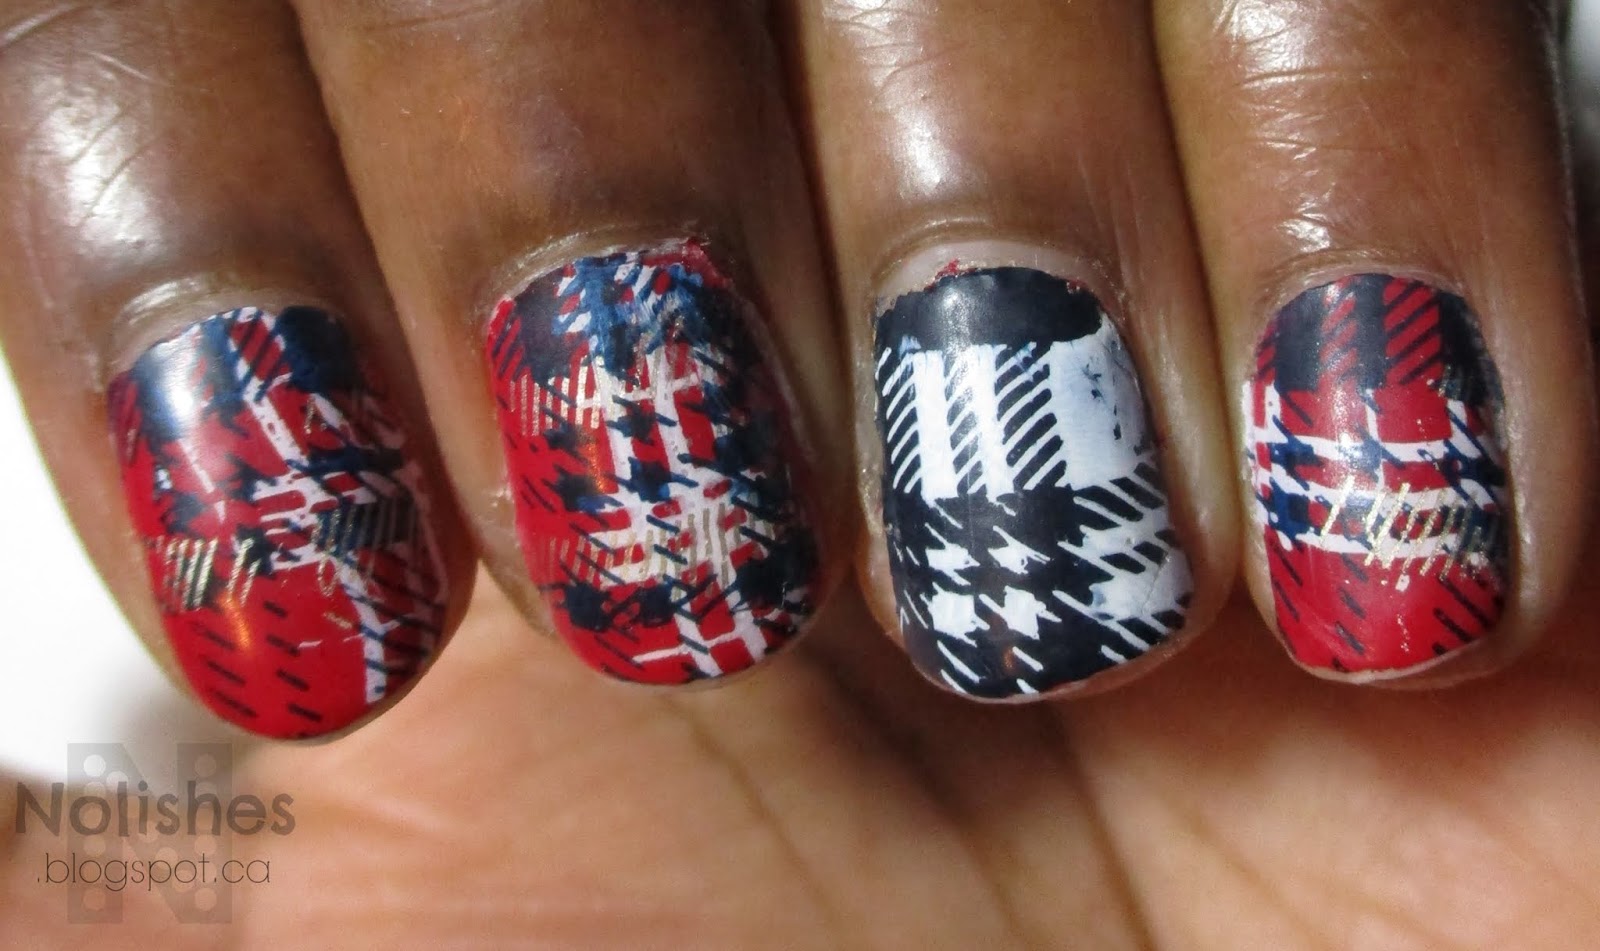
On my left hand, I did a different crackle mani using the same colours.  Originally, my plan for both hands was to do a stamped hounds-tooth design (from Bundle Monster plate BM-322) on my middle and ring fingers, and use the dot design only for the thumb, index and pinky fingers.  I painted my nails with 'Rock the Boat', and did the crackle stamping on the accent fingers of both hands. I started doing the dots on the right hand. When I finished, I didn't like the way the 2 designs looked together, so I decided to nix the hounds-tooth and just do the same dot design on the ring and middle fingers (as mentioned above, this is where it all started to go wrong!).

When I got to my left hand, I didn't want to remove the hounds-tooth because I liked the way it looked, so I just decided to do another design on the remaining three fingers that worked with the hounds-tooth pattern. Here's the finished result:

Alternate Version Blue Crackle Mani
Using BM-322
Since this manicure also features a crackle polish technique that I am now using for the second time, I think I should go ahead and acknowledge it.  I'm calling it the 'Crackle Curve'. It's the sweep of crackle nail polish that starts at or near the base of one corner of the nail, and ends up at the top corner of the opposite side of the nail. The other time I used this technique was in the Pink, Red, and White Valentine's Day Mani. So to make it official:

2015 Crackle Polish Challenge Manicure #20.5 - Blue Houndstooth Crackle Manicure:

Featured crackle application:
The 'Crackle Curve' technique

Featured crackle polish:
OPI 'Blue Shatter'

Stay tuned for my next post which will be the final instalment of the 2015 Crackle Polish Challenge!

Tuesday, March 24, 2015

Crackle Polish Challenge #19 - Diagonal Stripe Themed Mani

2015 Crackle Polish Challenge Manicure #19

Featured crackle application:
Using manicure tape to mask areas of a crackle combo to create diagonal lines of clear polish.

Featured crackle polish:
OPI 'Red Shatter'

Nail stamping manicure featuring all nails covered with red shatter polish over a gold base. On the thumb and ring finger, pieces of nail art tape were used to mask randomly placed diagonal lines, so that when removed it would leave lines of clear polish. The remaining fingers are stamped with a nail stamping pattern featuring randomly place thin white lines.
Diagonal Stripe Themed Mani
Polishes Used:
Quo by Orly 'Filthy Rich'
OPI 'Red Shatter'
Konad Special Polish in White

Plate Used:
Moyou London Holy Shapes Collection - 07

Quo by Orly 'Filthy Rich', OPI 'Red Shatter',  and Konad Special Polish in White
Polishes Used
I like how my thumbnail turned out in this manicure. The tape removed cleanly, and the way it breaks the shatter polish into sections is a pretty cool effect.  Overall, I'm kind of on the fence about this manicure - I don't necessarily hate it, but I don't love it either. Oh well, the beautiful thing about nail polish is that you don't have to wear it forever!  LOL!

Tuesday, March 3, 2015

Crackle Polish Challenge #16 - Blue and Bronze 'Barely There' Crackle Mani

2015 Crackle Polish Challenge Manicure #16

Featured crackle application:
Using wisps of crackle polish to embellish the nail

Featured crackle polish:
China Glaze Crackle Glaze 'Cracked Medallion'

Nail stamping manicure featuring light blue polish on all nails except for ring finger, stamped with a medium blue thin lattice pattern, and then embellished with wisps of bronze crackle polish. The ring finger is painted with bronze polish, and covered in bronze glitter.
Barely There Crackle Mani

China Glaze Crackle Glaze 'Cracked Medallion', China Glaze 'At Vase Value', OPI 'Brisbane Bronze', OPI 'Can't Find my Czechbook', and Essie 'Summit of Style'

Polishes Used:
China Glaze Crackle Glaze 'Cracked Medallion'
China Glaze 'At Vase Value'
OPI 'Brisbane Bronze'
OPI 'Can't Find my Czechbook'
Essie 'Summit of Style'

Nail Stamping Plate Used:
Konad m57


This manicure was really quick and easy to do.  The wisps of crackle polish didn't end up looking exactly as I had envisioned them, but I still think the end result works. Overall, there's not much else to say about this one, so I think I'll keep this post short and to the point!

Saturday, February 28, 2015

Crackle Polish Challenge #15 - Rainbow Graffiti Mani

2015 Crackle Polish Challenge Manicure #15

Featured crackle application:
Combining multiple crackle polishes with regular polishes for a graffiti art effect

Featured crackle polish:
OPI 'Black Shatter'
A nail stamping manicure using 10 nail polishes to create a multi-colour abstract splatter effect manicure. The ring finger has a silver and black graffiti tag decal.
Rainbow Graffiti Mani
Polishes Used
Claire’s ‘Splatter Paint’
Sally Hansen Crackle Overcoat ‘Cherry Smash’
Nicole by OPI ‘Tangerini Bikini’
OPI ‘The “It” Color’
Sally Hansen Complete Salon Manicure ‘Grass Slipper’
OPI ‘Turquoise Shatter’
OPI ‘Super Bass Shatter’
Sally Hansen Insta-Dri ‘Silver Sweep’
OPI ‘Black Shatter’
Konad Special Polish in Black

Claire’s ‘Splatter Paint’, Sally Hansen Crackle Overcoat ‘Cherry Smash’, Nicole by OPI ‘Tangerini Bikini’, OPI ‘The “It” Color’, Sally Hansen Complete Salon Manicure ‘Grass Slipper’, OPI ‘Turquoise Shatter’, OPI ‘Super Bass Shatter’, Sally Hansen Insta-Dri ‘Silver Sweep’, OPI ‘Black Shatter’, and Konad Special Polish in Black
Polishes Used
Nail Stamping Plate Used:
Moyou London Rockstar Collection - 12

I wanted this manicure to be colourful and fun, so I decided to use a bright yellow base colour (OPI 'It Color'), to layer all of the other polishes over. I started with small strokes of the four shatter polishes (red, turquoise, purple, and black) , and tried to vary the direction, placement and length of the strokes for a random effect. I used the black shatter polish last, to help it stand out a little more.

Then I used a dotting tool to add dots of the orange and green regular polishes, again varying the size of the dots, and their placement. After that, I topped all of my nails with a splatter effect glitter topcoat. I made 2 graffiti tag nail stamping decals using silver and black polishes, and then placed the decals over my ring fingers. I finished the look off with some topcoat to seal everything in and to add shine.

I really love the finished look! This manicure was so much fun to do, and to wear - I found myself looking at my nails a lot as I went through my day!

Here are some more shots of the completed manicure:

3 different shots of the Rainbow Graffiti Manicure
Rainbow Graffiti Mani - Extra Shots

Sunday, February 22, 2015

Crackle Combo Mani #2

So I gave in to temptation and re-did the Crackle Combo Mani from my last post! Here's the Do-Over:

Nail stamping manicure featuring a light blue base covered with red and blue strokes of crackle polish, and then topped with a white negative space circle pattern stamping image
Crackle Combo Mani #2
Polishes Used:
Essie 'Mint Candy Apple'
Sally Hansen Crackle Overcoat 'Cherry Smash'
OPI 'Navy Shatter'
Konad Special Polish in White

Essie 'Mint Candy Apple', Sally Hansen Crackle Overcoat 'Cherry Smash', OPI 'Navy Shatter', and Konad Special Polish in White
Polishes Used
I like the overall look of this mani much better, due to the lighter colours. However, I noticed that the stamping image doesn't stand out as much on this one as it did in the last version. If you look closely at the pinky, you may be able to see a bit of Sally Hansen 'Silver Sweep' nail polish outlining a portion of some of the circles. I tried stamping the image using silver polish on that nail, to see if the pattern would stand out more. It didn't make much difference, so I just stamped over it again with white so that the nails would be consistent.

I did a side-by-side before and after collage to show the differences between the manicures.


Stay tuned for my next post, where I will continue with the rest of the 2015 Crackle Polish Challenge!

Saturday, February 14, 2015

Crackle Polish Challenge #11 - Pink, Red and White Valentine's Day Mani

2015 Crackle Polish Challenge Manicure #11

Featured crackle application:
Basic stamping over a shatter background.

Featured crackle polish:
OPI 'White Shatter'

Valentine's Day Mani featuring a medium pink base polish jazzed up in a variety of ways. The thumb has a full nail stamped image done with multi-coloured stamping (white and red) and then embellished with more red polish. The pinky and pointer fingers feature a swoosh of white crackle polish covering the tips, and a single nail art rhinestone each. The middle finger features a red and white chunky glitter polish, and the ring finger is covered with a layer of white crackle polish, and then a full nail image is stamped over it in red. This stamp reads 'Happy Valentine's Day'.
Pink, Red and White Valentine's Day Mani

OPI 'Got a Date To-Knight', OPI 'White Shatter', OPI 'Minnie Style', A England 'Perceval', and Konad Special Polish in WhitePolishes Used:
OPI 'Got a Date To-Knight'
OPI 'White Shatter'
OPI 'Minnie Style'
A England 'Perceval'
Konad Special Polish in White

Plates Used:
Moyou London Festive Collection - 20
PUEEN35


Today's manicure is another variation of the stamping over shatter polish, that I did in my last post. The difference is that on today's manicure, I did more traditional stamping where the stamped image is in the foreground, as opposed to my last manicure, where the negative space stamping becomes the background of the final image. In other words, this manicure uses shatter polish as the background for stamping (on my ring finger), while my last manicure uses stamping to put the shatter in the foreground.

I really love the colour combination for this manicure - it just screams Valentine's Day!!!