Showing posts with label OPI. Show all posts

Sunday, October 16, 2022

Red, Black and Gold Glitter Mani

Now that the summer is over and I've been spending less time in the garden, I managed to get some nail art done! 

Red, Black and Gold Glitter Mani

The inspiration for this mani all started with me wanting really bright red nails.  After scouring my collection for the brightest reds, I finally settled on Essie's 'Fifth Avenue'.  I then came across Pure Ice 'Studette', a gold glitter polish with small amounts of red glitter mixed in.  I decided to pair the two by making a gold glitter decal in a fun shape, and applying it over the red polish on my ring finger to accent the nail... I really just wanted to do a simple look after not having done a lot of nail art for a couple months!

I decided to go with a thin gold glitter triangle that stretched from the tip to the base of the nail. I executed the design perfectly, and was in awe at the stunning accent! Unfortunately, I would only be able to enjoy the design for a few minutes - while it was drying, I accidentally smudged my nail while reaching for something!  I was so disappointed! I decided to try to salvage what I could, and to take the opportunity to push the design further. 

Luckily, the decal itself wasn't ruined, just the red portion on one side of the decal was smudged. I carefully removed the red polish from that side, and masked the (now dry) unblemished portion of the nail. Then I added a black polish, 'Never Have Too Mani Friends!' from the original OPI 'Hello Kitty' collection. It worked, and looked even better than the original design! I'm glad I didn't give up! Inspired by the new improved accent, I then went on to add more black and gold accents to the rest of the nails to tie everything together. In the end, I am so pleased with how the final look turned out!

Red, Black and Gold Glitter Mani - Polishes


The final look reminds me of the face cards in a deck of cards - it's all of the bold geometric shapes and the combination of red, black and gold. This mani would be a great look for a poker tournament! If I wanted to run with the playing card theme, a matte topcoat, and maybe a club, diamond, heart or spade nail stamp on the thumb instead of the gold and black circle would have been a nice touch... Wow, looks like once those creative juices start flowing, they never want to stop - here I am still designing the mani, after it's already complete! 😂  

Above, I have a collage of the polishes used, and below, I have a collage with some additional shots of the manicure.

Red, Black and Gold Glitter Mani

Sunday, December 26, 2021

Christmas Glitter Mani 2021

I fell behind with posting, but I really wanted to get this Christmas Mani up on the blog (even though there are a few older manis that I have yet to post! 😅), as it's becoming a bit of a tradition for me to do this same mani at Christmas-time:

Christmas Glitter Mani 2021

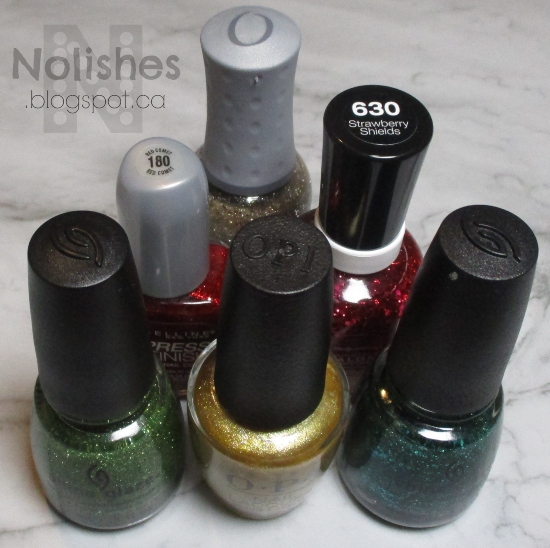
Polishes Used Christmas Glitter Mani 2021

I talked about the first two times that I did this manicure in this post from December 2018. I'm pretty sure that this is actually the fourth time I re-created this mani, as I distinctly remember wearing it during the holidays in 2019, however, it looks like I didn't take any pictures of it that year.

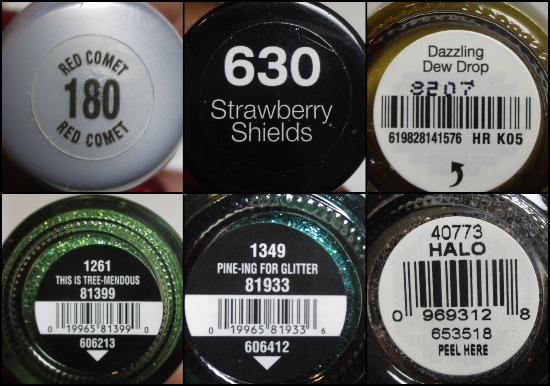
One change that I made from the original version, is that I am using a different gold base polish for my middle finger. In the first two versions I used Orly 'Luxe' as the base coat, which is a bit more of a true gold colour. This year (and I think last year too), I started using OPI 'Dazzling Dew Drop', which is a bit more of a brassy, yellow-toned gold. I think that this shade of gold works a little better with this bright, playful look. For both versions, I used Orly 'Halo' as the glitter topper over the gold polishes.

Christmas Glitter Mani 2021 - Polishes

Polishes Used - Label Shots

Once again, I love how it turned out! This manicure was so much fun to wear, as it instantly put me in a festive mood!  

Happy Holidays to all!

Tuesday, July 20, 2021

Sky Blue Dotticure

Today I have a dotticure to share:

Sky Blue Dotticure

This manicure was quick and easy to do, and a lot of fun to wear. It's simply a bright sky blue base, with silver, orange, and dark teal layered polka-dots. This is the perfect type of mani to do if you want to incorporate a little nail art into your manicure, but don't want to do a lot of thinking or planning. I haven't been doing a lot of manicures lately, so it has been really fun to revisit this hobby after a little while away!

Polishes Used

Polishes Used - Label Shots

Monday, April 5, 2021

OPI '15 Minutes of Flame' - Hollywood Collection for Spring 2021

Today, I have another polish from the OPI Spring 2021 Hollywood collection. This beauty is called '15 Minutes of Flame':

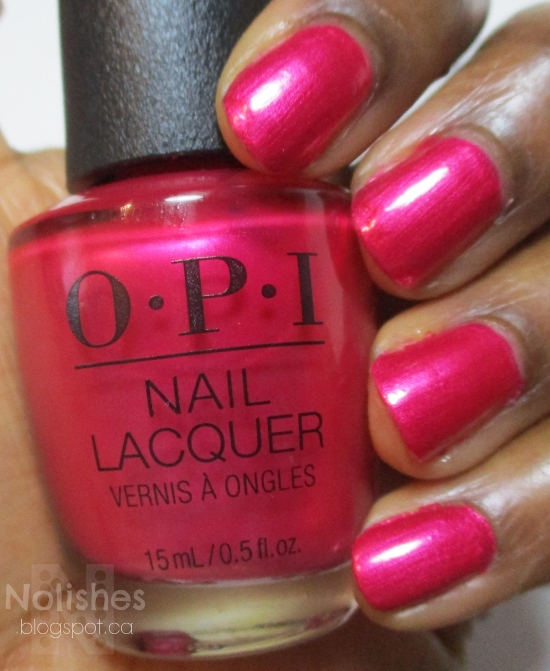
OPI '15 Minutes of Flame'

'15 Minutes of Flame' is a stunning metallic fuchsia polish. On the OPI website it's tag line is that "this fuchsia nail polish has a flair for the dramatic" - it's so true, the polish is very bright, and eye-catching, with a shimmery finish that reflects light in such a way that the polish seems to glow from within. 

OPI '15 Minutes of Flame' - Label Shot

I found the formula on '15 Minutes of Flame' to be a little tricky to work with, but I feel it's still worth it for the gorgeous colour and shimmer pay-off. The coverage is really good, and if you have a smooth nail surface, you might be able to get away with one coat. When I used one coat, it applied well and dried easily, but did nothing to hide the surface imperfections on my nail. 

I decided to go for a second coat, but that's when I ran into problems with the formula. After a few attempts, I found that it's best to give a fair amount of dry time between coats to ensure that the first layer is dried thoroughly before applying the second. This seemed to minimize bubbling. And also, if applying two coats, it's probably best to give a good amount of dry time before doing other activities, or going to bed. The first couple tries, I did my nails about an hour before going to sleep, and woke up with a little bit of smudging.

All in all, I really do love '15 Minutes of Flame' - despite how careful I had to be when applying it. It such a fun, and flashy colour and finish. I'm looking forward to more great manis with this awesome shade!

Sunday, March 21, 2021

OPI 'I'm Really an Actress' - OPI Hollywood Collection for Spring 2021

2021 marks the 40th anniversary of OPI's 1981 inception in California, USA. To celebrate this milestone, the company has created a Hollywood collection for Spring 2021. This is actually the second Hollywood collection that OPI has released. The first was for Fall/Winter 1999, the 10th anniversary of their 1989 nail lacquer launch collection. Even though they started running the company in 1981, they only expanded their products to include nail polishes in 1989. They are now one of the most popular brands of nail polish in the world!

That first Hollywood collection introduced one of OPI's most iconic polishes, 'I'm Not Really a Waitress',  which has since become part of their permanent line. The polish has also become one of their best sellers. As a nod to this renowned polish, the 2021 Hollywood collection includes the equally cheekily named 'I'm Really an Actress'. When I first heard about this collection and saw that this polish was part of it, I instantly knew that I had to have it! And so we have the subject of today's post!:

OPI 'I'm Really an Actress'

OPI is known for it's red polishes being some of the best in the industry, so it's only fitting that the marquee polish of the Spring 2021 40th Anniversary 'Hollywood' collection would also be a red! 

'I'm really an Actress' is a bright red holographic polish, with slightly cool undertones. This red has a somewhat translucent consistency, which is the perfect base to showcase the fine holographic shimmer particles mixed into the formula. It really does embody the glitz and glamour of Hollywood actresses and red carpets. It also has an excellent formula, and looks quite lovely on the nail.

Now, you may be wondering how 'I'm Really an Actress' compares to it's sister polish 'I'm Not Really a Waitress'. Well, I've got you covered with a handy-dandy comparison swatch below!:

Comparison of OPI's 'I'm Not Really a Waitress', and 'I'm Really an Actress'

As you can see, both polishes have completely different finishes, and are different shades of red. 'I'm Not Really a Waitress' is a stunning deep red metallic perfectly befitting the Fall/Winter collection that it was originally released in, while 'I'm Really an Actress' is a gorgeous brighter red holo, more suitable for Spring.

As someone who not only loves polish, but also appreciates the nostalgia element of certain polishes, I'm super excited to have 'I'm Really an Actress' in my collection. 

As a side note, I also own another polish that was initially released in the original 1989 Hollywood collection. It is a deep red creme shade called 'Chick Flick Cherry'.  I used this polish in an earlier post on this blog, which you can see here.

OPI 'Envy the Adventure'

St. Patrick's day has recently passed, but I was still in a green mood! Today I have a quick mani to share using OPI's 'Envy the Adventure', and Rimmel's 'Dazzle':

OPI 'Envy the Adventure'

For this mani, I started with a base of 'Envy the Adventure', and then added a few simple star embellishments that I made by using a star-shaped hole punch on a dried sheet of gold nail polish, 'Dazzle'. It was super quick and easy, and made for a fun mani!

Materials Used:

OPI Envy the Adventure and Rimmel Dazzle

Tuesday, March 9, 2021

Blue, Orange, and Silver Stamped and Dotted Manicure

I finally managed to do a little nail stamping! It's been a while, but it was fun to get back into it again. Here's what I came up with:

Blue, Orange, and Silver Stamped and Dotted Manicure

I started with a simple base of Sally Hansen Complete Salon Manicure 'Calypso Blue'. Then I stamped some silver accents on my middle and ring fingers using an image from my ÃœberChic Beauty ‘Culture Rich’ stamping plate. I finished it off by using a dotting tool to add orange dots on the nails.

The manicure came together rather quickly, as the embellishments were done pretty much at the spur of the moment. However, I really like how it turned out!

Materials Used
 

Wednesday, September 16, 2020

OPI Fall 2020 'Muse of Milan' collection: 'My Italian is a Little Rusty'

Today I have another polish to share from the OPI Fall 2020 collection 'Muse of Milan'. This one is called 'My Italian is a litle Rusty':

'My Italian is a Little Rusty' is a warm chestnut brown creme polish. To me, it seems like a darker version of 'Have Your Panettone and Eat it Too', another polish in the 'Muse of Milan' collection. Just like '...Panettone..', 'My Italian is a Littly Rusty' is super-autumnal, and instantly puts me in a fall mood! In fact, these were the only two polishes from the collection that really sparked my interest.

Label Shot: 'My Italian is a Little Rusty'

I found the shade to be quite lovely - it reminds me of fresh, unworked clay... so earthy and gorgeous! I also think it worked will with my skin tone. On me, the colour is very neutral, but the extra warmth adds a bit of 'oomph', to make the over-all look a bit more interesting. The formula was also very good.

All in all, this polish did not disappoint! 

Monday, September 7, 2020

OPI Fall 2020 collection, 'Muse of Milan': 'Have Your Pannetone and Eat it Too'

It's Labour Day, today - Happy Labour Day! And with that, comes the unofficial end to the (relatively) relaxing days of summer. It's always sad to realize that the summer is almost over, but at least we still have all of the beautiful fall nail polish collections to look forward to! 😉

Today I have a swatch to share from the new OPI Fall 2020 collection: 'Muse of Milan'. The polish is called 'Have Your Pannetone and Eat it Too':

OPI 'Have Your Pannetone and Eat it Too'

The colour lies in between a spiced pumpkin orange, and a very warm caramel brown - although it definitely leans more orange. It goes really well with my skin's warm undertones, and gives an overall very neutral look on me. This colour is so perfectly representative of fall, for me... it reminds me of pumpkin pie, yellowed leaves, and tan leather boots - all things that just scream autumn!

'Have Your Pannetone and Eat it Too'

The formula was also very lovely. It took two coats for full opacity, dried well, and has a beautiful shiny finish. All in all, I'm really happy that I picked this polish up!

Thursday, November 7, 2019

Throwback Thursday: Blue Shatter Mani with Red Base

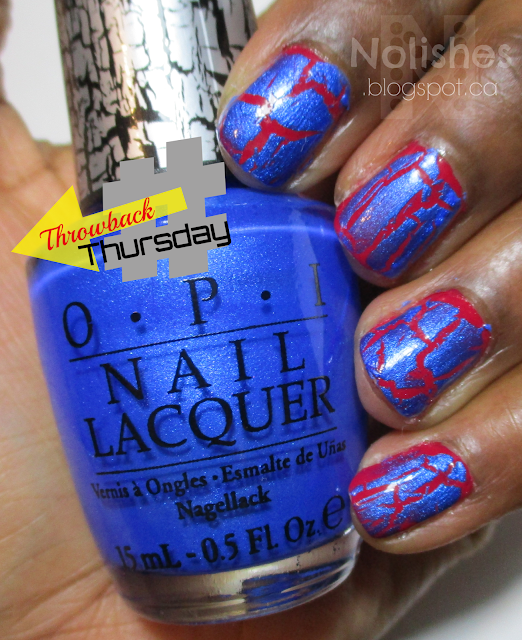
Shattercure using OPI 'Blue Shatter', and Revlon 'Cherries in the Snow' as the base

For today's post, in the spirit of 'Throwback Thursday', I'm sharing a red and blue shatter manicure (Shattercure?!) featuring OPI's 'Blue Shatter', and Revlon's 'Cherries in the Snow'. The nostalgia game is strong with this one!  Blue shatter came out in OPI's Summer 2011 Shatter Collection, and 'Cherries in the Snow' nail polish was first introduced by Revlon in 1953! Enjoy the throwback vibes!

OPI 'Blue Shatter' and Revlon 'Cherries in the Snow'

Friday, September 6, 2019

Glitter Mani Featuring 'Party of Five Glitters'

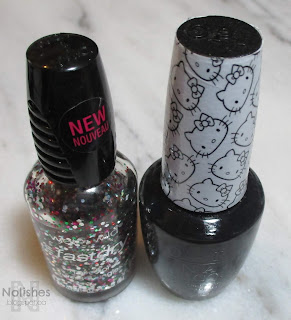
Glitter Manicure featuring a black base of OPI's 'Never Have Too Mani Friends', and glitter topper Wet n Wild Fastdry 'Party of Five Glitters'

Polishes Used
Wet n Wild Fastdry ‘Party of Five Glitters’
OPI ‘Never Have Too Mani Friends!’

Today I have a quick and easy glitter manicure to share featuring a Wet n Wild glitter called 'Party of Five Glitters'. I've had this glitter for several years now, and recently decided to try it out again. Honestly, I've been thinking of decluttering it, and wanted to see how it looked on my nails to help me decide.  I decided to wear it over a black polish since it really helped the glitter mix to stand out.

There are 5 different colours of glitter in this polish: red, green, purple, light blue, and silver. I remember this collection contained polishes with names inspired by various TV shows. So this polish was named after 'Party of Five', a prime-time drama series from the nineties. I used another polish from this collection 'Saved by the Blue' (Inspired by the teen comedy show 'Saved by the Bell'), in my 'Australian Aboriginal Art Themed Mani', which I blogged about here.

Sadly, I'm not a really big fan of 'Party of Five Glitters' anymore. I rarely get that excited about glitter polishes in general, nowadays, but this one in particular is really not my cup of tea right now. This is mainly because I don't particularly care for  the mix of colours. 

Funnily enough, I remember being really excited about the polish back when I bought it, as multi-coloured 'glitter bomb' polishes like Deborah Lippmann's 'Happy Birthday', and OPI's 'Rainbow Connection' were all the rage at the time. At the time, this seemed like an affordable, comparable version of that look.  You can even see that there is quite a low fill line - the bottle is about one quarter empty! This really goes to show how one's tastes can change a lot over the years...  

I think I may try one more look with the polish, before making any decisions: I want to try the polish on it's own, with as many coats as it takes to get full coverage.  Perhaps it might look nicer as a solid block of multi-coloured glitter, as opposed to being used as a glitter topper.

Wet n Wild Fastdry 'Party of Five Glitters', and OPI 'Never Have Too Mani Friends!'

Thursday, August 22, 2019

Metallic Red and Silver Stamped Mani

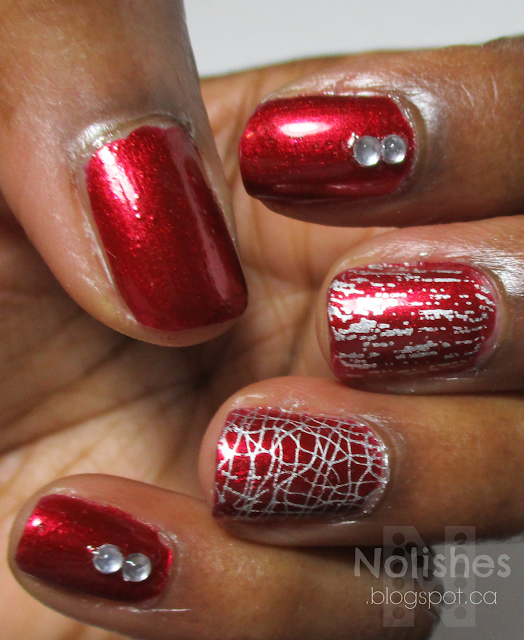
Today I have a simple nail stamping manicure to share using metallic red and silver polishes, and embellished with some nail art jewels:

Nail stamping nail art manicure featuring red metallic polish OPI's ‘A Little Guilt Under the Kilt’ from the Fall 2019 Scotland collection, and silver metallic polish Sally Hansen ‘Silver Sweep' (original formula). Nail stamping images were from ÜberChic Beauty's ÜberMini 'Texture-licious' plate 3

Polishes Used
Stamping Plate Used
OPI ‘A Little Guilt Under the Kilt’
Über Mini: Texture-licious – Plate 3
Sally Hansen ‘Silver Sweep’*
                 
*Original formula                 

I created this manicure by starting off with a base of metallic red nail polish, OPI's 'A Little Guilt Under the Kilt'. Next, I stamped 2 separate textural images from ÃœberChic Beauty's ÃœberMini 'Texture-licious' plate 3 on both my ring and middle fingers. I used a metallic silver polish for the stamping, my quickly depleting bottle of original formula Sally Hansen's 'Silver Sweep'. I completed the look by placing 2 colourless nail art jewels each, on my pinky and index fingers.

OPI ‘A Little Guilt Under the Kilt’ from the Fall 2019 Scotland collection, and Sally Hansen ‘Silver Sweep' (original formula)

I did this manicure during the middle of the work week, so I didn't really have a lot of time for planning and execution. Typically in these situations, I would do a traditional manicure using just one shade of polish on all of my nails. However, I've been trying to get back into the habit of doing nail art regularly, so I decided to go a step further and do some basic nail stamping and add some embellishments. I'm really pleased with how the look turned out, and it has served as a reminder for me that a manicure does not have to be complicated or time-consuming to be beautiful. In fact, sometimes simpler is better, since I don't end up going over-board and doing way too much! 😄

Below, I've included a few additional pictures of the manicure:

Nail stamping nail art manicure featuring red metallic polish OPI's ‘A Little Guilt Under the Kilt’ from the Fall 2019 Scotland collection, and silver metallic polish Sally Hansen ‘Silver Sweep' (original formula). Nail stamping images were from ÜberChic Beauty's ÜberMini 'Texture-licious' plate 3

Wednesday, August 21, 2019

'A Little Guilt Under the Kilt' - OPI Scotland Collection for Fall 2019

OPI Scotland Collection, Fall 2019 - 'A Little Guilt Under the Kilt'. A deep metallic red nail polish.

Today I have a swatch of a new polish I recently purchased. It's from OPI's 'Scotland' collection for fall 2019. The shade is called 'A Little Guilt Under the Kilt' and it is a gorgeous metallic red with slightly warm, rusty undertones. This shade was the standout for me from this fall's OPI collection, mainly because lately I've developed a penchant for red polishes, and metallic red is my favourite way to wear red nails. It's also a truly stunning shade of blood red, that is perfect for fall!

This polish has a wonderful formula. It was easy to apply, self-leveling, and dried reasonably fast. It also applied smoothly, with no brush-strokes. However, I noticed that similar to many other metallic polishes, since the formula does apply so smoothly, it does not cover the the slight ridges and imperfections in my nail as much as a creme polish would. This is pretty insignificant in most real life situations, but becomes just barely noticeable when viewing your nails in close-up photos! It's also pretty easy to fix by remembering to lightly buff my nails before applying metallic polishes. Truthfully though, I'm generally not really concerned about it, so I usually don't take the time to buff before applying metallics.

Below, I've included a comparison photo in which I've selected 12 metallic red polishes from my collection (including 'A Little Guilt Under the Kilt') and placed swatches of them in a line-up (you should be able to click on the photo to enlarge it). I don't have any exact matches for 'A Little Guilt Under the Kilt' in my collection, as it is a lot lighter than most of my warm metallic reds, but putting these subtle variations in undertones aside, as you can see, I do have some polishes that are somewhat similar in hue.

OPI 'A Little Guilt Under the Kilt' - Scotland Collection, Fall 2019 - Comparison with other deep metallic red polishes: 1) China Glaze - Mommy Kissing Santa, 2) OPI - I'm Not Really a Waitress, 3) Zoya - Isla, 4) China Glaze - Long Kiss, 5) Cover Girl - Forever Festive, 6) Orly – Torrid, 7) A England - Perceval, 8) OPI - An Affair in Red Square, 9) OPI - A Little Guilt Under the Kilt, 10) China Glaze  - Cranberry Splash, 11) China Glaze  - Just Be-Claws, 12) Sinful Colors - Sugar Sugar

The names of the polishes in the comparison line-up photo above are:

1) China Glaze - Mommy Kissing Santa
2) OPI - I'm Not Really a Waitress
3) Zoya - Isla
4) China Glaze - Long Kiss
5) Cover Girl - Forever Festive
6) Orly – Torrid
7) A England - Perceval
8) OPI - An Affair in Red Square
9) OPI - A Little Guilt Under the Kilt
10) China Glaze  - Cranberry Splash
11) China Glaze  - Just Be-Claws
12) Sinful Colors - Sugar Sugar

All in all, I really love this nail polish, and I'm happy to have it in my collection!

Sunday, August 4, 2019

Jelly Polishes for Leadlight Manicures

I started writing this post on January 29 2015, and it has been in my Draft folder ever since! I wanted to go through my entire collection and compile a large list of my jelly polishes and take pictures so that I could catalogue them for easy retrieval when needed. I realize now that I'm probably never going to get around to doing that! With my previous post on the Essie 'Glazed Days' Collection, I thought I would finally just publish this post, even though it is not a comprehensive list, as the information may still be useful, since some of these polishes are still available.
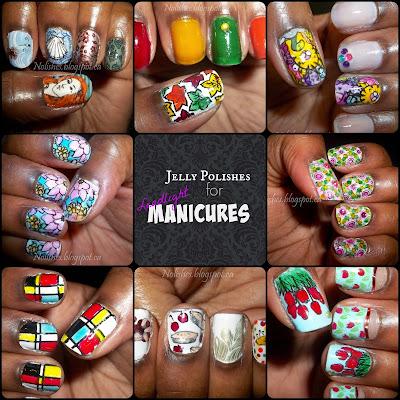
Collage featureing 8 different leadlight manicures that I have previously done on this blog

Today's post is all about polishes that can be used for Leadlight manicures. 'Leadlighting' is a nail stamping technique where coloured, translucent polishes (jellies, and tints) are painted over stamped outlines, usually in a dark colour, over a white or light coloured base. It allows for the creation of multi-coloured images on the nail. The pros of leadlighting are that compared to the decal method, the other popular method of creating multicoloured stamped images, it is much quicker, because the colours are applied directly to the nail, as opposed to a stamper.

I first learned this technique from a you-tube video posted by Messy Mansion in spring 2014. Back then, I only had a few jelly polishes in my collection.  I immediately started researching and store-hunting for a variety of jellies that I could use for this technique. Today, I want to share some of what I have found.

1) Create your own
A lot of people have shared that you can create jelly polishes by adding clear nail polish to other polishes already in your collection. They can be mixed as required by combining a few drops of each on a piece of saran wrap, plastic, or whatever un-needed flat surface you have handy. This way you do not have to mix up an entire bottle of jelly polish, if you only need a little bit for some nail art. I have never personally tried this technique, but I have seen it successfully done in manicure tutorials on-line.

2) OPI Sheer tints
This collection came out in spring or summer 2014, just as the leadlight technique was really catching on in the nail art community.  They are lightly pigmented, so although they work beautifully for the technique, the colours you get tend to be pastel shades.  You might be able to build the colour intensity with multiple coats, but, you may end up with a lumpy surface. The colours are 'I'm Never Aberrassed', 'Be Magentale with Me', 'Don't Violet Me Down', and 'I Can Teal You Like Me'.

3) NFU OH Jelly Syrup Series
I'm not sure exactly when, but a quick internet search leads me to believe that it was sometime in either late 2010 or early 2011, that Nfu Oh came out with an entire collection of jelly polishes, containing a whopping 45 shades of jelly awesomeness! From my experience with the polishes from this series that I have in my collection, these polishes are very pigmented, and are fantastic for use in the leadlight technique.

4) China Glaze Summer 2013 Sunsational Collection
This collection included 6 jelly polishes: 'You Drive Me Coconuts', 'Heat Index', 'Shell-O', 'Keepin' it Teal', 'Isle See You Later', and 'Are You Jelly?'. These are gorgeous, bright, fun shades. They are not perfectly translucent, as they have a translucent white base, but I've found that they still work well for leadlight manicures.

5) OPI Color Paints collection (Summer 2015)
I did a comprehensive review of these polishes in an earlier post. Click here to view it.

6) Essie Silk Watercolor collection (Summer 2015)
This was a collection of 8 jelly polishes and a white base. The colours were:
'Highest Bidder' - Crimson
'Blush Stroke' - Scarlet
'Love Sheen' - Rose
'Art New-Beau' - Orange
'Muse, Myself' - Citrus
'Pen & Inky' - Teal
'Point of Blue' - Blue
'No Shrinking Violet' - Violet
'White Page' - White base polish

7) Some examples of random Jelly Polishes sorted by colour:
Red:  Essie Jelly Apple Burgundy: China Glaze 'Ravishing, Dahling'
Orange: OPI Big Hair...Big Nails, OPI 'Y'all Come Back Ya Hear?'
Yellow: Deborah Lippmann 'Yellow Brick Road'
Turquoise: Zoya 'Frida'
Blue: China Glaze 'Ride the Waves', and 'Splish Splash'
Purple: Zoya 'Katherine', and China Glaze 'Creative Fantasy'
Pink: Misa 'Bed of Roses'
White: OPI 'Don't Touch My Tutu', and 'Funny Bunny'

8) Essie Glazed Days Collection, Summer 2019
I did a comprehensive review of these polishes in an earlier post. Click here to view it.
Tuesday, April 23, 2019

OPI 'Say Hello Kitty'

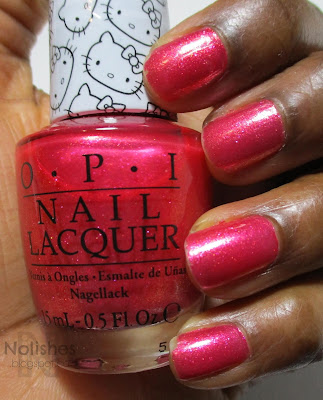
Today's post features the special edition polish from OPI's 2016 Hello Kitty Collection. The shade is called 'Say Hello Kitty':

Swatch of OPI 'Say Hello Kitty', shimmery pink nail polish

This was really fun to wear. The polish is so bright, shimmery and girly - it just really made me happy every time I looked at it my nails! The polish came in a box set with swarovksi crysal bows. One day, I'll have to create a Hello Kitty themed manicure so I can use the bows... 

Sunday, March 24, 2019

Adjacent Color Scheme Skittles Mani (Blueprint only)

Today I have the blueprint of a manicure to share, but not the manicure itself.  Sadly, I didn't get to take a picture of the actual manicure, however I did get a picture of the polishes that I used.

What happened? Well, I did my manicure, and then took a picture of the polishes that I used so that I could put the polishes away. I was planning to take a picture of my manicure later, after I had done some clean up on my cuticles. Unfortunately, I never got around to taking the picture! I figured I'd put the polish picture up anyways because one of the main reasons for this blog has always been to keep track of my various manicure ideas and looks, as well as to share the results. Unfortunately, I don't have the results for this post, but it was still a pretty good idea that turned out well, so I figure that it's worth noting.

Anyways, it was a skittles mani created with the following polishes (in the same order from thumb to pinky):


The polishes I used were: OPI 'Ski Teal we Drop', Zoya 'Meg', Zoya 'Elphie' (PixieDust), Zoya 'Ryan' and Zoya 'Waverly' (PixieDust). I quite liked how the colours looked together, and I remember being really taken with how lovely the textured polishes, Elphie and Waverly, looked. I only wear textured polishes occasionally, so it was a nice change for me.

Sunday, February 3, 2019

Neutral Mani

Today I'm sharing a neutral, subdued and understated mani that still has a bit of style and creativity.


I don't typically do a lot of neutral manicures as I tend to favour fun and colourful looks that 'pop', however, I like to switch things up every once in a while too.  I actually was quite surprised by the neutral base colour that I used, 'Tickle my France-y'.  I had it in a miniature size and I'm pretty sure that this is the first time that I've used it.  I really liked how the colour worked with my skin tone. I was so impressed that I even went out and purchased a full sized bottle!  

I did a little bit of stamping on my nails using Uber Chic Beauty's 'Texture-licious plate 01', for a little bit of visual interest. And as an accent nail, I did a glitter gradient using Sally Hansen's 'Big Money', and then placed 3 nail gems down the middle of the nail for a bit of added bling.

Polishes Used

Polishes Used
Stamping Plate Used
Sally Hansen Insta-Dri 'Silver Sweep'
Uber Chic Beauty - Texture-licious-01
OPI 'Tickle my France-y'
              Uber Mini Nail Stamp Plate
Sally Hansen Gem Crush 'Big Money'


I really like this textured stamping plate. It's such an easy way to spice up a simple mani without doing a lot of design work. Sometimes I want to paint my nails, and would love to do some nail art, but I'm not inspired to design an entire themed look. I'm thinking that these texture images would be perfect for those times. They should also be great for making textured backgrounds to double stamp, or place a decal over. I'm going to have to keep these handy to use a bit more frequently!

Sunday, December 9, 2018

Reveal Mani with Multi-Coloured Shatter Base

Today I have what I like to call a 'Reveal Mani' to share. I use the term reveal mani, to describe a manicure where I start with a base decorated with an abstract print or pattern, and then stamp a negative space image over it to reveal the patterned base as abstract patterned shapes.


For this manicure, I started with a white base and then used 3 different shatter polishes in turquoise, gold, and blue, to create a multi-coloured abstract look. Then, to add a bit of sparkle, I added a holographic glitter polish to my ring finger. Below I have a picture of the base before the stamping.


I stamped over this base using black stamping polish and 2 different negative space images form Messy Mansion's Lily Anna Plate LA07. Overall, I really like how the circle and square pattern on my index and middle fingers turned out, but I had a little bit of trouble with the star image. Images with lots of negative space can be tricky to pick up since there's so much more area to fill with polish, which increases the chances of not picking all of it up cleanly. I wasn't in the mood to try multiple times to ensure perfect image transfers, so I just left well enough alone.  For the most part, the star images look pretty good, but they are not as clean and crisp as I would like.

Polishes Used

Polishes Used
China Glaze 'White on White'
OPI 'Turquoise Shatter'
Nicolie by OPI 'Gold Texture'
OPI 'Blue Shatter'
Maniology 'Straight Up Black' Stamping Polish
Urban Outfitters 'Afterhours'
Plate Used: Lily Anna Plate LA07

Below, I have a cool close-up shot of the Holographic glitter polish that I used, 'Afterhours'. The lighting and angles that I used for the manicure photos above didn't capture the beauty of the polish, so I wanted to share a photo that did.  

Close shot of 'Afterhours'

Wednesday, November 21, 2018

Spotlight on 'Project Polish' Polishes: OPI 'Glow Up Already!'

For today's 'Spotlight' on one of the 16 polishes that I have included in my 'Project Polish', I have a swatch of OPI's 'Glow Up Already!' to share:

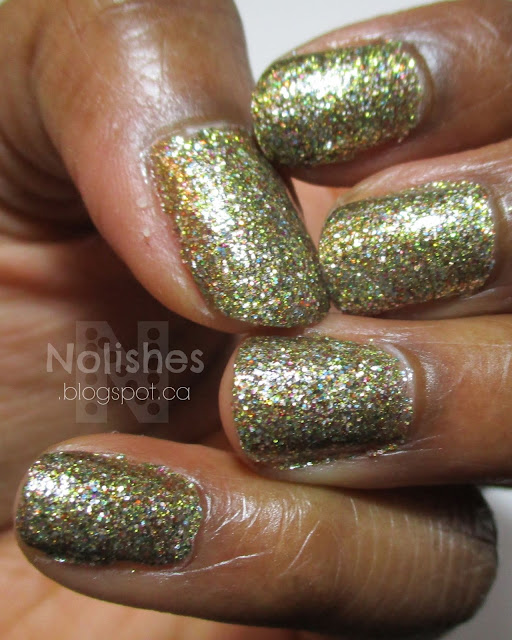
Gold glitter polish from OPI's Holiday 2010 'Burlesque Collection'
'Glow Up Already!' from OPI's Holiday 2010 'Burleque' Collection

This glitter polish is from the OPI 'Burlesque' collection from Holiday 2010. The 'Burlesque' collection was a cross-promotion with the Cher and Christina Aguilera movie of the same name. If I recall correctly, I remember glitter polishes being really big at the time, and a plethora of fun glitter polishes and glitter/glitter-heavy collections were being offered by several nail polish manufacturers. It was a fun time in the world of nail polish!

A lot of the legendary glitter polishes like OPI's 'Mad as a Hatter' and 'Absolutely Alice', China Glaze's 'Emerald Sparkle' and Deborah Lippmann's famous series of glitter polishes (eg, 'Glitter in the Air', 'Bad Romance' etc.) were all released around this period of a few years.

I remember being totally mesmerized by so many of all of the pretty glitter polishes that were coming out. I was completely on board the glitter band-wagon at the time, and I bought way more glitter polishes back then than I do now. However, as I mentioned in my last post, I've been using my glitters less and less these days. Typically, when I do use a glitter, I will just paint one nail with the polish as an accent nail. But even this is only occasionally, as a lot of the time I'll accent certain nails using other methods. Consequently, I'm not surprised that most of my project polish polishes are glitter polishes. 

I'm really looking forward to the challenge of finding new ways to incorporate glitters into my nail art. Perhaps I can adapt all of the methods I came up with for using my 'Crackle' polishes during my '2015 Crackle Polish Challenge'!

For now, I'll leave you with some additional shots of 'Glow Up Already'.

Gold glitter polish from Holiday 2010 'Burlesque Collection'

Wednesday, November 14, 2018

Project Polish

In my Blue and Gold Manicure using Quo by Orly 'Celestial Star' post, I mentioned that I wanted to do a 'Project Polish': A deliberate attempt to use up particular nail polishes over a period time by using them frequently and consistently until they are gone.

In that post I explained that when I was going through my collection, I noticed some glitter and special effect polishes that seemed to be drying up in the bottles. I decided that I wanted to try to use them up as soon as possible, in order to avoid them becoming unusable before I had even gotten a chance to get my money's worth.

I finally got around to photographing and listing all of the polishes that I wanted to include in the project. First here are the pictures:

16 polishes that I will try to use up


I'm starting to realize that creme polishes seem to hold up better over time, as all of these polishes that I found that seem to be evaporating away, are glitter and shimmer heavy polishes. I'm glad that they still look relatively good. Some need to be thinned out with lacquer thinner, and some of the glitters may actually even perform better as the base has shrunk away - hopefully this should lead to denser glitter coverage during application.

In addition to the 'Blue and Gold' manicure that I discussed earlier, I have already managed to do two other manicures using some of these polishes. I used Gone Wishin' in my 'Purple and Silver Negative Space Stamping Glitter Mani', and I used 'Scandal, Secrets & Sparkle' for my 'Remembrance Day Manicure - 2018'.

Here's a list of the names of the polishes above that I want to use up as part of the project (the grid of names is in the same order as the pictures in the collage):

China Glaze
I love Your Guts
Kleancolor
Starry Night
OPI
Glow Up Already!
Nicole by OPI
Nicole... Spotted!
Nicole by OPI
Honey-Dew You Love Me?
Quo by Orly
Turquoise Moonlight
China Glaze
Water You Waiting For?
Quo by Orly
Celestial Star
Nicole by OPI
Rich in Spirit
Claire's Cosmetics
Flashing Lights
China Glaze
Liquid Crystal
Nicole by OPI
Gone Wishin'
China Glaze
All Wrapped Up
Quo by Orly
Night Sky
China Glaze
Snow Globe
Nicole by OPI
Scandals, Secrets & Sparkle

Now, I've never done a 'Project Polish' before, so this will definitely be a new and interesting experience for me.  Since I love nail stamping, my approach will be to use one of these 16 polishes as the base for a nail stamping design for each of my manicures. Three of the polishes are technically toppers ('Honey-Dew You Love Me?', 'Flashing Lights', and 'Snow Globe'), so there's also an option of doubling up for each manicure: using one of the polishes as a base, and then one of the toppers to complete the look. The best thing about this approach is that I will still be able to use all of my other polishes along with these ones, so I'm not limited to just 16 polishes.

I think the most challenging polish to work with will be China Glaze's 'I Love Your Guts', a frosty semi-matte red textured polish with black micro-glitters from their 2014 Halloween collection 'Apocalypse of Colour'.  I previously used it for my 'Halloween Themed Test Mani', and my 'Red and Black Tree Mani'.  Since the polish already makes quite a statement on it's own, my first instinct is to use it for Halloween-type designs, but I'm going to have to try to rethink that now that Halloween is over.

I've decided that I don't want to come up with an arbitrary deadline for using up the polishes. I can commit to trying to use them for every manicure, and to trying to do my nails more frequently, as needed. I don't want to commit to changing my nail polish every day (as many other 'Project Polishers' suggest), as I typically spend a lot of time planning and executing my nail art, and I like being able to wear each manicure for a few days, in order to decrease the total amount of time I spend doing my nails on a weekly basis. Also, I think forcing myself to do my nails everyday would eventually feel like a chore.

Now that I am in a nail polish collection culling frame of mind, I'm starting to notice some other polishes that I would like to add to the project. I may make this project on-going, and as certain polishes are used up, I may add others to replace them. We'll see how this goes...