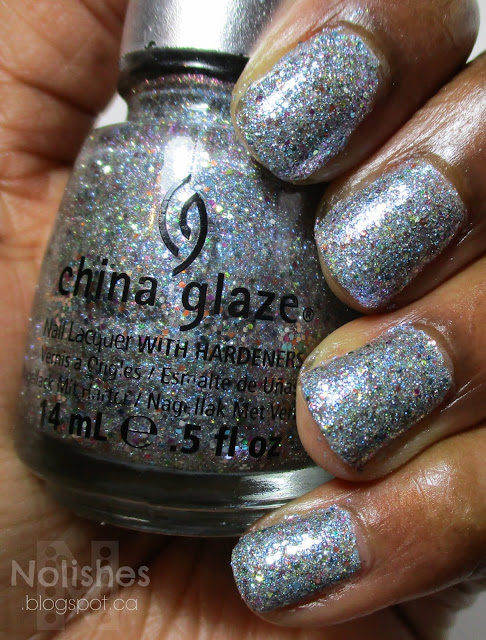
I fell behind with posting, but I really wanted to get this Christmas Mani up on the blog (even though there are a few older manis that I have yet to post! 😅), as it's becoming a bit of a tradition for me to do this same mani at Christmas-time:
Showing posts with label China Glaze. Show all posts
Showing posts with label China Glaze. Show all posts
Sunday, December 26, 2021
Christmas Glitter Mani 2021
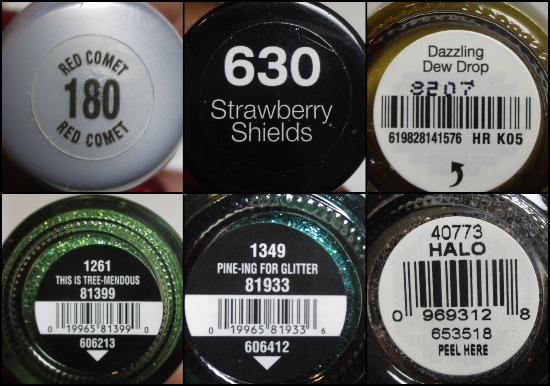
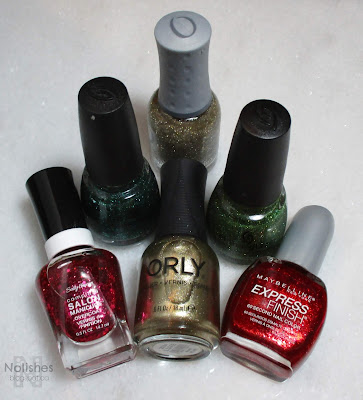
One change that I made from the original version, is that I am using a different gold base polish for my middle finger. In the first two versions I used Orly 'Luxe' as the base coat, which is a bit more of a true gold colour. This year (and I think last year too), I started using OPI 'Dazzling Dew Drop', which is a bit more of a brassy, yellow-toned gold. I think that this shade of gold works a little better with this bright, playful look. For both versions, I used Orly 'Halo' as the glitter topper over the gold polishes.
Once again, I love how it turned out! This manicure was so much fun to wear, as it instantly put me in a festive mood!
Happy Holidays to all!
Labels:
China Glaze,
glitter,
gold,
green,
Maybelline,
Occasion,
OPI,
Orly,
red,
Sally Hansen,
skittles mani
Friday, August 20, 2021
China Glaze 'Ruby Pumps'
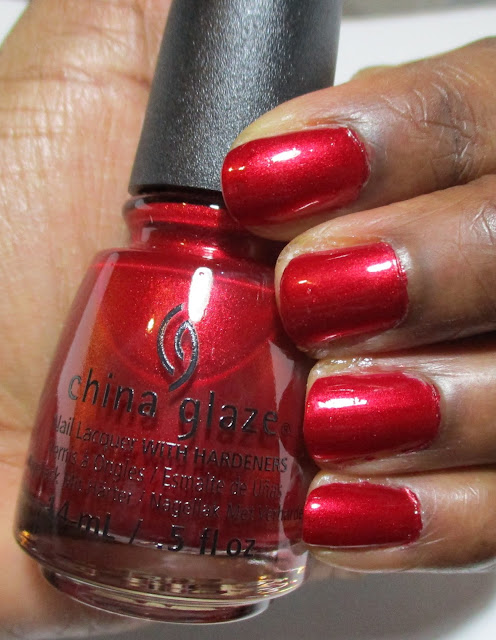
Today I have a swatch of an oldie but goodie, China Glaze 'Ruby Pumps':
'Ruby Pumps' is an amazing ruby red jelly glitter polish that is part of China Glaze's core line. Apparently, the polish was originally released as part of a collection called 'The Wizard of Ooh Ahz' way back in 2001, and then brought back due to popular demand in 2009. 'Dorothy Who?' is another polish that I own, that was originally from the same collection. I previously featured it on the blog in this post.
In the picture above, the polish looks a lot lighter than it really does in person. However, it does a good job of showing the embedded sparkle from the shimmer particles in the deep red translucent base. The picture below more closely captures the gorgeous true shade of the lacquer.
I believe that the 'Wizard of Ooh Ahz' collection was released for the holiday season, and I can definitely see how 'Ruby Pumps' in particular would be great for Christmas time. However, it is such a glamorous and glitzy look, that I'll make it work any time of year! 😄
Sunday, August 9, 2020
Polish Cutout Decal Mani: Version 3
Today I have another polish cutout Decal manicure to share:
I still had some sheets of polish leftover from my decal making manicures that I shared on the blog a few posts ago: the 'Polish Cutout Decal Mani' version 1, and version 2. I didn't wan't to waste the sheets of polish, so I came up with a quick abstract mani using strips of polish I cut from the sheets using my pinking shears, and regular scissors. I topped the manicure with a matte glitter topper called 'Can I Get an Untz Untz' from China Glaze's iconic 'Summer Nights' collection that they released in Summer 2015.
The finished look isn't exactly as I had envisioned, but I kind of like the chaotic, random vibes that this manicure gives off! Cutting up the nail polish strips and applying them directly to the nail was a great way to use up more of the sheets of polish. There still are more odds and ends left, so if I feel up to it, I may be able to do one more version of the 'Polish Cutout Decal Mani', but we'll see...
Labels:
blue,
China Glaze,
Decals,
glitter,
green,
Sally Hansen
Tuesday, July 21, 2020
China Glaze 'Cackle if you Want to'
'Cackle if You Want to' was released as part of China Glaze's Halloween 2015 'Ghoul's Night Out' collection. It is a glitter topper with matte purple and black glitters in a variety of sizes. The purple glitter particles are quite unique, in that they have a light purple and dark purple alternating 'pinstripe'.
Even though this was part of a Halloween collection, it can work with a variety of nail looks, any time of year. For this manicure, I used 'Cackle...' over China Glaze's 'Ahoy', the polish that I wrote about in my last post, which you can see here. The combination creates a manicure that is edgy, fun, and artistic.
Even though I don't frequently wear glitter topper polishes, I'm really happy to have this one in my collection. The colourway is pretty versatile, since it is only one colour and a neutral, which allows it to be worn with a greater variety nail polish shades. Also, it is pretty unique (particulary for a mainstream polish). Overall, it's a really cool option for adding some visual interest to a simple manicure.
Monday, July 20, 2020
Swatch: China Glaze 'Ahoy!'
Today I have a swatch of China Glaze 'Ahoy!', a very pigmented fuschia crelly polish with gold shimmer particles. Apparently, 'Ahoy!' was originally released as part of China Glaze's spring 2011 'Anchor's Away' collection, but I think it may have become part of the permanent collection, as I'm pretty sure that I purchased it well after 2011.
'Ahoy!' is truly quite lovely. The cool-toned, dark pink shade is beautiful, and is suitable for any season. And to top it all off, the gold shimmer really adds dimension to the finished look of the polish. All in all, it is absolutely stunning!
Sunday, October 20, 2019
China Glaze 'Drastic'
Today I have a quick post to share another nail polish swatch. This polish is China Glaze's 'Drastic', a deep red jelly polish that is absolutely stunning! I love the candy-like translucence and shine, and the deep cool-toned shade of red is so gorgeous!
Sunday, September 22, 2019
Blue and Silver Stamped Manicure featuring China Glaze 'Dorothy Who'
Polishes Used
|
China Glaze ‘Dorothy Who?’
|
Sally Hansen Color Foil ‘Sterling Silver’
|
Stamping Plate Used
|
Maniology/Bundle Monster ‘Chic
Peek’ BM-XL476
|
ÜberChic Beauty Love and
Marriage – Plate 02
|
Here's a little mani that I threw together with a glitter polish that I had handy, and some nearby stamping plates! This is the first time that I've used my bottle of China Glaze's 'Dorothy Who', so I'm glad I was able to take this one off the untried list... It truly is a lovely shade of blue!
After painting my nails with the polish, I wanted to jazz the look up a bit with a little stamping. I had used the ÜberChic Beauty Love and Marriage 02 plate for my last manicure, the Burgundy and Gold Stamped Mani, and had not put the plate away yet, so I decided to use it again for this manicure. The negative space heart stamped image on my middle finger is from that plate. On my ring finger, I stamped a textural image from my Bundle Monster Chic Peek BM-SL476 plate.
Labels:
Basic Stamping,
blue,
Bundle Monster/Maniology,
China Glaze,
glitter,
Impromptu Mani,
Sally Hansen,
ÜberChic Beauty,
untried
Thursday, September 5, 2019
Verdigris Mani 3.0
Polishes Used
|
Stamping Plates Used
|
China Glaze ‘Too Yacht to Handle’
|
Lina Nail Art Supplies:
|
Essie ‘Lady Godiva’
|
- Make Your Mark Plate 02
|
Essie ‘Say it ain’t Soho’
|
- You’re a Damasque! Plate 02
|
KB Shimmer 'Funky Cold Patina'
|
In my last post on KB Shimmer's 'Funky Cold Patina', I mentioned that I had plans to do a look inspired by that polish. 'Funky Cold Patina' got me thinking about some manicures I had done in the past based on copper patinas. Now, I typically don't like to repeat the exact same nail art manicure more than once, but for today's look I have decided to do the third incarnation of one of my favourite manicures ever - the 'Verdigris Mani'. I'll include a link to a post where I talk about the two previous versions that I did, and give a little more background on the manicure, right here.
This time around, I wanted to do a copper relief effect for the base copper parts of the manicure, and then put little spotches of light teal over it, to simulate copper relief art that has just started to develop a patina. To make the copper relief effect, I stamped a damasque pattern from Lina Nail Art Supplies 'You're a Damasque!' plate 02 using a chocolate brown polish, 'Lady Godiva', over an amazing copper polish, 'Say it Ain't Soho'. I then double stamped a texture image from Lina Nail Art Supplies 'Make Your Mark', plate 02 in light turquoise to create the verdigris effect. The other nails are painted with 'Funky Cold Patina'.
I really like how the manicure turned out, but if I could do it again, I would find a way to incorporate some of the copper polish onto some or all of the turquoise nails: perhaps making the ring finger an accent nail that incorporated both looks on one nail, or even just having 3 copper/effect nails by painting the pinky finger the same as the index and middle fingers... Below, I've included a couple additional shots of this manicure.
Labels:
Basic Stamping,
China Glaze,
crelly,
Double Stamping,
Essie,
KB Shimmer,
Lina Nail Art Supplies
Sunday, August 25, 2019
Red, White, and Purple Mani featuring KB Shimmer 'Falling for Hue'
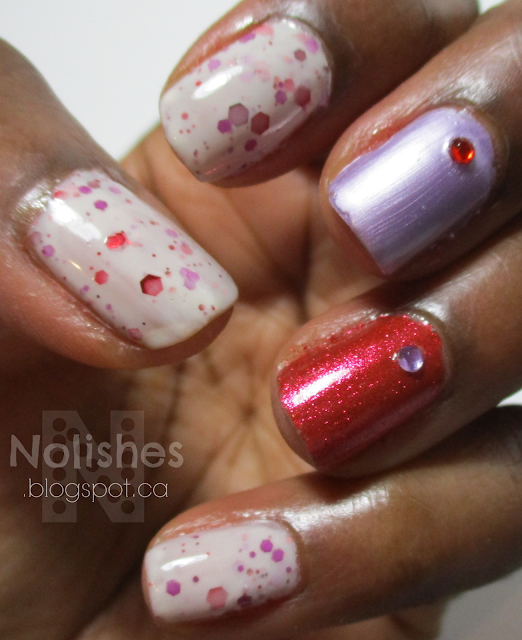
Today I have a quick and easy manicure I did using a crelly glitter polish and matching metallic polishes:
Polishes Used
|
ILNP ‘Love Me Not’
|
China Glaze ‘Ah Ah Ah-mazing!’
|
KB Shimmer ‘Falling for Hue’
|
The KB Shimmer white crelly glitter has suspended red and purple metalic glitters of various sizes, and is called 'Falling for Hue'. I decided to do two accent nails, one in a metallic red shade from ILNP which is similar to the red glitter in the crelly, called 'Love Me Not', and the other accent nail is in a metallic lavender polish called 'Ah Ah Ah-mazing!'.
'Ah Ah Ah-mazing!' is from the China Glaze summer 2019 Sesame Street: You Do Hue collection, and I recently purchased it on clearance at one of my favourite beauty supply stores. Since it coordinated with the glitters in the crelly, I decided to try it out for the first time in this manicure. The soft metallic lavender shade is very beautiful, but the formula is a little tricky to work with. If you are not careful, it's really easy to to get noticeable brushstrokes.
Below, I have a photo collage showing some additional shots of the manicure:
Sunday, August 18, 2019
'Panning for Gold' Stamped Glitter and Pond Manicure
Today's manicure is a water-themed look centred around the idea of panning for gold. I wanted to do a pond manicure using the Essie jelly polish collections that I've been playing around with for the last few posts, the 'Silk Watercolor' collection from 2015, and the new 'Glazed Days' collection released earlier this year.
Polishes Used
|
Stamping Plates Used
|
Essie Silk Watercolor ‘Pen
& Inky’
|
ÜberChic Beauty – Moroccan Delight
|
Essie Glazed Days ‘Ooh La Lolly’
|
Über Mini: Texture-licious – Plate 2
|
China Glaze ‘Water You Waiting For’
|
|
Sally Hansen Color Foil – 'Liquid
Gold'
|
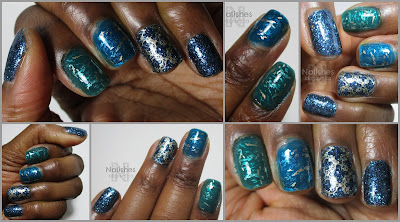
However, I wanted to do something a little different for the pond manicure, so I came up with the idea of irregular gold flakes visible through the layers of blue and teal jelly polish, as if they were small pieces of gold at the bottom of a river bed, being brought to the surface while panning for gold. I used this concept for my index and middle fingers, using Essie jelly polishes 'Pen & Inky', and 'Ooh La Lolly', and then painted my other nails using 'Water You Waiting For', a gorgeous teal glitter from the China Glaze Cirque du Soleil 'Worlds Away' collection from Winter 2012. This polish was included in my 'Project Polish' list of polishes that I'm trying to use up soon(ish 😉).
I finished the manicure by stamping a gold arabesque pattern over my ring finger as an accent, and then topping everything off with a quick dry, glossy top coat. The arabesque pattern was from the ÜberChic Beauty - 'Moroccan Delight' plate, while the gold flakes in the 'Pond' portion of the manicure were stamped from ÜberChic Beauty's Über Mini 'Texture-licious' plate 2. Below I have a collage featuring a few additional shots of the manicure.
I really like how this manicure turned out! It actually kind of reminds me of the 'Teal and Gold Crackle Sandwich' manicure I did years ago on this blog as part of my '2015 Crackle Polish Challenge'.
I really love how the featured 'pond' portion of the mani turned out, but interestingly, this manicure has really revived my appreciation for the China Glaze glitter 'Water You Waiting For'. I've always loved the stunning, deep teal shade, but wearing it now, I see how well it works with my skin tone, and just how genuinely sparkly and beautiful it is!
Labels:
Basic Stamping,
blue,
China Glaze,
Essie,
glitter,
Jelly Polish,
Project Polish,
Sally Hansen,
ÜberChic Beauty
Sunday, August 4, 2019
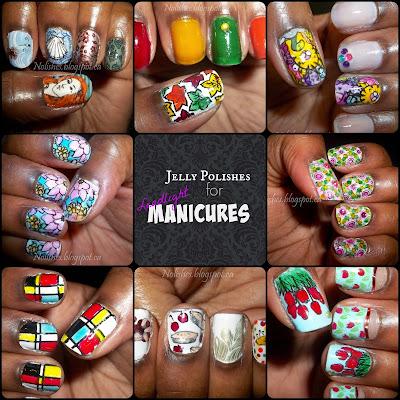
Jelly Polishes for Leadlight Manicures
I started writing this post on January 29 2015, and it has been in my Draft folder ever since! I wanted to go through my entire collection and compile a large list of my jelly polishes and take pictures so that I could catalogue them for easy retrieval when needed. I realize now that I'm probably never going to get around to doing that! With my previous post on the Essie 'Glazed Days' Collection, I thought I would finally just publish this post, even though it is not a comprehensive list, as the information may still be useful, since some of these polishes are still available.
Today's post is all about polishes that can be used for Leadlight manicures. 'Leadlighting' is a nail stamping technique where coloured, translucent polishes (jellies, and tints) are painted over stamped outlines, usually in a dark colour, over a white or light coloured base. It allows for the creation of multi-coloured images on the nail. The pros of leadlighting are that compared to the decal method, the other popular method of creating multicoloured stamped images, it is much quicker, because the colours are applied directly to the nail, as opposed to a stamper.
I first learned this technique from a you-tube video posted by Messy Mansion in spring 2014. Back then, I only had a few jelly polishes in my collection. I immediately started researching and store-hunting for a variety of jellies that I could use for this technique. Today, I want to share some of what I have found.
1) Create your own
A lot of people have shared that you can create jelly polishes by adding clear nail polish to other polishes already in your collection. They can be mixed as required by combining a few drops of each on a piece of saran wrap, plastic, or whatever un-needed flat surface you have handy. This way you do not have to mix up an entire bottle of jelly polish, if you only need a little bit for some nail art. I have never personally tried this technique, but I have seen it successfully done in manicure tutorials on-line.
2) OPI Sheer tints
This collection came out in spring or summer 2014, just as the leadlight technique was really catching on in the nail art community. They are lightly pigmented, so although they work beautifully for the technique, the colours you get tend to be pastel shades. You might be able to build the colour intensity with multiple coats, but, you may end up with a lumpy surface. The colours are 'I'm Never Aberrassed', 'Be Magentale with Me', 'Don't Violet Me Down', and 'I Can Teal You Like Me'.
3) NFU OH Jelly Syrup Series
I'm not sure exactly when, but a quick internet search leads me to believe that it was sometime in either late 2010 or early 2011, that Nfu Oh came out with an entire collection of jelly polishes, containing a whopping 45 shades of jelly awesomeness! From my experience with the polishes from this series that I have in my collection, these polishes are very pigmented, and are fantastic for use in the leadlight technique.
4) China Glaze Summer 2013 Sunsational Collection
This collection included 6 jelly polishes: 'You Drive Me Coconuts', 'Heat Index', 'Shell-O', 'Keepin' it Teal', 'Isle See You Later', and 'Are You Jelly?'. These are gorgeous, bright, fun shades. They are not perfectly translucent, as they have a translucent white base, but I've found that they still work well for leadlight manicures.
5) OPI Color Paints collection (Summer 2015)
I did a comprehensive review of these polishes in an earlier post. Click here to view it.
6) Essie Silk Watercolor collection (Summer 2015)
This was a collection of 8 jelly polishes and a white base. The colours were:
'Highest Bidder' - Crimson
'Blush Stroke' - Scarlet
'Love Sheen' - Rose
'Art New-Beau' - Orange
'Muse, Myself' - Citrus
'Pen & Inky' - Teal
'Point of Blue' - Blue
'No Shrinking Violet' - Violet
'White Page' - White base polish
7) Some examples of random Jelly Polishes sorted by colour:
Red: Essie Jelly Apple Burgundy: China Glaze 'Ravishing, Dahling'
Orange: OPI Big Hair...Big Nails, OPI 'Y'all Come Back Ya Hear?'
Yellow: Deborah Lippmann 'Yellow Brick Road'
Turquoise: Zoya 'Frida'
Blue: China Glaze 'Ride the Waves', and 'Splish Splash'
Purple: Zoya 'Katherine', and China Glaze 'Creative Fantasy'
Pink: Misa 'Bed of Roses'
White: OPI 'Don't Touch My Tutu', and 'Funny Bunny'
8) Essie Glazed Days Collection, Summer 2019
I did a comprehensive review of these polishes in an earlier post. Click here to view it.
Labels:
China Glaze,
Deborah Lippmann,
Essie,
Jelly Polish,
Leadlight Technique,
Misa,
Nfu Oh,
OPI,
Zoya
Tuesday, May 7, 2019
China Glaze 'Cranberry Splash'
Today's manicure features China Glaze's 'Cranberry Splash':
'Cranberry Splash' originally came out in China Glaze's Holiday 2012 'Holiday Joy' Collection. It's a gorgeous metallic red polish. I would have to say that metallic red polishes are my favourite way to wear red on my nails. The look is so polished, and elegant, but still very chic and cool.
Sunday, December 16, 2018
Ice Crystal Mani using Nicole by OPI 'Rich in Spirit' and China Glaze 'Snow Globe'
Today I have another 'Project Polish' manicure to share. This mani uses 2 of my 'Project Polish' polishes: Nicole by OPI 'Rich in Spirit' and China Glaze 'Snow Globe'. I'm calling it the 'Ice Crystal' Mani:
Polishes
Used
|
Stamping
Plate Used
|
Nicole
by OPI 'Rich in Spirit'
|
Bundle
Monster Winter Kingdom -
|
China
Glaze 'Snow Globe'
|
Plate
BM-XL485
|
Konad
white stamping polish (not shown)
|
 |
| Ice Crystal Mani - Thumb Close-up |
 |
| Ice Crystal Mani - Ring, Middle, and Index fingers |
Labels:
Basic Stamping,
blue,
Bundle Monster,
China Glaze,
glitter,
Konad,
Nail Stamping,
Nicole by OPI,
Project Polish,
Seasonal
Sunday, December 9, 2018
Reveal Mani with Multi-Coloured Shatter Base
Today I have what I like to call a 'Reveal Mani' to share. I use the term reveal mani, to describe a manicure where I start with a base decorated with an abstract print or pattern, and then stamp a negative space image over it to reveal the patterned base as abstract patterned shapes.
Below, I have a cool close-up shot of the Holographic glitter polish that I used, 'Afterhours'. The lighting and angles that I used for the manicure photos above didn't capture the beauty of the polish, so I wanted to share a photo that did.
For this manicure, I started with a white base and then used 3 different shatter polishes in turquoise, gold, and blue, to create a multi-coloured abstract look. Then, to add a bit of sparkle, I added a holographic glitter polish to my ring finger. Below I have a picture of the base before the stamping.
I stamped over this base using black stamping polish and 2 different negative space images form Messy Mansion's Lily Anna Plate LA07. Overall, I really like how the circle and square pattern on my index and middle fingers turned out, but I had a little bit of trouble with the star image. Images with lots of negative space can be tricky to pick up since there's so much more area to fill with polish, which increases the chances of not picking all of it up cleanly. I wasn't in the mood to try multiple times to ensure perfect image transfers, so I just left well enough alone. For the most part, the star images look pretty good, but they are not as clean and crisp as I would like.
 |
| Polishes Used |
|
Polishes
Used
|
|
China
Glaze 'White on White'
|
|
OPI
'Turquoise Shatter'
|
|
Nicolie
by OPI 'Gold Texture'
|
|
OPI
'Blue Shatter'
|
|
Maniology
'Straight Up Black' Stamping Polish
|
|
Urban
Outfitters 'Afterhours'
|
|
Plate
Used: Lily Anna Plate LA07
|
 |
| Close shot of 'Afterhours' |
Labels:
Basic Stamping,
Bundle Monster/Maniology,
China Glaze,
Holographic,
Lily Anna,
multi-coloured,
Nicole by OPI,
OPI
Monday, December 3, 2018
Christmas Glitter Mani
Today's manicure represents one of the few times that I've recreated a manicure in the last few years. I've actually been planning to recreate this mani for almost one year now. I'll get in to that later, but first, here is the picture:
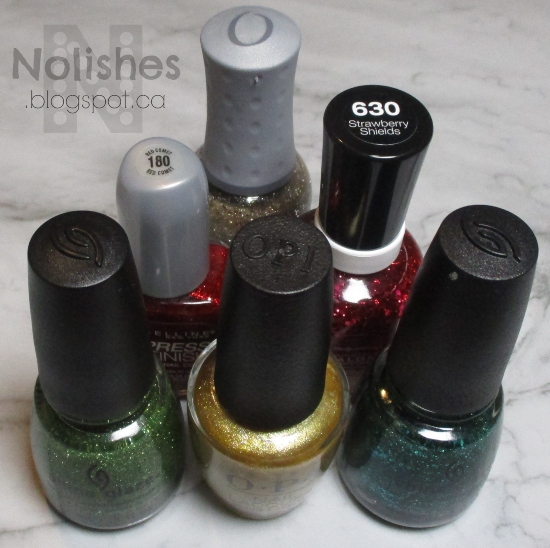
|
Polishes
Used
|
|
|
Sally
Hansen Complete Salon Manicure 'Strawberry Shields'
|
China
Glaze 'Pine-ing For Glitter'
|
|
Orly
'Halo'
|
Orly
'Luxe'
|
|
China
Glaze 'This is Tree-mendous'
|
Maybelline
Express Finish 'Red Comet'
|
I wore this look to my office holiday gathering last year, and received lots of compliments. At the time, I wasn't updating my blog and as a result, I didn't have all of my equipment ready to even take a picture that could be used for the blog at a later time. I hoped to get everything set up again so that I could post the mani, but of course, during the busy holiday season I didn't get a chance to do that.
So, I decided that I would try to recreate the mani at a later time and post it then. Originally I was hoping for right after Christmas, but then I was busy with all of the Boxing Week sales. By the time things settled down, it was too late to do a Christmas manicure that season! I decided to put the polishes aside, and wait until next Christmas to recreate and post the mani. So finally, after a year of anticipation - I've completed my mission! LOL!
Even though it is essentially a basic glitter mani, I really like how it turned out. It's fun and funky because of the colourful glitters, yet there's a classic charm to it as well due to the traditional Christmas colours.
As for the technical aspects of the mani, I used 3 coats of the dark green glitter 'Pine-ing For Glitter' on my pointer finger, one coat of orly 'Luxe' as a base and one coat of Orly 'Halo' on my middle finger, two coats of Maybelline 'Red Comet' as a base, and once coat of Sally Hansen -Strawberry Shields' on my thumb and ring fingers, and two coats of China Glaze 'This is Tree-mendous' on my pinky. I used a peel off base coat to aid with removal, and a glossy quick-dry top coat on top to smooth and shine the glitters.
Now that I've completed the mani, I can finally put the polishes away... but now that I've blogged about this and have the details here, I'm inspired to maybe try to make this my Christmas tradition mani going forward! We'll see how that works out, and how long the polishes last, but that definitely sounds like a fun tradition to start, especially after the quirky story of why I've worn the same manicure two Christmas seasons in a row!
Labels:
China Glaze,
Do-over,
glitter,
Maybelline,
multi-coloured,
Occasion,
Orly,
Sally Hansen
Friday, November 16, 2018
Spotlight on 'Project Polish' Polishes: China Glaze 'Liquid Crystal'
I've decided to include posts featuring each of the polishes included in my 'Project Polish'. Since I like to actually wear any swatches that I do, I will be doing this 'Spotlight' series over a period of time. Today, I wanted to start with the polish I used for my last 'Project Polish' Manicure, China Glaze 'Liquid Crystal'.
This polish is from the China Glaze Prismatic Chroma Glitters Collection from Spring 2012. There were 6 polishes in the collection, all with the same concept but in varying shades.
It really looks a lot more like a textured metallic polish with glitter, than a glitter polish - but that could be because my 6 year old bottle has started thickening. Either way, I like the look. I used a peel-off base coat, and some quick dry high-gloss top coat on the manicure above. I've also included some additional shots below.
Labels:
China Glaze,
glitter,
Project Polish,
Spotlight Series,
swatches
Thursday, November 15, 2018
Light Blue Glitter Mani - Using China Glaze Liquid Crystal and Quo by Orly 'Liquid Crystal'
There's not really much to say about today's simple glitter manicure with subtle stamped stripes...
I had to loosen 'Night Sky' up a bit with a little polish thinner, (and a lot of shaking!) due to how how thick it was originally. The fill line of the bottle was originally half way down the bottle, though I don't recall ever using the polish! So apparently, half of the solvents evaporated out over the years, and left a thick, gloopy, non spreadable polish. I was able to salvage the polish, and it now works well as a regular nail color. Now that it is fixed, I hope to use it as a base for my next manicure.
I wanted to try to use 2 of my 'Project Polish' polishes by stamping one over the other, but the darker colour, 'Night Sky' did not stamp very well. I initially assumed that since it had evaporated and thickened up over the years, it would work for stamping. Unfortunately, it doesn't. I realized during the process that 'Night Sky' seems to be a dark translucent base, with lots of shimmer particles floating in it. So when trying to stamp with it, the stamper would only pick up a thin line of dark purple jelly polish, and hardly any shimmer particles.
So instead of going with a bold negative space image (which would not work due to the consistency of the polish), I stamped subtle lines over the nail for a tiny bit of visual interest.
 |
| Polishes Used |
|
Polishes
Used
|
Stamping
Plate Used
|
|
China
Glaze 'Liquid Crystal'
|
Winstonia
Plate W205
|
|
Quo
by Orly 'Night Sky'
|
|
I had to loosen 'Night Sky' up a bit with a little polish thinner, (and a lot of shaking!) due to how how thick it was originally. The fill line of the bottle was originally half way down the bottle, though I don't recall ever using the polish! So apparently, half of the solvents evaporated out over the years, and left a thick, gloopy, non spreadable polish. I was able to salvage the polish, and it now works well as a regular nail color. Now that it is fixed, I hope to use it as a base for my next manicure.
Labels:
Basic Stamping,
China Glaze,
Project Polish,
Quo by Orly,
Winstonia
Wednesday, November 14, 2018
Project Polish
In my Blue and Gold Manicure using Quo by Orly 'Celestial Star' post, I mentioned that I wanted to do a 'Project Polish': A deliberate attempt to use up particular nail polishes over a period time by using them frequently and consistently until they are gone.
In that post I explained that when I was going through my collection, I noticed some glitter and special effect polishes that seemed to be drying up in the bottles. I decided that I wanted to try to use them up as soon as possible, in order to avoid them becoming unusable before I had even gotten a chance to get my money's worth.
I finally got around to photographing and listing all of the polishes that I wanted to include in the project. First here are the pictures:
Now, I've never done a 'Project Polish' before, so this will definitely be a new and interesting experience for me. Since I love nail stamping, my approach will be to use one of these 16 polishes as the base for a nail stamping design for each of my manicures. Three of the polishes are technically toppers ('Honey-Dew You Love Me?', 'Flashing Lights', and 'Snow Globe'), so there's also an option of doubling up for each manicure: using one of the polishes as a base, and then one of the toppers to complete the look. The best thing about this approach is that I will still be able to use all of my other polishes along with these ones, so I'm not limited to just 16 polishes.
I think the most challenging polish to work with will be China Glaze's 'I Love Your Guts', a frosty semi-matte red textured polish with black micro-glitters from their 2014 Halloween collection 'Apocalypse of Colour'. I previously used it for my 'Halloween Themed Test Mani', and my 'Red and Black Tree Mani'. Since the polish already makes quite a statement on it's own, my first instinct is to use it for Halloween-type designs, but I'm going to have to try to rethink that now that Halloween is over.
I've decided that I don't want to come up with an arbitrary deadline for using up the polishes. I can commit to trying to use them for every manicure, and to trying to do my nails more frequently, as needed. I don't want to commit to changing my nail polish every day (as many other 'Project Polishers' suggest), as I typically spend a lot of time planning and executing my nail art, and I like being able to wear each manicure for a few days, in order to decrease the total amount of time I spend doing my nails on a weekly basis. Also, I think forcing myself to do my nails everyday would eventually feel like a chore.
Now that I am in a nail polish collection culling frame of mind, I'm starting to notice some other polishes that I would like to add to the project. I may make this project on-going, and as certain polishes are used up, I may add others to replace them. We'll see how this goes...
In that post I explained that when I was going through my collection, I noticed some glitter and special effect polishes that seemed to be drying up in the bottles. I decided that I wanted to try to use them up as soon as possible, in order to avoid them becoming unusable before I had even gotten a chance to get my money's worth.
I finally got around to photographing and listing all of the polishes that I wanted to include in the project. First here are the pictures:
I'm starting to realize that creme polishes seem to hold up better over time, as all of these polishes that I found that seem to be evaporating away, are glitter and shimmer heavy polishes. I'm glad that they still look relatively good. Some need to be thinned out with lacquer thinner, and some of the glitters may actually even perform better as the base has shrunk away - hopefully this should lead to denser glitter coverage during application.
In addition to the 'Blue and Gold' manicure that I discussed earlier, I have already managed to do two other manicures using some of these polishes. I used Gone Wishin' in my 'Purple and Silver Negative Space Stamping Glitter Mani', and I used 'Scandal, Secrets & Sparkle' for my 'Remembrance Day Manicure - 2018'.
Here's a list of the names of the polishes above that I want to use up as part of the project (the grid of names is in the same order as the pictures in the collage):
China
Glaze
I
love Your Guts
|
Kleancolor
Starry
Night
|
OPI
Glow
Up Already!
|
Nicole
by OPI
Nicole... Spotted!
|
Nicole
by OPI
Honey-Dew
You Love Me?
|
Quo
by Orly
Turquoise
Moonlight
|
China
Glaze
Water
You Waiting For?
|
Quo
by Orly
Celestial
Star
|
Nicole
by OPI
Rich
in Spirit
|
Claire's
Cosmetics
Flashing
Lights
|
China
Glaze
Liquid
Crystal
|
Nicole
by OPI
Gone
Wishin'
|
China
Glaze
All
Wrapped Up
|
Quo
by Orly
Night
Sky
|
China
Glaze
Snow
Globe
|
Nicole
by OPI
Scandals,
Secrets & Sparkle
|
Labels:
China Glaze,
Claire's Cosmetics,
KleanColor,
Nicole by OPI,
OPI,
Project Polish,
Quo by Orly
Subscribe to:
Posts (Atom)
