Showing posts with label review. Show all posts

Tuesday, September 3, 2019

KB Shimmer 'Funky Cold Patina'

KB Shimmer 'Funky Cold Patina': A turquoise crelly polish with copper, shades of blue, and purple hexagonal metallic glitters of various sizes.

Today I have a swatch and brief review to share of a fun polish from the indie brand KB Shimmer. The polish is called 'Funky Cold Patina', and it is a turquoise crelly polish with copper, shades of blue, and purple hexagonal metallic glitters of various sizes. It was initially released in the KB Shimmer Spring 2015 collection.

First of all - I love the name! As a punny play on the title of the 1980's Tone Loc song 'Funky Cold Medina', in my head, I can't help but say the name of the polish in the same cadence Tone Loc uses when he says the verse in the song! 

Second, I love the concept. The polish is clearly inspired by the patina formed by copper oxidation:  verdigris. I've done a couple verdigris manicures in the past, and my next post will be another version of a verdigris manicure, featuring and inspired by this polish.

As for the polish itself, it applies beautifully, has a great formula, and is absolutely gorgeous. I also really like how this shade of turquoise looks on me. In addition, I've noticed that the polish has held up really well over the few years that I had it, with no bleeding of the glitter colour into the base, and the polish consistency remaining perfect for smooth application. To me, this appears to be a great testament to the quality of the materials being used by the brand!

All in all, I'm really happy with this polish, and I can't wait to play with it in the next look that I create... stay tuned!
Label shot

Wednesday, August 21, 2019

'A Little Guilt Under the Kilt' - OPI Scotland Collection for Fall 2019

OPI Scotland Collection, Fall 2019 - 'A Little Guilt Under the Kilt'. A deep metallic red nail polish.

Today I have a swatch of a new polish I recently purchased. It's from OPI's 'Scotland' collection for fall 2019. The shade is called 'A Little Guilt Under the Kilt' and it is a gorgeous metallic red with slightly warm, rusty undertones. This shade was the standout for me from this fall's OPI collection, mainly because lately I've developed a penchant for red polishes, and metallic red is my favourite way to wear red nails. It's also a truly stunning shade of blood red, that is perfect for fall!

This polish has a wonderful formula. It was easy to apply, self-leveling, and dried reasonably fast. It also applied smoothly, with no brush-strokes. However, I noticed that similar to many other metallic polishes, since the formula does apply so smoothly, it does not cover the the slight ridges and imperfections in my nail as much as a creme polish would. This is pretty insignificant in most real life situations, but becomes just barely noticeable when viewing your nails in close-up photos! It's also pretty easy to fix by remembering to lightly buff my nails before applying metallic polishes. Truthfully though, I'm generally not really concerned about it, so I usually don't take the time to buff before applying metallics.

Below, I've included a comparison photo in which I've selected 12 metallic red polishes from my collection (including 'A Little Guilt Under the Kilt') and placed swatches of them in a line-up (you should be able to click on the photo to enlarge it). I don't have any exact matches for 'A Little Guilt Under the Kilt' in my collection, as it is a lot lighter than most of my warm metallic reds, but putting these subtle variations in undertones aside, as you can see, I do have some polishes that are somewhat similar in hue.

OPI 'A Little Guilt Under the Kilt' - Scotland Collection, Fall 2019 - Comparison with other deep metallic red polishes: 1) China Glaze - Mommy Kissing Santa, 2) OPI - I'm Not Really a Waitress, 3) Zoya - Isla, 4) China Glaze - Long Kiss, 5) Cover Girl - Forever Festive, 6) Orly – Torrid, 7) A England - Perceval, 8) OPI - An Affair in Red Square, 9) OPI - A Little Guilt Under the Kilt, 10) China Glaze  - Cranberry Splash, 11) China Glaze  - Just Be-Claws, 12) Sinful Colors - Sugar Sugar

The names of the polishes in the comparison line-up photo above are:

1) China Glaze - Mommy Kissing Santa
2) OPI - I'm Not Really a Waitress
3) Zoya - Isla
4) China Glaze - Long Kiss
5) Cover Girl - Forever Festive
6) Orly – Torrid
7) A England - Perceval
8) OPI - An Affair in Red Square
9) OPI - A Little Guilt Under the Kilt
10) China Glaze  - Cranberry Splash
11) China Glaze  - Just Be-Claws
12) Sinful Colors - Sugar Sugar

All in all, I really love this nail polish, and I'm happy to have it in my collection!

Thursday, August 15, 2019

Essie 'Silk Watercolors' and 'Glazed Days' Collections Comparison

Essie 'Silk Watercolor' collection: Essie ‘Highest Bidder’, Essie ‘Point of Blue’, Essie ‘Love Sheen’, Essie ‘No Shrinking Violet’, Essie ‘Blush Stroke’, Essie ‘White Page’, Essie ‘Art New-Beau’, Essie ‘Muse, Myself', Essie ‘Pen & Inky’.  Essie 'Glazed Days' collection: 'Glazed Days' (red), 'Confection Affection' (orange), 'Sweet Supply' (yellow), 'But First, Candy' (green), 'Ooh La Lolly' (blue), and 'Sweet not Sour' (purple)

For today's post, I wanted to do a quick comparison between the two iterations of Essie's Jelly Polish collections: Essie's 'Silk Watercolors' collection from 2015, and Essie's 'Glazed Days' collection from 2019. To see reviews on the collections separately, you can click the links on the collection names in the previous sentence.

Overall, I really like both collections, and think that they actually complement eachother really well. Because of the different formulas, and hues, I'm happy to have both sets in my collection.  

I noticed that the silk watercolor collection has a slightly thinner, and slightly less vibrant formula, which lends itself a bit better to blending and layering applications. For example, blending a watercolour-type abstract pattern on the nails, or layering designs between coats of the jelly polish, as is done with 'pond' manicures.

By contrast, the 'Glazed Days' Collection seems to be more vibrant and the formula is a bit thicker, which lends itself a bit better to nail art applications where more full coverage is important, like 'leadlighting'.  None of the shades are exact dupes of eachother, so combined, the 2 collections provide a total of 14 rainbow shades!

Below I have samples of nail art that use all of the polishes in both collections. On the 'Glazed Days' portion of the collage, the polishes are layered over a silver background (Sally Hansen's 'Silver Sweep').

Essie 'Silk Watercolor' collection: Essie ‘Highest Bidder’, Essie ‘Point of Blue’, Essie ‘Love Sheen’, Essie ‘No Shrinking Violet’, Essie ‘Blush Stroke’, Essie ‘White Page’, Essie ‘Art New-Beau’, Essie ‘Muse, Myself', Essie ‘Pen & Inky’.  Essie 'Glazed Days' collection: 'Glazed Days' (red), 'Confection Affection' (orange), 'Sweet Supply' (yellow), 'But First, Candy' (green), 'Ooh La Lolly' (blue), and 'Sweet not Sour' (purple)

Sunday, August 4, 2019

Essie's 'Glazed Days' Collection

A shot of all 6 translucent jelly polishes in the 'Glazed Days' collection by Essie. Essie 'Glazed Days' collection: 'Glazed Days' (red), 'Confection Affection' (orange), 'Sweet Supply' (yellow), 'But First, Candy' (green), 'Ooh La Lolly' (blue), and 'Sweet not Sour' (purple)
The Essie 'Glazed Days' Collection
I recently purchased the Essie 'Glazed Days' translucent jelly polish collection that was released earlier this year. It was a little difficult to get a hold of this collection here in Canada, as I couldn't find it in any stores, and only found it in one place on line. However now, after getting a chance to use the polishes in some nail art, I feel that it was definitely worth the trouble finding these polishes!

Jelly polishes give a "squishy" effect (ie looks kind of like flavoured gelatin or jam) when worn alone on the nail. However, I think they truly shine when it comes to nail art. There are so many wonderful  jelly polish nail art applications , like the lead light technique, pond manicures, jelly sandwiches (layering over glitter), various layering techniques (for example, layering over interesting bases like a crackle top coat, or a holographic polish), watercolour blend techniques, and more.

There are 6 polishes in the Essie 'Glazed Days' collection: 'Glazed Days' (red), 'Confection Affection' (orange), 'Sweet Supply' (yellow), 'But First, Candy' (green), 'Ooh La Lolly' (blue), and 'Sweet not Sour' (purple). These jelly polishes are very pigmented, producing very saturated swatches of colour when applied to the nail - even after only one coat! That is fantastic for nail art, as a lot of jelly polish nail art applications are layered, and not needing multiple coats for adequate color saturation helps cut down on overall application and drying time.

Below, I have a picture of some nail art done on one of my fingers which features all 6 colours from the collection.

Essie 'Glazed Days' collection: 'Glazed Days' (red), 'Confection Affection' (orange), 'Sweet Supply' (yellow), 'But First, Candy' (green), 'Ooh La Lolly' (blue), and 'Sweet not Sour' (purple)
Nail Art using the Essie 'Glazed Days' Collection
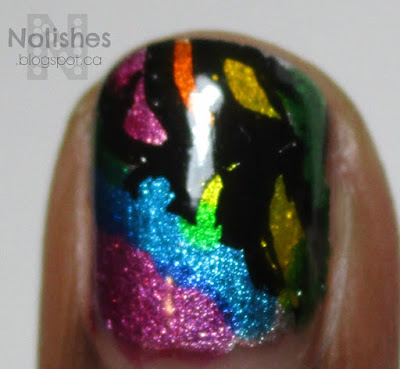
I used the lead-lighting technique in this example. I started with a silver base coat, stamped the black design on the upper portion of the nail, and then coloured in the silver sections using the jelly polishes and a dotting tool.  

One thing I noticed in this application, is that the red and purple polishes 'Glazed Days', and 'Sweet not Sour' (respectively), are tonally quite similar to eachother. In the example above, I used 'Glazed Days' on the upper portion of the nail, in the section to the left of the orange section. 'Sweet not Sour' is on the very bottom of the nail, just below the blue section.  You can see how there definitely is a difference on how they look over the silver polish, but nevertheless, they do appear quite similar.  From the swatches that I've seen on line, the differences between the two polishes seem to stand out more when applied over white, or when they are worn alone.

Overall, I'm thrilled with this collection. I love jelly polishes, and these ones perform well, look beautiful, and are very pigmented. I can't wait to play around with them some more!

Wednesday, January 2, 2019

Essie 'Nama-Stay the Night'

Today I did a simple manicure using a new polish that I bought during a boxing day sale. This is Essie's 'Nama-Stay the Night' from Essie's Resort 2016 'Going Guru' Collection.


I can't even to begin to tell you how much I loved this polish! The colour is so intense and gorgeous, and it applied beautifully with a wonderful formula. This stunning shade of blue took my breath away - I couldn't stop staring at my nails as I was wearing it. 

I actually acquired all four of the polishes from the 'Going Guru' collection, along with a lot of other Essie polishes, during the boxing day sale I mentioned, as the polishes were heavily discounted. This was one of the standouts from the haul that I wanted to try right away!

I have a lot of complete older collections in my own nail polish collection, so I've been thinking about starting a series of 'Flashback' reviews of older collections... maybe a 'Flashback Friday'? I think it could still be helpful to review some of these older collections because even though a lot of them were limited time only, a lot of the polishes can still be found on-line and some beauty supply stores for a few years to come, and then in destashes and blog sales afterwards.  Cataloguing these older collections would also help me keep track of what's in my personal collection. Hopefully I can start doing this later this year.

Sunday, October 7, 2018

Navy Blue and Gold Mani using OPI 'Holidazed Over You'

This manicure was created using various images from Lina Nail Art Supplies Stamping Plate 'You're a Damasque! - 01'.  I really like how the look turned out:

Images from Lina Nail Art Supplies 'You're a Damasque - 01' stamped in gold over navy blue jelly base, OPI 'Holidazed Over You'

I'm starting to realize that I don't really enjoy wearing dark polishes on their own these days. However, I really love how dramatic they look when paired with silver or gold metallic stamped images. The dark base provides the perfect high contrast background for the beautiful metallic images.

I did something similar with my 'Burgundy and Gold Mani', as well as my 'Navy and Silver Dot Design Mani'.

Here are some more images of the finished look:

various shots of blue and gold manicure

For this manicure, I got to use yet another untried polish - OPI 'Holidazed Over You'. 'Holidazed...' is a very dark navy blue jelly from the OPI 2017 Holiday collection: 'Love OPI, XOXO'. The polish is absolutely stunning. I love the finish! The highly pigmented navy blue hue combined with the transparent jelly formula give the polish so much dimension. It looks super squishy and super shiny - like polished onyx, or a pool of ink.  

Orly 'Luxe', Sally Hansen Color Foil 'Liquid Gold', and OPI 'Holidazed Over You'
Polishes Used

Polishes Used
Orly 'Luxe'
Sally Hansen Color Foil 'Liquid Gold'
OPI 'Holidazed Over You'

Friday, August 14, 2015

Essie Summer Neons Collection 2015

Today I have a quick review on Essie's Neon collection for Summer 2015. I purchased these polishes a few weeks ago, but now that I have gotten a chance to use all of them, I wanted to share my thoughts on the entire collection.

‘Vibrant Vibes’, ‘Melody Maker’, ‘Groove is in the Heart’, ‘Make Some Noise’, ‘Coacha’Bella’, and ‘All Access Pass’

Essie Neon Collection 2015
‘Vibrant Vibes’
‘Melody Maker’
‘Groove is in the Heart’
‘Make Some Noise’
‘Coacha’Bella’
‘All Access Pass’

I love wearing bright, vivid colours on my nails so these polishes are right up my alley! Now, most of these polishes aren't traditionally what I would think of when I hear the word neon, but I do see how these colours fit into a broader interpretation of neon colours. I would say that the light green polish 'Vibrant Vibes', and the light pink polish 'Groove is in the Heart', are pastel neons, while the remaining four shades are medium-dark toned neons.

Friday, July 31, 2015

OPI 'Centennial Celebration'

My last post featured 'Visions of Georgia Green', one of the two new additions to OPI's Coca Cola themed collection of polishes. Today's post is on 'Centennial Celebration', the other new addition to the line up.

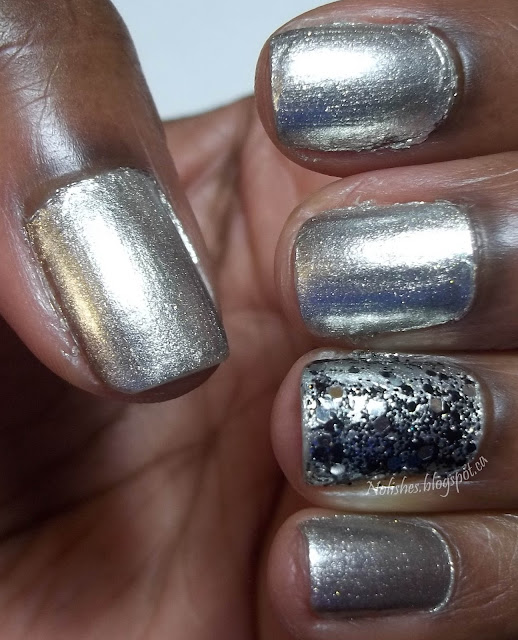
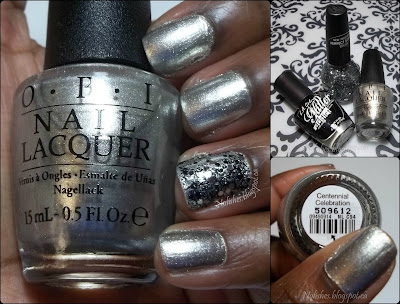
Basic manicure featuring OPI's 'Centennial Celebration', and an accent nail (ring finger) with black and silver glitter.

Both polishes were made to celebrate the 100th anniversary of the Coca Cola bottle. 'Visions of Georgia Green' was a take on the green glass soft drink bottle, while this one appears to be a take on the classic clear, colourless bottle.

L.A. Girl Glitter Addict ‘Uninhibited’, Nicole by OPI ‘Make U Smile’, and OPI ‘Centennial Celebration’

Polishes Used
L.A. Girl Glitter Addict ‘Uninhibited’
Nicole by OPI ‘Make U Smile’
OPI ‘Centennial Celebration’

At first glance, I was going to pass on buying 'Centennial Celebration' because I already have a lot of silver polishes. However, I purchased 'Visions of Georgia Green', and I loved it so much that I decided to go back and give this polish a try as well. The thing I realized with 'Visions...' is that it wasn't just the colour of the polish that made it special, it was the texture and consistency as well.

These polishes are glass-themed, so they attempt to characterize certain elements of glass such as its translucence, its reflective nature, and its sparkle. Accordingly, the polishes are semi-translucent, metallic, and contain micro-glitter particles. 

In addition to the cool textural properties of 'Centennial Celebration', this particular shade of silver is a little different as well. There is a slight gold tint to this silver which adds a little warmth, and also makes it seem more luxurious.

All in all, I really like this polish, and I'm glad that I decided to give it a try!

Collage featuring extra shots of the manicure, and polishes

Monday, June 1, 2015

OPI Color Paints Leadlight Mani

Today I have a nail stamping manicure created using the 'leadlight technique' to share with you. For this mani I used the new OPI Color Paints Collection that has recently been released for summer 2015:

nail stamping manicure created using the 'leadlight technique', and OPI Color Paints: OPI Color Paints ‘Pen and Pink’, OPI Color Paints ‘Magenta Muse’, OPI Color Paints ‘Chromatic Orange’, OPI Color Paints ‘Primarily Yellow’, OPI Color Paints ‘Landscape Artist’, OPI Color Paints ‘Turquoise Aesthetic’, OPI Color Paints ‘Indigo Motif’, OPI Color Paints ‘Purple Perspective’, and OPI Color Paints ‘Silver Canvas’

It's been a while since I've done a manicure like this. I usually try to avoid doing full-hand leadlight manicures, since they tend to be very time-consuming. However, I was really excited to try out the entire line of OPI 'Color Paints', so I made an exception!

I first found out about the 'Color Paints' collection sometime in April, and learned that it was supposed to launch in early May. I was so eager to try these polishes, that I actually began hunting for them in different beauty supply stores near the end of April (just in case they were put out early!). I had no such luck. In fact, compared to other OPI collections, these polishes were relatively hard for me to get a hold of. A lot of the places that I usually go to buy OPI polishes don't seem to have them (...yet?). Perhaps that will change as we get a little further into the season.

Around the first or second week of May, I finally saw them on display in one of my favourite beauty supply stores. At the time, they only had a small display featuring only one each of the full sized colours, and 4 bottles of 'Silver Canvas'. Unfortunately, the one bottle of 'Magenta Muse' was sold out, so I could only purchase the other colours, and continue the hunt for the missing bottle. Funnily enough, that same colour was also sold out at the only other place I was able to find these at the time - and their display originally contained 3 of each colour! It took about another 2 weeks for me to finally be able to acquire that last polish - I ended up getting it when the first store I went to eventually got the larger '3 of each' display.

OPI Color Paints ‘Pen and Pink’, OPI Color Paints ‘Magenta Muse’, OPI Color Paints ‘Chromatic Orange’, OPI Color Paints ‘Primarily Yellow’, OPI Color Paints ‘Landscape Artist’, OPI Color Paints ‘Turquoise Aesthetic’, OPI Color Paints ‘Indigo Motif’, OPI Color Paints ‘Purple Perspective’, and OPI Color Paints ‘Silver Canvas’. Below: Sally Hansen Xtreme Wear 'Celeb City', Konad Special Polish in Black, and OPI 'In True Stefani Fashion'

Polishes Used
Polishes Used (Cont’d)
OPI Color Paints ‘Pen and Pink’
Sally Hansen Xtreme Wear ‘Celeb City’
OPI Color Paints ‘Magenta Muse’
Konad Special Polish in Black
OPI Color Paints ‘Chromatic Orange’
OPI ‘In True Stefani Fashion’
OPI Color Paints ‘Primarily Yellow’

OPI Color Paints ‘Landscape Artist’

OPI Color Paints ‘Turquoise Aesthetic’
Plate Used
OPI Color Paints ‘Indigo Motif’
Messy Mansion Leadlight Lacquer Plate A06
OPI Color Paints ‘Purple Perspective’

OPI Color Paints ‘Silver Canvas’


As for my first impressions, I am quite pleased with the collection as a whole. The polishes worked really well for leadlighting, and that was the main use I had in mind when getting them. Also, I really like the 'foil wrapper' look that you get when you layer these translucent colours over a silver base. Normally I would use a white base for leadlighting, so this is a new idea for me, and I love it! My favourite colour in the collection is 'Turquoise Aesthetic' - it's a gorgeous shade, and it looks absolutely amazing layered over the silver base.

The only colour that I have a minor complaint about is 'Purple Perspective'. I find that it is almost a little too highly pigmented so you have to be really careful to not use too thick of a coat or else the purple doesn't 'glow' as much over the silver base, and reads almost as black. 'Indigo Motif' was the second trickiest one to work with due to the intensity of the pigment, but even with a slightly thick application, it still reads as blue, although it won't 'glow' as much.

Collage showing nail stamping manicure created using the 'leadlight technique', and OPI Color Paints: OPI Color Paints ‘Pen and Pink’, OPI Color Paints ‘Magenta Muse’, OPI Color Paints ‘Chromatic Orange’, OPI Color Paints ‘Primarily Yellow’, OPI Color Paints ‘Landscape Artist’, OPI Color Paints ‘Turquoise Aesthetic’, OPI Color Paints ‘Indigo Motif’, OPI Color Paints ‘Purple Perspective’, and OPI Color Paints ‘Silver Canvas’

And as for the manicure, I like how it turned out. It's colourful and fun, and again, it's something new for me because of the foil look that the silver base gives. The manicure is really busy, because the driving force behind my colour selection was to use all 9 colours from the collection, however, due to the success I had with this trial mani, I can't wait to start experimenting with these polishes using smaller colour palettes, and less intricate designs!

Saturday, April 25, 2015

Wet n Wild Wild Shine Nail Colour

I dropped in to the pharmacy earlier this week, and as usual went browsing in the nail polish aisle. I was really excited to see that not only did they have the new Wet n Wild Wild Shine Nail Polishes, but they were also on sale for $1.50 (down from $1.99). I had heard about these polishes from various nail vloggers on YouTube, but I wasn't sure if they were available in Canada yet, so I was really excited to find them! There were a lot of bright, fun colours available, and for the price, I couldn't resist purchasing 12 of the polishes! So today, I'm doing a review on these polishes.

‘Red Red’, ‘Lavender Crème’, ‘Tickled Pink’, ‘Blazed’, ‘Nuclear War’, ‘D’oh!’, ‘Be More Pacific’, ‘Putting on Airs’, ‘Who is Ultra Violet?’, ‘Grape Minds Think Alike’, ‘Ready to Propose’, and ‘Yo Soy’
Wet n Wild Wild Shine Nail Polishes
Here are the colour names of the polishes (listed left to right):

Upper Row: Warm Colours
Lower Row: Cool Colours & Neutrals
‘Red Red’
‘Be More Pacific’
‘Lavender Crème’
‘Putting on Airs’
‘Tickled Pink’
‘Who is Ultra Violet?’
‘Blazed’
‘Grape Minds Think Alike’
‘Nuclear War’
‘Ready to Propose’
‘D’oh!’
‘Yo Soy’

First off, I really like the look of the packaging. They are so modern, and fun! The only problem I had with the packaging is that when I was swatching the polishes on my nail wheel, I had an incident where the black top of one of the polishes separated from the brush that was supposed to be attached to it, leaving the brush in the bottle. It wasn't that difficult to reattach - I had to lift the brush out of the bottle, place it back in (but not pushed all the way back down), and then place the lid over it and screw them both back into the bottle (see graphic below). It was a little inconvenient, but was easily fixed, and something I can overlook for a budget brand of polish.

Lift brush out of bottle, lower brush but not all the way, lightly place cap over brush, screw shut
How to Reattach Cap to Nail Polish Brush
As for the actual polish. I was quite pleased with the application. The polish was a little on the thick side, but not so much as to pose a problem. Actually, the thickness may have turned out to be a really good thing - all of the swatches below were done with only one thick coat of polish! The only one that really could've used an extra coat was the coral shade 'Blazed'. It's the fourth from the left in the swatch wheel below. In the picture, you can see how it looks a little sheer, and there's a bit of patchiness. In addition to the swatches, I also used one of the the colours for a full manicure. 'Putting on Airs' was used during my 'Earth Day Mani', and I had a similar experience to the test swatches.

‘Red Red’, ‘Lavender Crème’, ‘Tickled Pink’, ‘Blazed’, ‘Nuclear War’, ‘D’oh!’, ‘Putting on Airs’, ‘Be More Pacific’, ‘Who is Ultra Violet?’, ‘Grape Minds Think Alike’,  ‘Yo Soy’, and ‘Ready to Propose’

One thing that I was slightly disappointed with, is that I don't know if all of the colours are widely available here in Canada - or perhaps the drug store chain where I found them does not carry all of the colours. I later went to another location looking to see if they had more shades, but was out of luck. I counted 20 slots on the display at the stores I went to, but I recall seeing at least 24 polishes in the line on YouTube. I did a little googling, and from what I found, it looks like there may be as many as 27 different shades. 

I really wanted this beautiful kelly green shade I had seen called 'Do Pass Go', but couldn't find it in both stores I went to.  Some others I wanted but couldn't find were 'Dreamy Poppy', 'Grasping at Strawberries', and 'She Sells'. I'll keep an eye out for them at different drug stores. Hopefully I'll be able to find them eventually.

All in all, I'm quite satisfied with my purchase, and am looking forward to creating beautiful nail art with these new budget-friendly additions to my collection!

Friday, April 24, 2015

Drug Store Essie Haul!!!

A couple months ago, I came across an amazing deal on some Essie nail polishes at a local drug store. They were clearing out selected polishes for $2.00! Since I've managed to publish a daily blog post for a streak of 10 posts now, I wanted to continue the streak, but I love my current manicure too much to change it! So I thought I'd blog about this haul. It's something I had been meaning to do for a while, but never got around to.

'Chills and Thrills', 'Style Cartel', 'Fall in Line', 'The Perfect Cover Up', 'Partner in Crime', and 'Haute as Hello'
Essie Haul
The colours I got were:
'Chills & Thrills' from the Summer 2014 Too Taboo Collection
'Style Cartel' from the fall 2014 Dress to Kilt Collection
'Fall in Line' from the fall 2014 Dress to Kilt Collection
'The Perfect Cover Up' from the fall 2014 Dress to Kilt Collection
'Partner in Crime' from the fall 2014 Dress to Kilt Collection
'Haute as Hello' from the Essie Summer 2010 collection

These were the only colours I was able to find at this price. Luckily, I happen to like all of them! Below are the swatches of each colour.

'Chills and Thrills', 'Style Cartel', 'Fall in Line', 'The Perfect Cover Up', 'Partner in Crime', and 'Haute as Hello'

My favourite of the bunch is 'Haute as Hello' because I love bright colours. The dried polish seems to have a bit of a dull finish compared to the others. I wouldn't go so far as to say that it dried matte, or even semi-matte, but you can see the difference in the light reflection in the swatches above. 'Haute as Hello' is the coral swatch on the far right, and the reflection of the light is a bit more diffused than all of the other swatches. Now, this doesn't really bother me because I usually topcoat all of my manicures any ways, but I thought it was worth mentioning.

My next two favourites are 'Fall in Line', the medium toned greyish-green third from the left; and 'The Perfect Cover Up', the dark greyish-teal third from the right. I find colours like this really interesting - I really love when it takes more than a word or two to describe a polish colour!

Overall, I'm thrilled to add each of these to my collection - especially at this fantastic price!

Thursday, April 23, 2015

Happy Belated Earth Day!

Yesterday, I didn't get a chance to put up an earth day manicure, because I really wanted to try out my new peel-off base coat. So today, I have a belated Earth Day mani to share with you!

Earth Day inspired manicure made using a light blue base polish, stamped with black map imagery on the pinky, middle and index fingers. The thumb and ring finger are stamped with green continent images.
Earth Day Mani

Polishes Used
Plate Used
Wet n Wild Wildshine ‘Putting on Airs’
Moyou London Scholar Collection - 07
Konad Special Polish in Black

Sally Hansen Insta-Dri 'I-rush Luck'


Wet n Wild Wildshine 'Putting on Airs', Sally Hansen Insta-Dri 'I-rush Luck', and Konad Special Polish in Black
Polishes Used

I really like how this manicure turned out! The colours are perfect, and I love the images from the Moyou Scholar plate. I honestly couldn't stop staring at my nails all day! I love how the map imagery on the pinky, middle and index fingers look exactly like a page out of an atlas, while the thumb and ring fingers look exactly like little globes. I love when a manicure is both quick and easy to do, but the end result is so cute, and memorable!

This is also my first time using one of the new reformulated and redesigned Wet n Wild Wildshine polishes. I really like the look of the new bottles - such a great improvement! I was also pretty happy with the formula of this polish. It was just a touch on the thick side, but not to the point where it caused any problems. In fact, I'm hoping that the thickness would make these polishes good for stamping!

Wednesday, April 22, 2015

Purple Glitter Mani & Peel-Off Base Coat Review

Today I have another impromptu mani to share. This one was done using only glitter polishes!

Full glitter mani with multi purple and holographic glitter polish on all fingers except ring finger, which is covered in a purple, aqua, and silver glitter polish
Purple Glitter Mani
Polishes Used:
Sally Hansen Insta-Dri 'Grape Shifter'
NYC Strip Me Off Base Coat
Picture Polish 'Mardi Gras'

Sally Hansen Insta-Dri 'Grape Shifter', NYC Strip Me Off Base Coat, and Picture Polish 'Mardi Gras'

Now, normally I wouldn't do a complete glitter manicure, just because it is such a pain to have to remove it with nail polish remover. Because of this, I really have neglected a lot of my glitter polishes, only using them for an accent nail here and there.

I'd heard about peel off base coats designed to solve the problem of having to remove glitter and textured polishes, but I never really got around to trying one out until today. So far, I'm pretty happy with my first peel off base coat experience! The polish came off fairly easily, and there was no visible damage to my nails.

There were a few things that I was slightly disappointed with. The first is that the polish didn't come off in one sheet, as I had assumed it would. Ultimately, the removal was still a vast improvement over using nail polish remover, so this didn't really bother me all that much. The second minor issue, was that I feel like it took a lot longer for the polish to dry. The surface seemed susceptible to nicks and dents for about an hour or so.

The third issue I had with the base coat, was that I started showing tip-wear by the end of day 1 of the manicure - that's a lot earlier than I normally would. And finally, the fourth issue I had with the base coat was that it left a slight residue on the nails which I could only fully remove with nail polish remover. However, it did come off fairly easily with the nail polish remover.

Ultimately, most of the issues I had relate to diminished staying power of the nail polish caused by the base polish. But in a way, that's exactly what the strip off base polish was designed to do, so I can't really fault it for making the manicure more fragile! At the end of the day, I'm glad that I didn't have to scrub at my nails with cotton balls soaked in remover for 2-4 minutes per nail. That's a time savings of approximately 20-40 minutes!

The brand that I used for today's base coat was NYC. I recently purchased OPI's 'Glitter Off', and also, a dear friend of mine generously whipped me up a batch of home-made Peel-Off base coat, using non-toxic white school glue, and water. I'm looking forward to trying these out too in the near future!

Monday, July 14, 2014

Sally Hansen Color Foils

Sally Hansen Color Foils (Complete Collection): Pink Platinum, Titanium Flush, Rose Copper, Minted Metal, Cobalt Chrome, Purple Alloy, Leaden Lilac, Liquid Gold, Yellow Gold, and Sterling Silver
Sally Hansen Color Foils (Complete Collection)

A few weeks ago, I ran around in a mad frenzy trying to purchase sufficient quantities of the limited edition Sally Hansen Color Foil Nail Makeup collection. A local drugstore chain had all Sally Hansen products on sale, so I purchased the entire collection on the first day of the promotion. As the week went by I convinced myself that I needed backup bottles of my 3 favorite colors from the collection (Liquid Gold, Yellow Gold, and Sterling Silver) - and that's when all of the running around began.

The majority of the drugstores I visited only had a display of 20 polishes - 2 bottles of each of the 10 shades in the collection. I'm pretty lucky that the collection was fairly new and just coming to the shelves in all of the stores, because in most cases nothing was sold out.  I was the first person to buy any of them in the first store I visited, and the display itself looked relatively untouched (no annoying test strokes all over the cardboard). 

Most of my enthusiasm for these polishes is because they work well for nail stamping. For most of the colors (6 to be exact), although I think they are beautiful, I don't really like the way the polish looks on my nails.  I don't see myself ever doing a full manicure with anything other than Rose Copper, Liquid Gold, Yellow Gold, and Sterling Silver.  However I can definitely see myself getting a lot of use out of all of these polishes as stamped accents over other polishes, and maybe an accent nail here and there. Here are all of the colors swatched:

Sally Hansen Color Foil Swatches: Pink Platinum, Titanium Flush, Rose Copper, Minted Metal, Cobalt Chrome, Purple Alloy, Leaden Lilac, Liquid Gold, Yellow Gold, and Sterling Silver
Sally Hansen Color Foil Swatches
 
From left to right we have Pink Platinum, Titanium Flush, Rose Copper, Minted Metal, Cobalt Chrome, Purple Alloy, Leaden Lilac, Liquid Gold, Yellow Gold, and Sterling Silver.

Here are some stamped mani looks that I came up with so far:
Sally Hansen Color Foil Nail Stamping Demo Manicure using OPI polishes 'Don't Touch My Tutu' and 'Pirouette My Whistle', stamped with a 'Leaden Lilac' accent decal
OPI polishes Don't Touch My Tutu and Pirouette My Whistle, stamped with a Leaden Lilac accent decal

Sally Hansen Color Foil Nail Stamping Demo Manicure using OPI 'Chic from Ears to Tail' stamped with 'Liquid Gold', and Finger Paints 'Go Baroque' on accent nail
OPI Chic from Ears to Tail stamped with Liquid Gold, and Finger Paints Go Baroque on accent nail

Sally Hansen Color Foil Nail Stamping Demo Manicure using OPI 'Shocking Pink' stamped with 'Sterling Silver', and a 'Sterling Silver' accent nail
OPI Shocking Pink stamped with Sterling Silver, and a Sterling Silver accent nail
Prior to the mad dash to get these metallic polishes, I was obsessed with neon nail polishes. I wanted to try to incorporate the two looks together, so that's where I came up with the neon pink and silver mani pictured above.  The image I used for the pattern was from Cheeky Jumbo plate A.
The light pink and gold mani was stamped with Moyou London's Artist plate 03, and the star decal on the otherwise demure white and silver sparkle mani is from BM-005.

As a whole, I really love this collection. The polishes stamp so well, and I'm ecstatic that I finally have a wide range of metallic-finish coloured polishes to create stamped manis with. I only started nail stamping in late 2013, so I missed out on the China Glaze Romantique collection (2009), and the Kiko Mirror collection (spring 2013).  It's been frustrating checking out other blogs, and seeing all of the stamping possibilities that coloured metallic polishes can provide, but not being able to get my hands on these popular, sold out, limited edition collections.  You can see now why I was so eager to snap up these Sally Hansen beauties as soon as the opportunity presented itself!

Also, I can certainly say that without a doubt, the 2 gold shades in the collection are now my favorite golds for stamping. The silver is amazing too, but there have always been a lot of great silver stamping polishes on the market.  All in all I'm really satisfied with this purchase!