Showing posts with label Decal Method. Show all posts

Sunday, November 11, 2018

Remembrance Day Manicure - 2018

Today is remembrance day in Canada. This remembrance day in particular is quite special, in that Novermber 11th, 2018 is the 100th anniversary since the end of the first world war. Today, I have a remembrance day manicure to share:

red white and black poppy themed manicure for remembrance day


Polishes Used
Stamping Plates Used
OPI 'My Wishlist is You'
Messy Mansion Plate MM78XL
Wet n' Wild Wildshine 'Black Crème'
Clear Jelly Stamper Stamping Plate:
Nicole by OPI 'Scandal, Secrets...
   'True North Strong' Plate CjSLC-08
          & Sparkle'


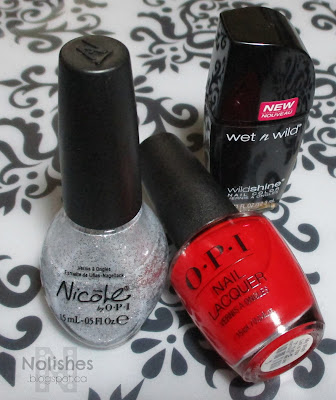
I really like the completed manicure. It is very understated, and tasteful. Here is a shot of the polishes that I used to create the manicure:

opi 'My Wishlist is You', Nicole by OPI 'Scandals, Secrets, and Sparkle', Wet and Wild Wildshine 'Black Creme'


Here's a link to the last Remembrance day Manicure that I did, back in 2014.  And below are additional shots of this years manicure.

red white and black manicure

Wednesday, October 24, 2018

Autumn Leaves Mani using China Glaze 'Aut-umm I Need That'

I recently purchased China Glaze's 'Aut-umm I Need That' from the Fall 2018 'Ready to Wear' collection. I normally am not drawn to brown polishes, but Aut-umm...'s beautiful shimmer that seems to reflect all of the greens, oranges, reds and golds of the changing fall leaves, caught my eye, and compelled me to purchase it!  Not only that, I also decided that I simply must do a 'fall leaves' manicure using this polish as soon as possible!

This manicure is the result:

Brown manicure using advanced stamping technique to apply coloured leave decals to accent some of the fingers. Amber coloured gems are used on accents for the other fingers.
Autumn Leaves Mani
I used 'Aut-umm I Need That' as the base colour for all of my nails, and then I used bundle monster plate BM-S321 (from the 'Botanicals Collection') to create fall leaf decals using the advanced stamping technique. The leaves are outlined in gold, and then filled in with various autumn colours.

First, here's a close up bottle shot of 'Aut-umm I Need That' which shows the beautiful shimmer:

Close up Bottle shot of China Glaze 'Aut-umm I Need That', nail polish


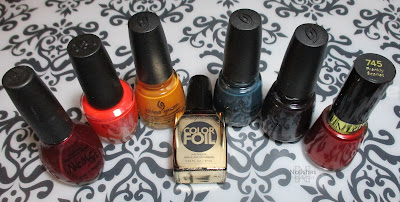
And here's a shot of all seven polishes I used to create this manicure:

Nicole by OPI 'Boys 'N Berry', OPI 'Atomic Orange', China Glaze 'Accent Piece', Sally Hansen 'Liquid Gold', China Glaze 'Baroqe Jungle', China Glaze 'Aut-umm I Need That', Revlon 'Frankly Scarlet'
Polishes Used

Polishes Used
Nicole by OPI 'Boys 'N Berry'
OPI 'Atomic Orange'
China Glaze 'Accent Piece'
Sally Hansen Color Foil 'Liquid Gold'
China Glaze 'Baroque Jungle'
China Glaze 'Aut-umm I Need That'
Revlon 'Frankly Scarlet' (745)

 I'm so happy with the way the manicure turned out! After applying the 6 leaf decals I created to 3 fingers on each hand, I applied amber coloured nail gems to the other two fingers to accent the look. Below I have included a couple of shots of my left hand.


Just for fun, I've included a link to my 'Fall Colours Mani' from 2014 where I used the 'Leadlight Technique to colour in a full nail stamping image from a different bundle monster plate, BM-H11.

Wednesday, August 5, 2015

Cute Monster Mani

Today I have a cute monster manicure to share.

 Nail stamping manicure featuring a pastel neon yellow base manicure embellished with a dark grey and white leopard print on the ring finger, and a cute grey cartoon monster on the middle finger.

Polishes Used
Plate Used
OPI ‘Nein! Nein! Nein! OK Fine!’

China Glaze ‘Pelican Gray’
Konad M11 (cute monster image)
Quo by Orly ‘Limelight’
Konad M57 (leopard print pattern)
China Glaze ‘White on White’

Konad Special Polish in Black


The Konad M11 plate that I used to stamp the monster image featured in this manicure has been around for quite some time, however I just bought it on sale recently. I just couldn't resist the adorable cartoon images on it! 

OPI ‘Nein! Nein! Nein! OK Fine!’, China Glaze ‘Pelican Gray’, Quo by Orly ‘Limelight’, China Glaze ‘White on White’, and Konad Special Polish in Black

I really love the colour combination of nail polishes that I used for this manicure - it's nothing super complicated, but I just think the bottles look so good lined up together!

The base polish I used is 'Limelight' from Shopper's Drug Mart's store brand of polishes 'Quo by Orly'. It's a neon pastel yellow polish, and I absolutely adore this shade! After choosing such a bright base colour, I wanted to tone the look down a bit, so I used black, white and a couple shades of gray for all of my embellishments. For the dark grey leopard spots, I used ‘Nein! Nein! Nein! OK Fine!’ from OPI's fall 2012 Germany collection. I dotted the inside of the leopard spots with China Glaze's 'White on White' (core collection). The monster is coloured in with China Glaze's 'Pelican Gray', from their Spring 2011 'Anchor's Away' collection. The monster's black outline was done with Konad Special Polish in Black.

I really like how this manicure turned out! It's so bright, whimsical, and cute - perfect for summer!

Monday, May 4, 2015

'May the Fourth Be With You' Mani

In honour of May the 4th, I decided to rework my previous mani into a space themed galaxy manicure:

Space themed manicure featuring  black nails with gold and holographic glitter, stamped with orbiting planets in silver on the thumb, and a grey and silver rocket ship with red and orange flames trailing it is stamped on the ring finger.
May the Fourth be with Your Manicure!
There is so much wear and tear on this manicure, that it's not even funny! The base for this manicure was only supposed to be an impromptu weekend manicure, that was hastily applied on top of the manicure I wore for most of last week - it's unbelievable how many layers of polish are on my nails right now! The plan was originally to do a new manicure on Sunday night, so that everything would be fresh for Monday morning, but then I came up with the idea to re-purpose the mani, since I already had the galaxy framework that I could build upon to create a May the Fourth Mani.

My previous mani featured a black base of Wet n Wild 'Black Crème', and a black, gold, and holographic glitter, Sally Hansen Complete Salon Manicure 'Midnight Glitz'. That combination already looked very 'spacey' so I just emphasized that by adding a cute spaceship from one of my Moyou London 'Sci Fi' plates, and some planets in orbit from my Messy Mansion 'Space Themed' plate. I made the rocket ship decal using advanced stamping technique.

Here are the details of the polishes and plates that I used to create this look:

Polishes Used:
Plates Used:
Wet n Wild Wild Shine ‘Black Crème’

OPI ‘Romantically Involved’
Messy Mansion ‘Space Themed’ MM33
Essie ‘No Place Like Chrome’

Sally Hansen C.S.M. ‘Midnight Glitz’
Moyou London Sci-Fi Collection - 03
OPI ‘Atomic Orange’

OPI ‘Embrace the Gray’


Wet n Wild Wild Shine ‘Black Crème’, OPI ‘Romantically Involved’, Essie ‘No Place Like Chrome’, Sally Hansen Complete Salon Manicure ‘Midnight Glitz’, OPI ‘Atomic Orange’, and OPI ‘Embrace the Gray’
Polishes Used
All in all, I think it is a super cute manicure (minus the tip wear, and bulky, multi-layered polish application!). I really like how the space-ship decal turned out, and how cool it looks floating on the background of the black and holo-glitter 'space'.

Saturday, February 28, 2015

Crackle Polish Challenge #15 - Rainbow Graffiti Mani

2015 Crackle Polish Challenge Manicure #15

Featured crackle application:
Combining multiple crackle polishes with regular polishes for a graffiti art effect

Featured crackle polish:
OPI 'Black Shatter'
A nail stamping manicure using 10 nail polishes to create a multi-colour abstract splatter effect manicure. The ring finger has a silver and black graffiti tag decal.
Rainbow Graffiti Mani
Polishes Used
Claire’s ‘Splatter Paint’
Sally Hansen Crackle Overcoat ‘Cherry Smash’
Nicole by OPI ‘Tangerini Bikini’
OPI ‘The “It” Color’
Sally Hansen Complete Salon Manicure ‘Grass Slipper’
OPI ‘Turquoise Shatter’
OPI ‘Super Bass Shatter’
Sally Hansen Insta-Dri ‘Silver Sweep’
OPI ‘Black Shatter’
Konad Special Polish in Black

Claire’s ‘Splatter Paint’, Sally Hansen Crackle Overcoat ‘Cherry Smash’, Nicole by OPI ‘Tangerini Bikini’, OPI ‘The “It” Color’, Sally Hansen Complete Salon Manicure ‘Grass Slipper’, OPI ‘Turquoise Shatter’, OPI ‘Super Bass Shatter’, Sally Hansen Insta-Dri ‘Silver Sweep’, OPI ‘Black Shatter’, and Konad Special Polish in Black
Polishes Used
Nail Stamping Plate Used:
Moyou London Rockstar Collection - 12

I wanted this manicure to be colourful and fun, so I decided to use a bright yellow base colour (OPI 'It Color'), to layer all of the other polishes over. I started with small strokes of the four shatter polishes (red, turquoise, purple, and black) , and tried to vary the direction, placement and length of the strokes for a random effect. I used the black shatter polish last, to help it stand out a little more.

Then I used a dotting tool to add dots of the orange and green regular polishes, again varying the size of the dots, and their placement. After that, I topped all of my nails with a splatter effect glitter topcoat. I made 2 graffiti tag nail stamping decals using silver and black polishes, and then placed the decals over my ring fingers. I finished the look off with some topcoat to seal everything in and to add shine.

I really love the finished look! This manicure was so much fun to do, and to wear - I found myself looking at my nails a lot as I went through my day!

Here are some more shots of the completed manicure:

3 different shots of the Rainbow Graffiti Manicure
Rainbow Graffiti Mani - Extra Shots

Saturday, February 7, 2015

Crackle Polish Challenge #7 - Shattered Heart Mani

2015 Crackle Polish Challenge Manicure #7

Featured crackle application:
Using crackle polish to make a decal

Featured crackle polish:
Sally Hansen's Crackle Overcoat in 'Fuchsia Shock'

A 5 picture collage showing a black and pink nail stamping manicure. All 5 nails were painted with a translucent, dark grey base. The thumbnail was then double stamped with 2 images, one in black and the next in pink. The pointer and pinky are just stamped with black, with a pink nail art rhinestone added. Middle finger: pink shard glitter. Ring finger: Lt pink heart decal with medium pink shatter polish over it.

Polishes Used:
Sally Hansen Crackle Overcoat in 'Fuchsia Shock'
Sally Hansen 'Big Smoky Topcoat'
Sally Hansen Xtreme Wear 'Rouge Rush'
Sally Hansen Insta-Dri 'Presto Pink'
China Glaze 'Feel the Breeze'

Plate Used:
Pueen Celebration Collection 'Fireworks Festival'
PUEEN41

Today's crackle technique involved making a stamping decal out of dried crackle polish.  To do this, I started by painting a couple coats of my base polish, 'Feel the Breeze', a light pink creme polish, over a stamper. When that was fully dry, I painted a layer of 'Fuchsia Shock' over it, and allowed that to dry.  When the stamper was completely dry, I carefully peeled off the polish, and then cut two heart shapes out of the dried polish.

After painting my nails with the sheer black polish, 'Big Smoky Top Coat', I placed the decals over the slightly wet nails, and then added a layer of topcoat in order to get the decal to adhere to my nail. I finished up with a little stamping, glitter, and rhinestones on my other nails.

On the bottom right corner of the collage, you can see a variation of the decal that I did on my right hand. Not only is the heart decorated with shatter nail polish, but this heart is also cracked into three pieces, and slightly separated to reinforce the shattered heart theme. I really like this variation because it takes advantage of one of the special features of decals - you can manipulate their shape, and placement.

All in all, I really like how this mani turned out. I love how the shards of 'Rouge Rush' glitter echo the 'shattered' theme, as well as how awesome-looking the double stamping on my thumb turned out - I may have to do an entire mani like this! I also think that this use of shatter polish really does add something special to the overall look of the mani.

Wednesday, January 14, 2015

Crackle Polish Challenge #1: Crazy Decal Mani

2015 Crackle Polish Challenge Manicure #1

Featured crackle application: Background for nail decals

Featured crackle polish: OPI 'Turquoise Shatter'

Today's manicure is the first instalment of the '2015 Crackle Polish Challenge'!  My first idea was to use crackle polish as the background over which I would place nail stamping decals made using advanced stamping technique. The finished look is a bit clashy, but it was a lot of fun to make, and to wear!

Nail stamping manicure with crackle polish base (teal crackle with chartreuse peeking through), and each finger has a different cartoon decal in a large variety of colours.Nail stamping manicure with crackle polish base (teal crackle with chartreuse peeking through), and each finger has a different cartoon decal in a large variety of colours.

Crackle Base

Polishes Used:
OPI 'Turquoise Shatter' and Finger Paints 'Margarita Mambo'

The teal and chartreuse crackle base kind of reminds me of watermelons! Appropriately, I have a cute watermelon wedge on my right index finger! I love the combination, however in hindsight, I should have used more neutral colours since the decals are already so colourful. A black/gray crackle base, or white/gray, black/white, or any of those colours with silver would have been nice. This might call for a do-over! Here is a picture of what the base looked like before the decals were applied, followed by a collage of all of the polishes I used:

Crackle Base Using OPI 'Turquoise Shatter', and Finger Paints 'Margarita Mambo'
All 20 Polishes Used for the Crazy Decal Mani: Sinful Colors 'On the Bright Side', Sinful Colors 'Nirvana', Sinful Colors 'Daisy Daze', Sinful Colors 'Cream Soda', Sinful Colors 'Decadent', Sinful Colors 'Energetic Red', Sinful Colors 'Cinderella', Sinful Colors 'Citrine', Sinful Colors 'Exotic Green', China Glaze 'Feel the Breeze', China Glaze 'Be More Pacific', China Glaze 'White on White', China Glaze 'Pelican Gray', China Glaze 'Don't Honk Your Thorn', China Glaze 'Feel the Breeze', China Glaze 'Rose Among Thorns, Finger Paints 'Louvre This Pink', Finger Paints 'Art You Wondering', Finger Paints ‘Margarita Mambo’, and OPI ‘Turquoise Shatter’

Decals

I used 18 different polishes for the decals in addition to the 2 that I used for the base coat. I've listed them along with the decal images they were used for.

Polishes Used:
Konad Special Polish in Black was used for the outline of all of the decals

Teddy Bear Head (left thumb) - 1:
Diagram showing all of the polishes used to create the Crazy Decal Mani: Sinful Colors 'On the Bright Side', Sinful Colors 'Nirvana', Sinful Colors 'Daisy Daze', Sinful Colors 'Cream Soda', Sinful Colors 'Decadent', Sinful Colors 'Energetic Red', Sinful Colors 'Cinderella', Sinful Colors 'Citrine', Sinful Colors 'Exotic Green', China Glaze 'Feel the Breeze', China Glaze 'Be More Pacific', China Glaze 'White on White', China Glaze 'Pelican Gray', China Glaze 'Don't Honk Your Thorn', China Glaze 'Feel the Breeze', China Glaze 'Rose Among Thorns, Finger Paints 'Louvre This Pink', Finger Paints 'Art You Wondering', Finger Paints ‘Margarita Mambo’, and OPI ‘Turquoise Shatter’
Detailed Breakdown of Polishes Used
Sinful Colors 'On the Bright Side'
Sinful Colors 'Nirvana'
Sinful Colors 'Daisy Daze'
China Glaze 'Feel the Breeze'

Lollipop (left index) - 2:
Sinful Colors 'Cream Soda'
China Glaze 'White on White'
Sinful Colors 'Decadent'

Cat Head (left middle) - 3:
China Glaze 'White on White'

Cat (left ring) - 4:
Sinful Colors 'Energetic Red'

Wrapped Candy (left pinky) - 5:
Sinful Colors 'Cinderella'

Carrot (right pinky) - 6:
Sinful Colors 'Citrine'
Sinful Colors 'Exotic Green'

Bowl of Rice (right ring) - 7:
China Glaze 'Be More Pacific'
China Glaze 'White on White'

Dog? (right middle) - 8:
China Glaze 'Pelican Gray'

Watermelon (right index) - 9:
China Glaze 'Rose Among Thorns
Finger Paints 'Louvre This Pink'
Finger Paints 'Art You Wondering'

Cupcake (right thumb) - 10:
China Glaze 'Don't Honk Your Thorn'
China Glaze 'Feel the Breeze'

Plate Used:
Moyou London Suki Collection Plate 03

Overall, I really enjoyed making the decals for this manicure. I've been wanting to use this particular Moyou London plate to make coloured decals for ages - It feels great to finally be able to cross that off my list! Also, I think that the 20 polishes that I used in this mani may be a personal record for me!
Monday, December 22, 2014

Candy Cane Mani

Today I have a candy cane themed manicure to share:

Nail stamping manicure featuring red and white striped nails, and ring finger accent nail with sparkly silver base colour, with 2 candy canes arranged in a heart shape, with a red nail art rhinestone in the centre of the candy-cane heart.
Candy Cane Mani
Polishes Used:
China Glaze 'Define Good...'
China Glaze 'White on White'
Sally Hansen Xtreme Wear 'Celeb City'
Konad Special Polish in White

Plate Used:
MoYou London Festive Collection - 03

Other than a few issues with getting my lines straight, I love this manicure! Incidentally, I discovered a great tip for getting my lines straight, just as I was finishing up the manicure. Just before I was about to put polish on the image plate to stamp the last unfinished nail, it suddenly dawned on me that instead of my trustee hard Konad stamper, I should try using my larger, squishy stamper. With my Konad stamper, not only were some of my lines becoming crooked during the process of rolling the images onto my nail, but also, at times I was having problems with a little bit of polish bleeding onto the negative space of the image when I tried to pick it up.

When I tried the squishy stamper, not only did the image pick up beautifully, with no bleeding, but I found it was also much easier to transfer this particular image cleanly by pushing my nail onto the stamper, than it was to roll the image onto my nail as I had been doing with the hard stamper. I realized that this is because when I roll an image onto my nail, I don't always use one smooth, continuous motion. In areas where I stop momentarily, or my hand moves a bit too fast, I end up with a crooked bit of the image. Pushing my nail onto the image with the squishy stamper solves this. It also makes it a bit easier to line up the image exactly how you want it on your nail.

You'll notice in the above picture that my index finger turned out perfectly straight, and the angle looks great. That's because I used the squishy stamper for that finger. I used my trusty hard Konad stamper for all of the other striped nails - you can probably see the difference!

 I love using the hard stamper because it's really great at picking up every detail of very fine images, whereas many times I have problems getting detailed images transferred onto the squishy stamper. Also, when I first started stamping, I only owned hard stampers, so when I'm gathering my mani materials, I often instinctively reach for them out of habit.

This experience really helped drive home the message that I really have to take the time to evaluate which is the right tool for the job, before I begin. As a basic guideline: the squishy stampers are better at picking up images with thicker lines and/or larger, open spaces of polish, while the hard stampers are better at picking up detailed images.

Sally Hansen Xtreme Wear 'Celeb City', China Glaze 'White on White', China Glaze 'Define Good...', and Konad Special Polish in White
Polishes Used
Now, I just want to take a moment to talk about how beautiful 'Define Good' is.  I think I mentioned before that I'm normally not the biggest fan of red nail polish, simply because it is so common, however this red polish is gorgeous! It's dark and sultry with blue undertones, and has this magnificent shimmery metallic finish to it. It also stamps really well, which is a big plus. I'm so happy I bought it! This is a red that I probably wouldn't even mind wearing on it's own (sans nail art) - now that's a big deal!

Saturday, December 20, 2014

Christmas Skittles Mani

Today I have a holiday themed manicure to share:

Christmas Themed Nail stamping manicure using light and dark green, red, gold, and white nail polishes. Stamped with images of presents, candy canes, bells, and trees.Christmas Themed Nail stamping manicure using light and dark green, red, gold, and white nail polishes. Stamped with images of presents, stockings, bells, and trees.


Polishes used:
OPI 'You Are So Outta Lime!', Sally Hansen 'On Pines and Needles', Revlon 'Bewitching', OPI 'Honey Rider', Sally Hansen Color Foils 'Liquid Gold', and Konad Special Polish in White.

Plate used:
Cheeky Jumbo Plate 6 'Happy Holidays'.

OPI 'You Are So Outta Lime!', Sally Hansen 'On Pines and Needles', Revlon 'Bewitching', OPI 'Honey Rider', Sally Hansen Color Foils 'Liquid Gold', and Konad Special Polish in White.
Polishes Used
Truthfully, this manicure didn't really turn out the way I had envisioned. I think it probably would have looked better to have put another dark green nail stamped with metallic gold on my ring finger, instead of the textured gold accent polish I used.

On a positive note, I really love the way my index fingers turned out!  I used the decal stamping method, and I really love how the 4 colours work together.

Wednesday, November 26, 2014

Mondrian Mani 2 - Using Moyou London Artist Plate 16

Today I have another instalment of the Moyou London Artist Collection Design Challenge:

Nail stamping manicure inspired by the artwork or Piet Mondrian. Designed using Moyou London Artist collection plate 16, and white, black, red, blue, and yellow polishes from China Glaze, Essie, Konad, and Nfu Oh.Nail stamping manicure inspired by the artwork or Piet Mondrian. Designed using Moyou London Artist collection plate 16, and white, black, red, blue, and yellow polishes from China Glaze, Essie, Konad, and Nfu Oh.

This manicure was done using Plate 16 from the Moyou London Artist Collection, and is the second last manicure in my challenge!

When I did my original 'Mondrian Inspired Mani' a few months ago, I mentioned that I wanted to try it again with a darker blue jelly nail polish. I've since acquired China Glaze's 'Ride the Waves', a beautiful deep blue jelly, so I'm happy that I now have the opportunity to use it as I revisit the same theme with a different plate.

Polishes Used:
Essie 'Jelly Apple'
Nfu Oh NFU JS19
China Glaze 'Ride the Waves'
China Glaze 'White on White'
Konad Special Polish in Black

With this manicure, I used the decal method of nail stamping (aka advanced nail stamping technique) to colour in the multi-coloured accent nails. I decided to use the decal method because when I did the first version of this mani, I tried colouring with the 'leadlight' technique and found that it was hard to keep the highly pigmented jelly polishes from going over the black lines.

The black lines are supposed to be crisp, and clean, and they are an important part of the design. When they are partially obscured with polish, the look does not have the same visual impact.  You can see an example of this in the picture of my right hand, above. On my right ring finger, I had to leadlight the larger section of blue to correct a small boo-boo caused when I was applying the decal to my nail. The blue polish covers a bit of the black line, and takes a bit away from the look.

Now, these are things that are barely noticeable when wearing the manicure in real life, but of course they are a lot more noticeable in close-up still photos with flash! 

Another thing I changed this time around, was that I tried to tone the look down a bit by adding white and black nails. I actually like this version a lot better because of this simplification. The contrast between the multi-coloured, and neutral nails makes the look more interesting, and also helps the multi-coloured nails stand out more.

I really can't believe the challenge is almost over! Currently, there are a total of 17 plates in the Artist Collection. Right now, I own 14 of them: all except for plates 6, 8, and 15. This manicure based on plate 16 is the 14th manicure that I've completed for the challenge (I did two manicures using plate 4 because I wasn't fully satisfied with my first one - you can check out both versions here and here). My next post will be the 15th and final manicure in the challenge, using plate 17. Stay tuned!

Saturday, November 15, 2014

Gaudí Inspired Mani - Using Moyou London Artist Plate 13

After several interruptions, I’ve finally managed to get back to my Moyou London Artist Collection Design Series! With Thanksgiving, Breast Cancer Awareness, Halloween, Movember and Remembrance Day I had a bunch of themed manicures to get done in a short period of time, so there weren’t really a lot of opportunities to continue the series until now.

Today’s manicure was completed using Moyou London Artist Collection plate 13. The plate is inspired by the work of Spanish architect Antoni Gaudí. Here is the finished manicure:
Nail Stamping manicure created using Moyou London Artist 13, in green, blue, navy, purple and gold.
Gaudí Inspired Manicure
Polishes Used:
Sally Hansen Insta-Dri 'I-rush Luck'
Sinful Colors 'Endless Blue'
Maybelline Color Show 'Midnight Blue'
Maybelline Color Show Holographic 'Bold Gold'
Sally Hansen Insta-Dri 'Grape Going!'
Konad Special Polish in Black

Other than the gold accent polish, I tried to choose colours in the same colour family, with medium to dark intensity. However, the flash on my camera is making the nail polish on my index finger, 'Endless Blue', look a lot brighter in the picture than it does in real life. It's actually more of a slightly-darker-than-medium blue.

Nail Stamping manicure created using Moyou London Artist 13, in green, blue, navy, purple and gold.

On my ring finger, I used the decal method to add colour to the lizard and mosaic tile stamp for the accent nail. It might be fun to try this lizard again doing a multi-coloured mosaic tile look, by painting each of the sections with a different colour of nail polish. It would be very time-consuming, but I think it would look pretty cool!

Overall, I'm happy with the way that this manicure turned out. I rarely do 5 different base colours, so I was a little nervous about whether or not this mani would have a unified look at the end - I think it does! The accent nail does a good job of tying everything together.

I only have 3 more plates to do from the Moyou London Artist Collection (I don't have the entire collection), so I hope to finish up with the challenge in the coming weeks - stay tuned!

Nail Stamping manicure created using Moyou London Artist 13, in green, blue, navy, purple and gold.
Gaudí Inspired Manicure

Tuesday, November 11, 2014

Remembrance Day Manicure

Today is Remembrance Day, and to commemorate this occasion, I wanted to do a quick post to share this poppy and cross themed manicure.

Remembrance Day Nail Stamping Manicure featuring poppies and crosses. Using Red, White, and Black polishes, and stamped with Moyou London and Shany Stamping plates.
Remembrance Day Manicure

Polishes Used:
Konad Special Polish in Black and White
OPI 'Coca-Cola Red'
China Glaze 'White on White'
NYC 'Black Lace Creme'

Plates Used:
Moyou London Hipster Collection (full nail cross pattern)
Shany SH219 (full nail flower pattern)
Moyou London Kitty Collection 02 (flower decal)

Monday, September 22, 2014

Pink Tribal Mani - Using Moyou London Artist Plate 09

One thing that I've started becoming more aware of, is the importance of editing design choices. Because I'm still sort of new at stamping, I'm still really enthusiastic about it. I've noticed that sometimes I go a little stamping crazy when designing manicures.  I'm starting to see the importance of using restraint. Just because you can stamp every finger, it doesn't mean you have to! That's where I was coming from when I created this instalment of the Moyou London Artist Plate challenge:

Pink Tribal Manicure, Using Moyou London Artist Collection Plate 09. Polishes used: Sinful Colors in 'Boom Boom' and 'Cream Soda'; Konad Special Polish in Black; and Sally Hansen 'Silver Sweep'.
Pink Tribal Mani

The polishes I used for this manicure were:
Sinful Colors 'Boom Boom' and 'Cream Soda'; Konad Special Polish in Black; and Sally Hansen 'Silver Sweep'.

I used the decal technique to place the stamp on the accent finger. I'm a little annoyed that the decal on my left hand is slightly off centre. The nail was slightly tacky when I laid down the decal, so it stuck to the nail right away. As a result, I didn't get a chance to reposition it. 

Pink Tribal Manicure, Using Moyou London Artist Collection Plate 09. Polishes used: Sinful Colors in 'Boom Boom' and 'Cream Soda'; Konad Special Polish in Black; and Sally Hansen 'Silver Sweep'.

It's funny, but the dots of peach on the completely fuchsia nails were a total afterthought - but I think they look so good! While I was colouring in my decal, I put a few too many drops of peach polish on the corner of the stamping plate that I was using as a palette. I'm not a big fan of waste, so I tried to figure out a way to use up the extra polish. That's when I got the idea of adding the dots.  I really like how it ties the whole manicure together. 

Tuesday, September 16, 2014

Birth of Venus Mani - Using Moyou London Artist Plate 05

Today's manicure was inspired from Sandro Botticelli's classic painting 'Nascita di Venere' or 'The Birth of Venus'.  This is the 3rd instalment of my design series using my Moyou London Artist Plates. Today's plate was Moyou London's Artist Plate 05, which is also inspired from the painting. I pulled colors and motifs from the original painting, and incorporated 5 images from different parts of the Moyou Plate. Here is the finished manicure:

Birth of Venus Nail Stamping Manicure - Using Moyou London Artist Plate 05, Moyou London Kitty Collection Plate 02, and Moyou London Sailor Collection Plate 01. Polishes Used: Maybelline New York Color Show 'Walk in the Park', Essie 'Sew Psyched', Sally Hansen Color Foil 'Rose Copper', DRK Nails 'Metallic Brown' Stamping Polish, Sally Hansen Xtreme Wear 'Breezy Blue', Revlon 'Urban', Rimmel 'Black Satin', Essie 'Rock the Boat', NYC 'French Tip White', Sally Hansen Complete Salon Manicure 'Almost Almond', OPI 'Y'all Come Back Ya Hear?', and NFU Oh Jelly Syrup Series NFU JS16.
Birth of Venus Mani

The pinky represents the tree canopy in the upper right quadrant of the painting, while the ring finger represents the robe that the handmaid is waiting to cover Venus with. The clamshell on the middle finger represents Venus' mode of transportation in the painting, and fittingly, it is stamped over wave images. The index finger represents the blowing winds and falling flowers to the left of Venus, and of course we have Venus' face on the thumb.

Here are the plates and polishes I used:
Plates:
Moyou artist collection plate 05, Moyou London Kitty Collection Plate 02 (flower image on index finger), Moyou London Sailor Collection Plate 01 (Clamshell image on middle finger).

Polishes:
Not including base and top coat, I used 12 different polishes to achieve this look. Here they are listed  by the finger on which the polish is one of the base or main colours:
Pinky: Maybelline New York Color Show 'Walk in the Park', and Essie 'Sew Psyched'
Ring Finger: Sally Hansen Color Foil 'Rose Copper', DRK Nails 'Metallic Brown' Stamping Polish
Middle finger: Sally Hansen Xtreme Wear 'Breezy Blue', Revlon 'Urban', and Rimmel 'Black Satin'
Index Finger: Essie 'Rock the Boat', and NYC 'French Tip White'
Thumb: Sally Hansen Complete Salon Manicure 'Almost Almond', OPI 'Y'all Come Back Ya Hear?', and NFU Oh Jelly Syrup Series NFU JS16.

Birth of Venus Nail Stamping Manicure - Using Moyou London Artist Plate 05, Moyou London Kitty Collection Plate 02, and Moyou London Sailor Collection Plate 01. Polishes Used: Maybelline New York Color Show 'Walk in the Park', Essie 'Sew Psyched', Sally Hansen Color Foil 'Rose Copper', DRK Nails 'Metallic Brown' Stamping Polish, Sally Hansen Xtreme Wear 'Breezy Blue', Revlon 'Urban', Rimmel 'Black Satin', Essie 'Rock the Boat', NYC 'French Tip White', Sally Hansen Complete Salon Manicure 'Almost Almond', OPI 'Y'all Come Back Ya Hear?', and NFU Oh Jelly Syrup Series NFU JS16.
Birth of Venus Mani

This manicure was very time-consuming. I used a lot of different materials and techniques to achieve the look, and I also had a lot of failed attempts and revisions of my original plan.

One of the techniques that I used was the decal method. This was done on the middle finger, where I made a stamped decal of a clamshell.This is the first time I've incorporated this technique into a manicure. All in all, it worked well, except for on my left hand where I had a slight problem when placing the decal over my freshly top-coated nail (which also had a stamped background image underneath). I ended up having to lift and reposition the decal, which caused the background to get a little smudged on that finger. Next time, I'm going to wait until the polish is completely dry before I place the decal.

I also want to point out that I really like the combination of 'Sew Psyched' with 'Walk in the Park' on my pinky.  I would love to do another manicure featuring these two colours - they look so good together!