For today's post, I'm sharing a gorgeous glitter crelly polish from KB Shimmer, 'Full Bloom Ahead'. I believe it may have been originally released as part of their 2014 Spring collection. The polish has fuschia, navy, gold, teal, and orange hexagonal glitters in various sizes suspended in a white semi-translucent base. It is so fun, and playful - it reminds me of a jawbreaker!
Showing posts with label white. Show all posts
Showing posts with label white. Show all posts
Thursday, July 23, 2020
Swatch: KB Shimmer 'Full Bloom Ahead'
Tuesday, March 31, 2020
White and Blue Line Art Nail Stamping Mani
Here's another unposted manicure from my archives. This manicure was from February 2017. I no longer remember the polishes or stamping plates used, as unfortunately, I didn't take a photo of the materials. It looks like I was going for a blue and white porcelain look, similar to one that I did over here.
Sunday, March 29, 2020
Zebra Print Nail Stamping Manicure
Today I have a nail stamping manicure to share from the archives I mentioned in an earlier post. This is a zebra-print nail, with a black ring finger accent nail topped in silver glitter. Again, I have no idea which polishes and plates were used, but I really like the way it turned out, so I figure that it was worth sharing!
Wednesday, August 14, 2019
Leadlighting Manicure featuring Essie's Silk Watercolor Collection
Polishes Used
|
Polishes Used
|
Essie ‘Highest Bidder’
|
Essie
‘Point of Blue’
|
Essie ‘Love Sheen’
|
Essie
‘No Shrinking Violet’
|
Essie ‘Blush Stroke’
|
Essie
‘White Page’
|
Essie ‘Art New-Beau’
|
Maniology
‘Straight Up Black’
|
Essie ‘Muse, Myself’
|
Stamping Plate Used
|
Essie ‘Pen & Inky’
|
Moyou
London Trend Hunter - 01
|
After reviewing my purchase of Essie's 'Glazed Days' collection which was released earlier this year, I decided to go back and do a manicure using Essie's 'Silk Watercolor' collection that I purchased back when it was released in 2015.
 |
| Essie 'Silk Watercolor' Collection |
I never did a complete review of the 'Silk Watercolor' collection when I purchased it. However, I did feature one of the shades in a blog post. It was the pink shade, 'Blush Stroke', which I used for a 'Pond' manicure. Here's a link to that post.
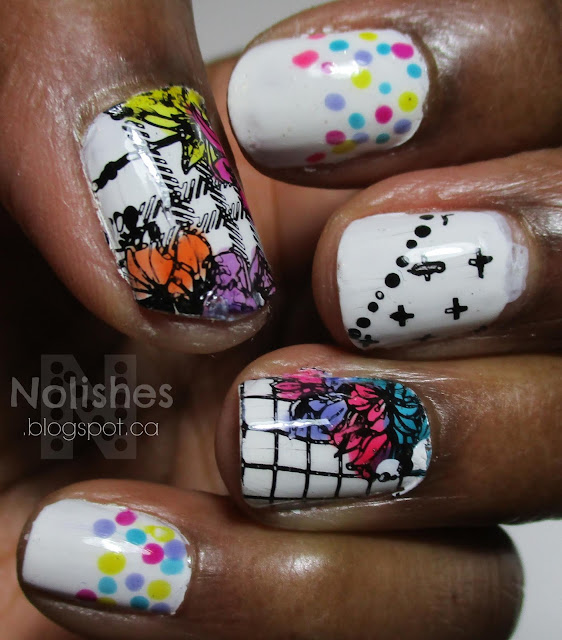
For today's manicure, I decided to use all of the shades from the collection to create a cute, colourful look. I started with 'White Page' as my white base colour, and then stamped two different floral images on my thumbs, and ring fingers. The images were from Moyou London stamping plate 'Trend Hunter - 01', and the black stamping polish I used was Maniology's 'Straight Up Black'. I also stamped the cross pattern on my middle fingers from a portion of one of the images on the same plate using the same polish.
Next, I coloured in the flower portions of the images with each of the colours from the 'Silk Watercolor' collection using the 'leadlight technique', which involves using a dotting tool (or any other tool or brush that can transfer polish) to place the transparent jelly polishes over different parts of the image. After this, I embellished the image on my middle finger with some black dots, and then added multi coloured dots on the bottom portion of my index, and pinky fingers. The multi-coloured dots were also made with the 'Silk Watercolor' collection. I completed the look by using a quick dry, glossy top coat in order to smoothe everything out, and add shine.
Below, is a collage with a few additional shots of the manicure:
Here are some of my thoughts about the 'Silk Watercolor' collection. I'm quite pleased with the colour saturation from the jelly polishes in the collection. The jellies look great over the white polish even with only one coat, which is really important for leadlighting. The white polish is pretty much your standard white polish. It performs well, but if you already have a white polish that you like, I don't see a specific need to get this one.
I also really like the colour range. There are more warm shades in the collection than cool shades, and I find that a lot of the colours are sort of 'in-between' shades, as opposed to 'true' shades ie 'pinky-red' as opposed to 'true' red. This works well for me, as I already have jelly polishes that are more classic shades, so these polishes are a great addition to my collection.
The 'Silk Watercolor' formula is really good as well. The jelly polishes are on the slightly thinner side, and have enough pigment to perform well for leadlighting, as well as on their own, as seen in my 'pond' manicure. Of course, I haven't used all of the jellies on their own yet, so I'm estimating the performance based on 'Blush Stroke', the one I've used (sort of) on it's own, as well as my experience with using all of the polishes in this manicure.
All in all, really like these polishes. I really enjoyed creating this look, and I love how it turned out. I even got a couple compliments on this manicure!
Labels:
Bundle Monster/Maniology,
Dotting,
Essie,
Jelly Polish,
Leadlight Technique,
MoYou London,
Nail Stamping,
white
Sunday, November 11, 2018
Remembrance Day Manicure - 2018
Today is remembrance day in Canada. This remembrance day in particular is quite special, in that Novermber 11th, 2018 is the 100th anniversary since the end of the first world war. Today, I have a remembrance day manicure to share:
Polishes
Used
|
Stamping
Plates Used
|
OPI
'My Wishlist is You'
|
Messy
Mansion Plate MM78XL
|
Wet
n' Wild Wildshine
'Black Crème'
|
Clear
Jelly Stamper Stamping Plate:
|
Nicole
by OPI 'Scandal, Secrets...
|
'True
North Strong' Plate CjSLC-08
|
&
Sparkle'
|
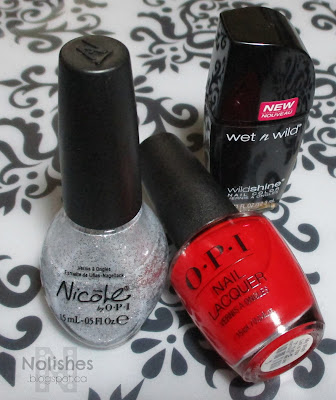
I really like the completed manicure. It is very understated, and tasteful. Here is a shot of the polishes that I used to create the manicure:
Here's a link to the last Remembrance day Manicure that I did, back in 2014. And below are additional shots of this years manicure.
Labels:
Advanced Stamping Technique,
Clear Jelly Stamper,
Decal Method,
Decals,
glitter,
Messy Mansion,
Nail Stamping,
Nicole by OPI,
Occasion,
OPI,
Project Polish,
Un-tried,
Wet n Wild,
white
Sunday, September 16, 2018
Venetian Marble Mani
Today's manicure is a really fun look I did using a stamped marble image, and three polishes from OPI's Venice Collection from fall/winter 2015. I'm calling it my Venetian Marble Mani.
 |
| Venetian Marble Manicure |
Polishes Used
|
| OPI 'My Gondola or Yours?' |
| OPI 'Baroque... But Still Shopping!' |
| OPI 'I Cannoli Wear OPI' |
For this manicure, I started with a white base of OPI's 'I Cannoli Wear OPI' on all of my nails except for my ring finger. I then used Moyou London nail stamping plate 'Let's Nail Moscow X MYL 01' to stamp the marble striations in black using OPI's 'My Gondola or Yours?'. For my ring finger accent nail, I used OPI's 'Baroque... But Still Shopping!', and finished it off by centering a small light blue gem at the base of the nail.
 |
| Polishes Used |
I really like how this one turned out, however if I had to do it again, I would like to try double stamping another marble image with some gold polish on the white and black nails, to simulate gold veining in the marble. I would also like to play around with either top-coating the stamped nails with a white crelly polish to slightly cover the stamped image, or mixing grey and black polish on the plate to get a more mottled uneven effect with the darker lines. I think these changes would add a bit more dimension to the look.
All in all, I'm quite pleased with the look - and I even got a couple of compliments too!
All in all, I'm quite pleased with the look - and I even got a couple of compliments too!
Labels:
Basic Stamping,
MoYou London,
Nail Stamping,
OPI,
white
Wednesday, April 15, 2015
Neon Rainbow Glitter Mani
I recently purchased China Glaze 'Point Me to the Party' from their new 'Electric Nights' collection for summer 2015. I was so eager to try it out that decided to throw together a simple glitter mani.
Polishes Used:
Sally Hansen Diamond Strength 'Diamonds'
China Glaze 'Point Me To The Party'
Revlon 'Pure Pearl'
My first idea for this manicure, was to use a white creme polish as the base, and then put the neon glitter over it. However, since the look was so simple, I decided to try to do something a little different. I decided to try out a white frost polish as the base, and then I put a silver micro-glitter over it. Then I put the neon glitter over all of that.
Truthfully, I'm a little disappointed with the way the mani turned out. I really don't like how bumpy the base looks. I had to use 2 coats of the white, one coat each of the glitters, and the topcoat over all of that. I'm not sure if the 5 coats caused bubbling, or if the micro-glitter has taken on the appearance of bubbles, - or perhaps both. However, I really do like the glitter - it's so bright and fun!
Subscribe to:
Posts (Atom)


