Showing posts with label Deborah Lippmann. Show all posts

Thursday, June 4, 2020

Revlon 'Whimsical'


Today, just in time for "Throwback Thursday", I have an oldie but goodie nail polish to share - Revlon's 'Whimsical'. There's quite an interesting history behind this polish. I think it came out sometime around late 2011 or early 2012.  It was a dupe for a really popular polish at the time by Deborah Lippman, called 'Glitter in the Air'. The Deborah Lippmann polish was named after and inspired by a song by the artist P!nk, which she famously performed at the 2010 Grammy Awards while doing aerial acrobatics. 

I remember being so excited to buy this polish back in the day. It looks so gorgeous in the bottle - the colours work so well together.  Also, there was a bit of a novelty factor, as crelly glitter polishes were not that common back then in mainstream brands. 

This particular bottle has held up well for how old it is (I'm not sure exactly when I bought it, and I think the polish was available for a few years after it was released). The base may have yellowed slightly, as I seem to recall it being more of a brighter sky blue, but it still looks essentially the same.

All in all, it was fun to pull this polish out of the collection and take a trip down memory lane!


Sunday, August 4, 2019

Jelly Polishes for Leadlight Manicures

I started writing this post on January 29 2015, and it has been in my Draft folder ever since! I wanted to go through my entire collection and compile a large list of my jelly polishes and take pictures so that I could catalogue them for easy retrieval when needed. I realize now that I'm probably never going to get around to doing that! With my previous post on the Essie 'Glazed Days' Collection, I thought I would finally just publish this post, even though it is not a comprehensive list, as the information may still be useful, since some of these polishes are still available.
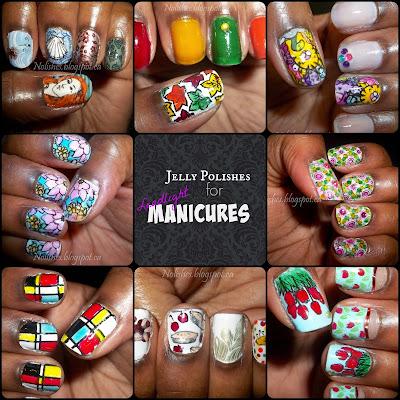
Collage featureing 8 different leadlight manicures that I have previously done on this blog

Today's post is all about polishes that can be used for Leadlight manicures. 'Leadlighting' is a nail stamping technique where coloured, translucent polishes (jellies, and tints) are painted over stamped outlines, usually in a dark colour, over a white or light coloured base. It allows for the creation of multi-coloured images on the nail. The pros of leadlighting are that compared to the decal method, the other popular method of creating multicoloured stamped images, it is much quicker, because the colours are applied directly to the nail, as opposed to a stamper.

I first learned this technique from a you-tube video posted by Messy Mansion in spring 2014. Back then, I only had a few jelly polishes in my collection.  I immediately started researching and store-hunting for a variety of jellies that I could use for this technique. Today, I want to share some of what I have found.

1) Create your own
A lot of people have shared that you can create jelly polishes by adding clear nail polish to other polishes already in your collection. They can be mixed as required by combining a few drops of each on a piece of saran wrap, plastic, or whatever un-needed flat surface you have handy. This way you do not have to mix up an entire bottle of jelly polish, if you only need a little bit for some nail art. I have never personally tried this technique, but I have seen it successfully done in manicure tutorials on-line.

2) OPI Sheer tints
This collection came out in spring or summer 2014, just as the leadlight technique was really catching on in the nail art community.  They are lightly pigmented, so although they work beautifully for the technique, the colours you get tend to be pastel shades.  You might be able to build the colour intensity with multiple coats, but, you may end up with a lumpy surface. The colours are 'I'm Never Aberrassed', 'Be Magentale with Me', 'Don't Violet Me Down', and 'I Can Teal You Like Me'.

3) NFU OH Jelly Syrup Series
I'm not sure exactly when, but a quick internet search leads me to believe that it was sometime in either late 2010 or early 2011, that Nfu Oh came out with an entire collection of jelly polishes, containing a whopping 45 shades of jelly awesomeness! From my experience with the polishes from this series that I have in my collection, these polishes are very pigmented, and are fantastic for use in the leadlight technique.

4) China Glaze Summer 2013 Sunsational Collection
This collection included 6 jelly polishes: 'You Drive Me Coconuts', 'Heat Index', 'Shell-O', 'Keepin' it Teal', 'Isle See You Later', and 'Are You Jelly?'. These are gorgeous, bright, fun shades. They are not perfectly translucent, as they have a translucent white base, but I've found that they still work well for leadlight manicures.

5) OPI Color Paints collection (Summer 2015)
I did a comprehensive review of these polishes in an earlier post. Click here to view it.

6) Essie Silk Watercolor collection (Summer 2015)
This was a collection of 8 jelly polishes and a white base. The colours were:
'Highest Bidder' - Crimson
'Blush Stroke' - Scarlet
'Love Sheen' - Rose
'Art New-Beau' - Orange
'Muse, Myself' - Citrus
'Pen & Inky' - Teal
'Point of Blue' - Blue
'No Shrinking Violet' - Violet
'White Page' - White base polish

7) Some examples of random Jelly Polishes sorted by colour:
Red:  Essie Jelly Apple Burgundy: China Glaze 'Ravishing, Dahling'
Orange: OPI Big Hair...Big Nails, OPI 'Y'all Come Back Ya Hear?'
Yellow: Deborah Lippmann 'Yellow Brick Road'
Turquoise: Zoya 'Frida'
Blue: China Glaze 'Ride the Waves', and 'Splish Splash'
Purple: Zoya 'Katherine', and China Glaze 'Creative Fantasy'
Pink: Misa 'Bed of Roses'
White: OPI 'Don't Touch My Tutu', and 'Funny Bunny'

8) Essie Glazed Days Collection, Summer 2019
I did a comprehensive review of these polishes in an earlier post. Click here to view it.
Saturday, June 20, 2015

Blue and Gold Key Mani

Nail stamping manicure featuring blue polish stamped with gold key motifs on middle and ring fingers.

Today's manicure continues my recent habit of quick and easy 'minute manis'. I like the finished look, but there really isn't a whole lot to say about it. As a result, I think I'll make this blog post quick and easy to match!

Polishes Used
Plate Used
Deborah Lippmann ‘On the Beach’
 Vivid Lacquer Plate VL028
Sally Hansen Color Foil ‘Liquid Gold’


Deborah Lippmann ‘On the Beach’, and Sally Hansen Color Foil ‘Liquid Gold’

Saturday, January 24, 2015

Crackle Polish Challenge #4: Dark Green and White Geometric Mani

2015 Crackle Polish Challenge Manicure #4

Featured crackle application: Filling swaths of negative space in a nail stamping manicure

Featured crackle polish: China Glaze's Crackle Glaze in 'Jade-d', a chartreuse glitter crackle polish.

Nail stamping manicure with ultra dark green nail polish with various geometric line patterns stamped in white on thumb, middle and ring fingers. Some of the Negative space between the white lines is filled with gold-green crackle glitter. The 2 unstamped fingers each have a yellow nail art rhinestone placed bottom centre
Dark Green and White Geometric Mani
Polishes Used:
Deborah Lippmann 'Billionaire'
China Glaze Crackle Glaze 'Jade-d'
Konad Special Polish in White

Plate Used:
Bundle Monster BM-604

Deborah Lippmann 'Billionaire', China Glaze Crackle Glaze 'Jade-d', and Konad Special Polish in White
Polishes Used
Overall, I like how this manicure turned out. This is the first time that I ever used 'Billionaire', and 'Jade-d'. I really like 'Billionaire' as it's an excellent alternative to black nail polish - still edgy, but with a touch of sophistication. However, I'm still on the fence about whether or not I like how the crackle glitter looks in this manicure. I think the application method of filling negative space with crackle polish is a great idea, however, I wonder if the effect might have been better with a crackle creme polish instead of a glitter.

To me, the crackle effect doesn't really seem to stand out all that much in this manicure. I feel that the glitter is already eye-catching enough, so the sparkle distracts your eye from the cracks. In addition, the dark green polish on the bottom layer shows through the translucent base of the crackle glitter, which also seems to take away from the crackle effect. Perhaps the crackle glitter would look better with a lighter colour?

I also found it hard to get consistent cracking with this polish. My thumb showed a lot of the shatter effect, my ring finger has a bit, however, on my middle finger the cracks are barely noticeable. In fairness, the lack of shatter on my middle finger could have been due to application, since I had to use a dotting tool to put it on. Incidentally, I happen to think the middle finger looks the best, due to the minimal cracking!

Another shot of the manicure described above
Dark Green and White Geometric Mani
I'm going to have to play around with 'Jade-d' some more to figure out how to use it best, especially since I actually have two bottles of chartreuse crackle glitter - this one, and another from Sally Hansen called 'Sage Smash' (see picture below). They are pretty much exact dupes, but I really love the colour so I want to find ways to use it that highlight the shade. I have an idea that I'm testing that could be a great solution for this - but more about that in my next post!!

Picture of 2 bottles of nail polish: China Glaze Crackle Glaze in 'Jade-d', and Sally Hansen Crackle Overcoat in 'Sage Smash'
Chartreuse Crackle Glitter Polishes: Jade-d, and Sage Smash

Sunday, November 16, 2014

Gold and White Klimt Inspired Mani - Using Moyou London Artist Plate 14

This is my 3rd last manicure from my Moyou London Artist Collection Design Series. It has been a lot of fun to do, but honestly, I'm glad that it is almost over! It will be great to not have any sort of obligation to do a particular manicure, and to just be free to create based on how I'm feeling. On the other hand, it has been a welcome change having a bit structure, and I've enjoyed giving myself the opportunity to use plates that I otherwise might have delayed using.

Today's manicure is very toned down and simplified compared to the majority of my other 'Artist Collection' manicures. I just needed a bit of a change from the multi-coloured, decaled, skittles manicures that I have been doing lately! Here is the finished mani:

Nail stamping manicure with white Gustav Klimt inspired images (from Moyou London Artist 14) stamped over a gold/pink duochrome base. Gold solid ring finger accent nail, embellished with a touch of rose gold glitter.Nail stamping manicure with white Gustav Klimt inspired images (from Moyou London Artist 14) stamped over a gold/pink duochrome base. Gold solid ring finger accent nail, embellished with a touch of rose gold glitter.

Polishes Used:
Deborah Lippmann 'Sugar Daddy'
Maybelline Color Show 'Gilded Rose'
Konad Special Polish in White

Deborah Lippmann 'Sugar Daddy', Mabelline Color Show 'Gilded Rose', and Konad Special Polish in White
Polishes Used - 'Sugar Daddy', 'Gilded Rose', and Konad White Special Polish

I used 'Sugar Daddy' as the base colour for all of my nails. Using the Gustav Klimt inspired Moyou London Artist Collection 14 plate, I stamped 8 different images in white over the rose/gold duochrome base. I left my ring fingers solid, but embellished the tips with a touch of 'Gilded Rose', a rose gold glitter.

This is my first time using a Deborah Lippmann polish. I've owned 'Sugar Daddy' for a few months now, but I never got around to using it. I'm quite pleased with the consistency and the coverage - for this manicure, I'm only wearing one coat! I also love how cute the bottle is!

I also really love how well 'Sugar Daddy', and 'Gilded Rose' go together. 'Gilded Rose' is practically the glitter version of 'Sugar Daddy'!  Because of this, using it on the tip of my accent finger kept the look monotone, but gave a bit of texture. I just adore the effect.

In the pictures above, the images of my thumbs are upside down, and partially obscured by the flash of my camera, here's a better look at them:

Nail stamping manicure with white Gustav Klimt inspired images (from Moyou London Artist 14) stamped over a gold/pink duochrome base. Nail stamping manicure with white Gustav Klimt inspired images (from Moyou London Artist 14) stamped over a gold/pink duochrome base.

All in all, I really love this manicure. The best part about it is that it was relatively quick and easy to do! Stay tuned for the final two instalments of the design series!