Showing posts with label 2015 Crackle Polish Challenge. Show all posts

Tuesday, April 14, 2015

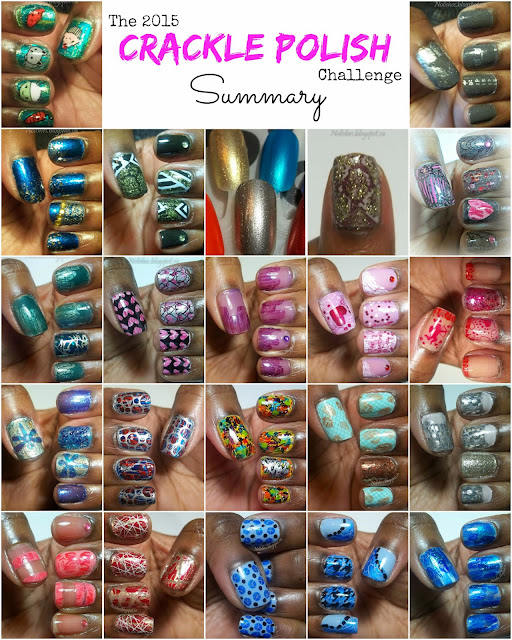
The 2015 Crackle Polish Challenge Summary

Now that the 2015 Crackle Polish Challenge is over, I want to use today's post to summarize my thoughts, feelings, and findings over the past few months.

Collage featuring all 22 of my 2015 Crackle Polish Challenge Manicures

As some of my readers may already know, I recently finished a self-imposed challenge to design manicures for each of the 20 bottles of crackle polish in my nail polish collection. The goal was to use each bottle in a different, creative way that updates the traditional crackle polish manicure. Prior to the challenge, the bottles had not been used for over three years. I was tired of ignoring them, so the challenge came about as my attempt to start using them again – without looking like I had just stepped out of 2011!
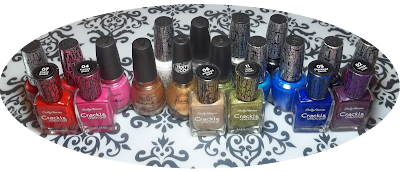
Sally Hansen Crackle Overcoat: Cherry Smash, Fuchsia Shock, Antiqued Gold, Sage Smash, Distressed Denim, and Vintage Violet; China Glaze Crackle Glaze: Broken Hearted, Cracked Medallion, Jade-d, and Cracked Concrete; OPI: Red Shatter, Pink Shatter, Turquoise Shatter, Blue Shatter, Navy Shatter, Super Bass Shatter, White Shatter, Silver Shatter, and Black Shatter; and Nicole by OPI 'Gold Texture'
My Crackle Polish Collection
My first post about the challenge was published Jan 9th, and the last post about it was published April 3rd. This project lasted exactly 12 weeks - that's close to 3 months! In total, I posted 22 crackle manicures, although there were also other vetoed ideas, and unsuccessful experiments. All told, that's a lot of time spent wearing, applying, and thinking about crackle polish! I definitely have learned a few things from the experience.

First and foremost, this experiment has made me appreciate the artistic value of crackle topcoat! It's a great tool to have in your bag of tricks, and can be used to create gorgeous nail art - the key is to think outside of the box with application and techniques to avoid looking dated. It helps to think of crackle polish as part of your manicure, as opposed to something you use for a ‘crackle manicure’. In other words, use it as part of a concept or theme, as opposed to it being the entire focus.

Some of my favourite techniques from the challenge did precisely this. I feel the uses went beyond a crackle manicure, and instead created nail art that just happened to use crackle polish. As a result, I'm looking forward to being able to incorporate these techniques into my nail art going forward. Here are my top five crackle applications from the challenge:

1) Using a negative space nail stamping image over a crackle background
2) Using crackle polish to create a graffiti art effect
3) Using crackle polish and jelly polish to make a 'Crackle Sandwich'
4) Using crackle polish for a dotted manicure
5) Using crackle polish to make nail decals

Negative Space Stamping over Pink on Pink Shatter, Rainbow Graffiti Mani, Teal and Gold Crackle Sandwich, Blue Crackle Dotticure, and the Dragonfly Double Crackle Mani
Left to Right: My Top 5 Crackle Polish Applications from the Challenge
I also have two honourable mentions from the challenge. These didn't necessarily transform the crackle polish into anything new, but they did tone down the look in such a way that the crackle polish does not overwhelm all of the other design elements of the manicure. I can also see myself using these techniques again in future manicures:

6) The 'Crackle Curve' technique
7) Using crackle polish to help embellish an accent nail

Blue Hounds-tooth Crackle Manicure, and the Blingy Turquoise and Gold Mani
Left to Right: My Top 2 Honourable
Mentions From the Challenge
Another thing I learned from this challenge, is to not get caught in the trap of feeling that you can't use something just because it isn't on trend. You can always add your own creativity and style into how you use any cosmetic product, and by doing that, you can make almost anything work. At the start of the challenge, when faced with the prospect of wearing crackle polishes for my next 20 manicures, I was originally worried about looking unfashionable and/or not loving my manicures. However, throughout the challenge, I actually got compliments on some of my nail looks, and even more importantly - I really loved how a lot of the manicures turned out!

This challenge also taught me to not let anything cramp your style. When I first thought of the challenge, I was also a little worried about not being able to add my own personal style into the manicures. I love nail stamping, and I originally thought that having to use crackle polish would mean that I wouldn't be able to do a lot of nail stamping for an extended period of time. However, as the challenge progressed it became more and more apparent to me that rather than being limited in the types of nail art I could do, having to use crackle polish actually gave me more options in some cases, by providing me with one more tool that I could use for my stamping manicures.

Not only did I still manage to do some nail stamping for the majority of the crackle manicures, I even got to execute some ideas that I had in mind for ages. 'Crazy Decal Mani', 'Dragonfly Mani', and 'Graffiti Mani' were all ideas I had quite some time ago - this challenge gave me the opportunity to do them, and a tool with which to make them better than I had originally envisioned. In addition, I even had a nail stamping epiphany that will make me a better stamper going forward:  I learned that the value of negative space nail stamping images lies in the fact that they enable you to turn an intricately patterned backgrounds into intricately patterned objects by stamping a the negative space background image over the pattern. This realization has breathed new life into my nail stamping!

Finally, this challenge has also reinforced a piece of wisdom that we sometimes take for granted: Just because something isn't popular, it doesn't mean that it is not good. There are all kinds of underrated concepts, people, places, and things in life - but for now, let's just stick to nail polish! Right now, I can only think of one major brand still making new bottles of crackle polish. This is a major contrast to how things were at the height of the crackle fad, when pretty much every single polish company had at least one crackle line, if not several variations of crackle polish to offer (metallic, neons, glitter, pastels etc.). I feel that the reason why crackle polish is virtually nowhere to be seen right now, is because it has suffered from the uber-popularity it enjoyed a few years ago. When something becomes too big of a fad, there is usually a reaction against it when the fad is over.

I'm realizing now just how unfortunate that is, because crackle polish is a wonderful top coat option - just like glitter top coat, matte top coat, glow-in-the-dark top coat, shimmer top coat, tinted top coats, high-gloss top coat etc. I think it's important not to throw the baby out with the bathwater. Yes, a full set of traditional crackle nails is not always the most creative, inventive manicure out there, but with surprising colour choices, and/or used with interesting techniques, crackle topcoat can be used to create beautiful works of nail art. Creative tools shouldn't be stigmatized, or deemed unfashionable in and of themselves. The result you get all depends on what you do with them. With a little effort and imagination, any polish can be used to make amazing nail art.

From what I remember, the crackle polish fad started with the popularity of OPI's 'Black Shatter' from their spring 2011 Katy Perry collection. Over the next 2 years or so, the fad spread to other brands, gathered momentum, reached its peak, and then slowly fizzled out. That 2 or 3 year period must have translated into millions of bottles of crackle polish sold. That means there must still be a lot of crackle polish out there in people's collections - some perhaps even gathering dust, just like mine were. For those of you in that situation, I challenge you to take them out, and play around with them. Have fun, and see what you come up with!
Friday, April 3, 2015

Crackle Polish Challenge #21 - Blue Patchwork Base Crackle Mani

2015 Crackle Polish Challenge Manicure #21

Featured crackle application:
Using a multi-coloured base underneath crackle polish

Featured crackle polish:
Sally Hansen Crackle Overcoat 'Distressed Denim'

Crackle manicure using multiple shades of blue as the base layer, and topped with royal blue crackle topcoat

Polishes Used:
Sally Hansen Crackle Overcoat 'Distressed Denim'
Sally Hansen Complete Salon Manicure 'Tulle Kit'
Essie 'Borrowed & Blue'
Essie 'Smooth Sailing'
Lise Watier 'Blue-tiful'
Borghese Rapido 'Capriccio Blue'
China Glaze 'Water You Waiting For'
Nicole by OPI 'Top of My World' (from the Justin Bieber Collection)

Sally Hansen Crackle Overcoat 'Distressed Denim', Sally Hansen Complete Salon Manicure 'Tulle Kit', Essie 'Borrowed & Blue', Essie 'Smooth Sailing', Lise Watier 'Blue-tiful', Borghese Rapido 'Capriccio Blue', China Glaze 'Water You Waiting For', and Nicole by OPI 'Top of My World'
Polishes Used
Today, I am so pleased to present the 21st and final manicure of the 2015 Crackle Polish Challenge! After two and a half months of using predominantly crackle polishes, I'm really excited about being free to use other polishes, styles, and techniques again!

For this manicure, I started with a base coat of the sheerest base polish - 'Tulle Kit'. Then, I applied the 5 other base polishes randomly on sections of each nail. I called this a patchwork base mani because the sections I used were uniform: I divided each nail into six parts, and each part was filled with a stroke of a different polish. The end result reminded me of a patchwork quilt!

collage showing how the blue patchwork base layer was created for the 'patchwork base crackle mani'
Base Layers
Next I applied the crackle polish in short, slightly spaced out, strokes. Then I topped everything off with an iridescent blue glitter topcoat, and then a layer of a glossy, quick dry topcoat. I'm quite happy with the results. I like how the use of different colours, sheens, and textures for the base coat transformed the crackle polish look into an abstract pattern.

I'm planning to do one final 'Crackle' post in which I sum up the challenge, and I also hope I'll be able to squeeze in an Easter Mani at some point.  Stay tuned!

Monday, March 30, 2015

Crackle Polish Challenge #20 - Blue Crackle Dotticure

2015 Crackle Polish Challenge Manicure #20

Featured crackle application:
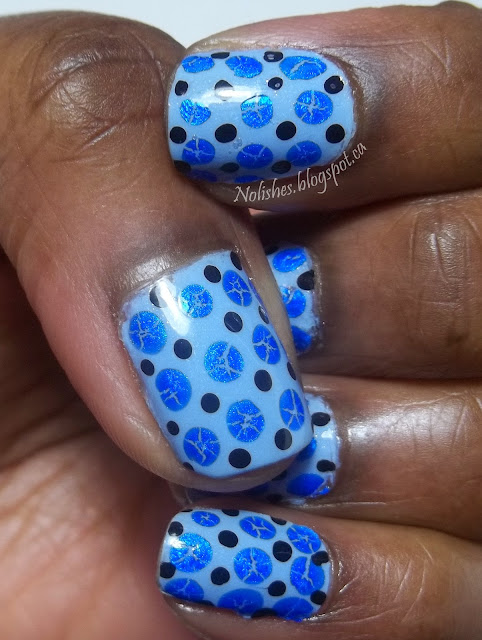
Using crackle polish for a dotted manicure

Featured crackle polish:
OPI 'Blue Shatter'
Manicure using a dotting tool to create dots in 2 sizes and 2 colours. The larger dots were made using blue crackle polish to give an interesting effect, and the smaller dots were made with black polish.
Blue Crackle Dotticure
Polishes Used:
Konad Special Polish in Black
OPI 'Blue Shatter'
Essie 'Rock the Boat'
Konad Special Polish in Black, OPI 'Blue Polish', and Essie 'Rock the Boat'

I'm really pleased with the way this dotted crackle effect turned out! The cracks on the blue shimmery dots kind of resemble the edges of the facets on the surface of a cut blue sapphire. It's like there are small gemstones all over my nail!

The only thing I was a little disappointed with is that I had trouble getting the crackle polish to work on 2 of my nails. The very first attempt with crackle dotting was done on the 3 fingers prominently displayed in the picture above. I was originally going to do something else with my other two fingers, but changed my mind (more on that later). When I went back to dot the remaining 2 fingers, for some reason, I couldn't get the polish to crack any more! I even went back and started from scratch 3 separate times, but could not recreate the effect.

When I first tried it, I didn't put much thought into it - I was experimenting, so I didn't pay too much attention to my technique. I just put a small blob of polish on the back of a piece of plastic, and started dotting. It worked fine. When It came out beautifully, and I later decided that wanted to continue doing it, I just could not recreate the results.  It was so frustrating! I may have to try again with a different polish. Here are some additional shots of the manicure:

Manicure using a dotting tool to create dots in 2 sizes and 2 colours. The larger dots were made using blue crackle polish to give an interesting effect, and the smaller dots were made with black polish.

On my left hand, I did a different crackle mani using the same colours.  Originally, my plan for both hands was to do a stamped hounds-tooth design (from Bundle Monster plate BM-322) on my middle and ring fingers, and use the dot design only for the thumb, index and pinky fingers.  I painted my nails with 'Rock the Boat', and did the crackle stamping on the accent fingers of both hands. I started doing the dots on the right hand. When I finished, I didn't like the way the 2 designs looked together, so I decided to nix the hounds-tooth and just do the same dot design on the ring and middle fingers (as mentioned above, this is where it all started to go wrong!).

When I got to my left hand, I didn't want to remove the hounds-tooth because I liked the way it looked, so I just decided to do another design on the remaining three fingers that worked with the hounds-tooth pattern. Here's the finished result:

Alternate Version Blue Crackle Mani
Using BM-322
Since this manicure also features a crackle polish technique that I am now using for the second time, I think I should go ahead and acknowledge it.  I'm calling it the 'Crackle Curve'. It's the sweep of crackle nail polish that starts at or near the base of one corner of the nail, and ends up at the top corner of the opposite side of the nail. The other time I used this technique was in the Pink, Red, and White Valentine's Day Mani. So to make it official:

2015 Crackle Polish Challenge Manicure #20.5 - Blue Houndstooth Crackle Manicure:

Featured crackle application:
The 'Crackle Curve' technique

Featured crackle polish:
OPI 'Blue Shatter'

Stay tuned for my next post which will be the final instalment of the 2015 Crackle Polish Challenge!

Sunday, March 29, 2015

Crackle Challenge Out-take: Dissolved Crackle Experiment

Today I have a failed crackle nail polish experiment to share:

Collage showing the results of a manicure experiment in which a manicure with an orange base covered in royal blue crackle top coat, was subjected to various attempts to remove sections of the polish (using nail polish remover), in a way that was pleasing to the eye - the experiment failed.
Failed Crackle Experiment:
Dissolved Crackle
As part of the 2015 Crackle Polish Challenge, I've been trying to find creative ways to use crackle polish, in order to find alternatives to the the traditional crackle combo (like the one pictured in the upper left quadrant in the collage above). Sometimes, the ideas work out, and result in beautiful manicures. Other times, the results aren't so pretty - today's manicure falls into this category!

Originally I wasn't going to post this, but I changed my mind. I still think dissolving parts of a crackle mani is a good idea, it just take some skill and technique to properly execute - which I haven't yet acquired! I'm going to have to do a bit of research to figure this out.

I tried to remove the polish using a cotton swab soaked in nail polish remover. I found it really hard to control the final shape of the dissolved area using this method, which is why the results are so messy looking. One thing I do like though, is how a border of the orange base colour is left around all of the clear sections where the polish was removed - it's a pretty interesting effect.

The polishes used for the experiment were Essie 'Capri', and Sally Hansen Crackle Overcoat 'Distressed Denim'.

Sally Hansen Crackle Overcoat 'Distressed Denim', and Essie 'Capri'
Polishes Used
There are only 2 more bottles of crackle polish left, in the Crackle Polish Challenge - I'm so excited to be almost at the finish line!

Tuesday, March 24, 2015

Crackle Polish Challenge #19 - Diagonal Stripe Themed Mani

2015 Crackle Polish Challenge Manicure #19

Featured crackle application:
Using manicure tape to mask areas of a crackle combo to create diagonal lines of clear polish.

Featured crackle polish:
OPI 'Red Shatter'

Nail stamping manicure featuring all nails covered with red shatter polish over a gold base. On the thumb and ring finger, pieces of nail art tape were used to mask randomly placed diagonal lines, so that when removed it would leave lines of clear polish. The remaining fingers are stamped with a nail stamping pattern featuring randomly place thin white lines.
Diagonal Stripe Themed Mani
Polishes Used:
Quo by Orly 'Filthy Rich'
OPI 'Red Shatter'
Konad Special Polish in White

Plate Used:
Moyou London Holy Shapes Collection - 07

Quo by Orly 'Filthy Rich', OPI 'Red Shatter',  and Konad Special Polish in White
Polishes Used
I like how my thumbnail turned out in this manicure. The tape removed cleanly, and the way it breaks the shatter polish into sections is a pretty cool effect.  Overall, I'm kind of on the fence about this manicure - I don't necessarily hate it, but I don't love it either. Oh well, the beautiful thing about nail polish is that you don't have to wear it forever!  LOL!

Monday, March 23, 2015

Crackle Polish Challenge #18 - See-Through Stripe Mani

2015 Crackle Polish Challenge Manicure #18

Featured crackle application:
Using manicure tape to section off strips of a crackle combo to create alternating stripes of clear polish, and crackle polish.

Featured crackle polish:
OPI 'Pink Shatter'

Crackle polish manicure featuring thick alternating stripes of sheer pink, and a light pink/medium pink crackle polish combo on thumb and ring finger. Index and pinky are solid sheer pink each with a pink nail art gemstone placed at the base of the nail. The middle finger is completely covered in the pink on pink crackle combo.
See-Through Stripe Mani
I'm back with another instalment of the 2015 Crackle Polish Challenge. It was really nice to have a little break from crackle manicures, but I'm really looking forward to finishing the last 4 manicures in this series (that's 4 including today's).

It seems to be a big trend right now in the nail art community to include sections of clear polish in manicures.  So to finish off the Crackle Challenge, I've been thinking of ways to combine today's trend with crackle polish, a big trend from about 4 years ago.

I like how this manicure turned out.  I really like the minimalism.  It doesn't feel like a crackle mani, it feels more like a clear mani with a little embellishment.  I think this really updates the crackle look by toning it down.

Polishes Used: 
China Glaze 'Pinking out the Window' (Spring 2015 'Road Trip' Collection)
OPI 'Pink Shatter'
Quo by Orly 'Soft Spot'
China Glaze 'Pinking out the Window', OPI 'Pink Shatter', and Quo by Orly 'Soft Spot'

Stay tuned for my next post, which will also feature a fusion of the clear polish trend of today, and the crackle polish trend of the recent past!

Thursday, March 12, 2015

Crackle Polish Challenge #17 - Pink, Grey, and White-Gold Half-Moon Crackle Dotticure

2015 Crackle Polish Challenge Manicure #17

Featured crackle application:
Using crackle polish as the background texture for a dotticure

Featured crackle polish:
China Glaze Crackle Glaze 'Cracked Concrete'

A nail stamping manicure using crackle nail polish as the background for a dotticure to give a 'studded leather' effect. All nails except the ring finger feature pink half-moons at the base, and grey crackle polish over a pink base on the upper portion. The grey crackle polish is also covered in white gold dots. The ring finger features white gold glitter over the whole nail.

Polishes Used:
Essie 'Jiggle Hi Jiggle Low'
OPI 'Spark De Triomphe'
OPI 'Makes Men Blush'
China Glaze Crackle Glaze 'Cracked Concrete'

Essie 'Jiggle Hi Jiggle Low', OPI 'Spark De Triomphe', OPI 'Makes Men Blush', and China Glaze Crackle Glaze 'Cracked Concrete'

I really love the way 'Spark De Triomphe' and 'Jiggle Hi Jiggle Low' match each other. The white gold is such a beautiful colour, it's great to have it in both a glitter and a metallic version! If this weren't the crackle challenge, this manicure would look beautiful with 'Jiggle' covering the entire upper portion of the nail, above the pink half moons.

I used circular paper reinforcements to serve as a guide for the half-moons.  Next time, I may try lowering them a bit, as I feel the half-moons are just a touch too large.

Overall, I'm happy with the way this manicure turned out.  In real life, it looks pretty cool on my hands. The grey crackle with the dots over it reminds me of studded leather - it's a pretty cool effect!

Tuesday, March 3, 2015

Crackle Polish Challenge #16 - Blue and Bronze 'Barely There' Crackle Mani

2015 Crackle Polish Challenge Manicure #16

Featured crackle application:
Using wisps of crackle polish to embellish the nail

Featured crackle polish:
China Glaze Crackle Glaze 'Cracked Medallion'

Nail stamping manicure featuring light blue polish on all nails except for ring finger, stamped with a medium blue thin lattice pattern, and then embellished with wisps of bronze crackle polish. The ring finger is painted with bronze polish, and covered in bronze glitter.
Barely There Crackle Mani

China Glaze Crackle Glaze 'Cracked Medallion', China Glaze 'At Vase Value', OPI 'Brisbane Bronze', OPI 'Can't Find my Czechbook', and Essie 'Summit of Style'

Polishes Used:
China Glaze Crackle Glaze 'Cracked Medallion'
China Glaze 'At Vase Value'
OPI 'Brisbane Bronze'
OPI 'Can't Find my Czechbook'
Essie 'Summit of Style'

Nail Stamping Plate Used:
Konad m57


This manicure was really quick and easy to do.  The wisps of crackle polish didn't end up looking exactly as I had envisioned them, but I still think the end result works. Overall, there's not much else to say about this one, so I think I'll keep this post short and to the point!

Saturday, February 28, 2015

Crackle Polish Challenge #15 - Rainbow Graffiti Mani

2015 Crackle Polish Challenge Manicure #15

Featured crackle application:
Combining multiple crackle polishes with regular polishes for a graffiti art effect

Featured crackle polish:
OPI 'Black Shatter'
A nail stamping manicure using 10 nail polishes to create a multi-colour abstract splatter effect manicure. The ring finger has a silver and black graffiti tag decal.
Rainbow Graffiti Mani
Polishes Used
Claire’s ‘Splatter Paint’
Sally Hansen Crackle Overcoat ‘Cherry Smash’
Nicole by OPI ‘Tangerini Bikini’
OPI ‘The “It” Color’
Sally Hansen Complete Salon Manicure ‘Grass Slipper’
OPI ‘Turquoise Shatter’
OPI ‘Super Bass Shatter’
Sally Hansen Insta-Dri ‘Silver Sweep’
OPI ‘Black Shatter’
Konad Special Polish in Black

Claire’s ‘Splatter Paint’, Sally Hansen Crackle Overcoat ‘Cherry Smash’, Nicole by OPI ‘Tangerini Bikini’, OPI ‘The “It” Color’, Sally Hansen Complete Salon Manicure ‘Grass Slipper’, OPI ‘Turquoise Shatter’, OPI ‘Super Bass Shatter’, Sally Hansen Insta-Dri ‘Silver Sweep’, OPI ‘Black Shatter’, and Konad Special Polish in Black
Polishes Used
Nail Stamping Plate Used:
Moyou London Rockstar Collection - 12

I wanted this manicure to be colourful and fun, so I decided to use a bright yellow base colour (OPI 'It Color'), to layer all of the other polishes over. I started with small strokes of the four shatter polishes (red, turquoise, purple, and black) , and tried to vary the direction, placement and length of the strokes for a random effect. I used the black shatter polish last, to help it stand out a little more.

Then I used a dotting tool to add dots of the orange and green regular polishes, again varying the size of the dots, and their placement. After that, I topped all of my nails with a splatter effect glitter topcoat. I made 2 graffiti tag nail stamping decals using silver and black polishes, and then placed the decals over my ring fingers. I finished the look off with some topcoat to seal everything in and to add shine.

I really love the finished look! This manicure was so much fun to do, and to wear - I found myself looking at my nails a lot as I went through my day!

Here are some more shots of the completed manicure:

3 different shots of the Rainbow Graffiti Manicure
Rainbow Graffiti Mani - Extra Shots

Sunday, February 22, 2015

Crackle Combo Mani #2

So I gave in to temptation and re-did the Crackle Combo Mani from my last post! Here's the Do-Over:

Nail stamping manicure featuring a light blue base covered with red and blue strokes of crackle polish, and then topped with a white negative space circle pattern stamping image
Crackle Combo Mani #2
Polishes Used:
Essie 'Mint Candy Apple'
Sally Hansen Crackle Overcoat 'Cherry Smash'
OPI 'Navy Shatter'
Konad Special Polish in White

Essie 'Mint Candy Apple', Sally Hansen Crackle Overcoat 'Cherry Smash', OPI 'Navy Shatter', and Konad Special Polish in White
Polishes Used
I like the overall look of this mani much better, due to the lighter colours. However, I noticed that the stamping image doesn't stand out as much on this one as it did in the last version. If you look closely at the pinky, you may be able to see a bit of Sally Hansen 'Silver Sweep' nail polish outlining a portion of some of the circles. I tried stamping the image using silver polish on that nail, to see if the pattern would stand out more. It didn't make much difference, so I just stamped over it again with white so that the nails would be consistent.

I did a side-by-side before and after collage to show the differences between the manicures.


Stay tuned for my next post, where I will continue with the rest of the 2015 Crackle Polish Challenge!

Saturday, February 21, 2015

Crackle Polish Challenge #14 - Crackle Combo Mani

2015 Crackle Polish Challenge Manicure #14

Featured crackle application:
Combining two colours of crackle polish for a cool abstract art effect

Featured crackle polish:
OPI 'Navy Shatter'

Manicure using 2 shades of shatter nail polish, red and navy) over a sparkly silver base. This is then stamped with a silver negative space circle pattern.
Left: Crackle Combo Mani
Right: Jazzed-up Version 
Polishes Used:
OPI 'Navy Shatter'
Sally Hansen Xtreme Wear 'Celeb City'
Sally Hansen Crackle Overcoat 'Cherry Smash'
Sally Hansen Insta-Dri 'Silver Sweep'

OPI 'Navy Shatter', Sally Hansen Xtreme Wear 'Celeb City', Sally Hansen Crackle Overcoat 'Cherry Smash' and Sally Hansen Insta-Dri 'Silver Sweep'
Polishes Used
Plate Used:
Lily Anna 06

I really don't know what to say about this manicure! I guess I'm kind of indifferent to the final look. It's a fun looking manicure, but it's not my usual style - I usually prefer brighter and/or lighter colours. I think if I were redesigning it now, I'd probably go with a light blue base, and maybe less coverage of the shatter polishes so more light blue shows through. Then I would probably try stamping the same negative space circle pattern in white instead of silver. As much as I would like to avoid doing a 'Do-Over' mani during a challenge (I've been wearing crackle polish manicures exclusively for over a month now, and still have 7 more to go!) - I'm really tempted to do just that!

Monday, February 16, 2015

Crackle Polish Challenge #13 - Dragonfly Double Crackle Mani

2015 Crackle Polish Challenge Manicure #13

Featured crackle application:
Layering a crackle decal over a crackle background to achieve a 'crackle on crackle' effect

Featured crackle polish:
Sally Hansen Crackle Overcoat 'Vintage Violet'

Skittles Manicure. The thumb and ring finger feature custom purple and iridescent teal dragon fly decals over a metallic green and gold crackle base. The middle finger has a purple, gold, green and blue chunky holographic glitter. The pinky and pointer fingers are covered in a shimmery purple polish with a subtle blue glass fleck.
Dragonfly Double Crackle Mani
Polishes Used
    Crackle Decal:
        Sally Hansen Crackle Overcoat 'Vintage Violet'
        Wet n Wild Wild Shine 'Bijou Blue' (also used as base coat under glitter)
    Glitter:
        Finger Paints 'Daubigny's Garden'
    Crackle Background:
        Sally Hansen Color Foil 'Minted Metal'
        Nicole by OPI 'Gold Texture'
    Solid Nails:
        Nicole by OPI 'Canadian Star', from the Justin Bieber Collection

I chose dragonfly themed colours for this manicure. They are are a combination of cool, shimmery and iridescent polishes. Here's a picture of the bottles.

Sally Hansen Crackle Overcoat 'Vintage Violet', Nicole by OPI 'Canadian Star', Wet n Wild Wild Shine 'Bijou Blue', Finger Paints 'Daubigny's Garden', Nicole by OPI 'Gold Texture', and Sally Hansen Color Foil 'Minted Metal'
Polishes Used
This was quite an elaborate manicure to do. The most time consuming part was making the nail polish decals.  To do this, I spread a large swath of (an inexpensive) nail polish over a flat piece of plastic. I used one of the flat sides from one those annoyingly difficult to open transparent rigid plastic packages that pretty much everything you buy these days seems to come encased in. It was great to find a use for them other than accidentally cutting myself, and frustrating me to no end! LOL!

After the polish was completely dry, I put a few different crackle polishes over the swath. When that was completely dry, I attempted to remove the polish from the plastic. At first, I was trying to peel the polish away from the plastic. I had a little difficulty with this method, so I added a layer of topcoat, to try to make it a bit more pliable. I was then able to peel and lift the polish when it dried.

I actually made two crackle sheets, using different base polishes. Due to all of the problems I had with the first sheet, I tried a different removal method for the second sheet. For that one, I tried bending the plastic backwards, along the edge of the dried polish. It worked like a charm - the polish lifted easily and cleanly without topcoat.

The next step was to cut the dried polish into shapes using hole punches. I made heart shapes, and dragon fly shapes since those are the 2 decorative punches that I have. After that, the decals were ready to be applied. I also have a bunch left over, for future manicures.

I've included a pictorial tutorial below:

Visual tutorial showing how the nail polish decals were made

Here is another collage showing different pictures of the manicure. The thumb close up shots give a better view of the green and gold crackle background, under the decal.

Collage showing base polishes before embellishments, close up of thumbs, and alternate view of the fingers.

This manicure was a lot of fun to do, and I really like how it turned out! So far, this is one of my favourites from the challenge!

Saturday, February 14, 2015

Crackle Polish Challenge #12 - Red Shatter Tip Valentine Mani

2015 Crackle Polish Challenge Manicure #12

Featured crackle application:
Using crackle polish to embellish nail tips

Featured crackle polish:
Sally Hansen Crackle Overcoat 'Cherry Smash'

Nail stamping manicure featuring nail tips embellished with red shatter polish, and nail stamps of cupid on the thumb, and a full nail heart design on the middle finger. The ring finger is covered with chunky red glitter.
Red Shatter Tip Valentine Mani
Polishes Used:
Sally Hansen Crackle Overcoat 'Cherry Smash'
Sally Hansen Complete Salon Manicure 'Strawberry Shields'
China Glaze 'Love Letters'
Sally Hansen Xtreme Wear 'Cherry Red' 

Plates Used:
Moyou London Festive Collection - 20
PUEEN43
Sally Hansen Crackle Overcoat 'Cherry Smash', Sally Hansen Complete Salon Manicure 'Strawberry Shields', China Glaze 'Love Letters', and Sally Hansen Xtreme Wear 'Cherry Red'
Polishes Used
Today I have one final Valentine's day Mani to share for this year. Still keeping with the Crackle Polish Challenge, I used red shatter polish to decorate my nail tips. One thing that I really like about using shatter polish this way, is that you don't have to be as careful when polishing your nail tips as you would normally have to be for a traditional French manicure. Actually, this is the main reason that I don't do a lot of tip designs or French manicures on this blog - I rarely have the patience for that!

I could definitely see myself trying this shatter tip mani again with my white shatter polish, or maybe even trying to layer a different coloured shatter polish over a traditional white French tip.

Bye for now, and Happy Valentine's Day!!!

Crackle Polish Challenge #11 - Pink, Red and White Valentine's Day Mani

2015 Crackle Polish Challenge Manicure #11

Featured crackle application:
Basic stamping over a shatter background.

Featured crackle polish:
OPI 'White Shatter'

Valentine's Day Mani featuring a medium pink base polish jazzed up in a variety of ways. The thumb has a full nail stamped image done with multi-coloured stamping (white and red) and then embellished with more red polish. The pinky and pointer fingers feature a swoosh of white crackle polish covering the tips, and a single nail art rhinestone each. The middle finger features a red and white chunky glitter polish, and the ring finger is covered with a layer of white crackle polish, and then a full nail image is stamped over it in red. This stamp reads 'Happy Valentine's Day'.
Pink, Red and White Valentine's Day Mani

OPI 'Got a Date To-Knight', OPI 'White Shatter', OPI 'Minnie Style', A England 'Perceval', and Konad Special Polish in WhitePolishes Used:
OPI 'Got a Date To-Knight'
OPI 'White Shatter'
OPI 'Minnie Style'
A England 'Perceval'
Konad Special Polish in White

Plates Used:
Moyou London Festive Collection - 20
PUEEN35


Today's manicure is another variation of the stamping over shatter polish, that I did in my last post. The difference is that on today's manicure, I did more traditional stamping where the stamped image is in the foreground, as opposed to my last manicure, where the negative space stamping becomes the background of the final image. In other words, this manicure uses shatter polish as the background for stamping (on my ring finger), while my last manicure uses stamping to put the shatter in the foreground.

I really love the colour combination for this manicure - it just screams Valentine's Day!!!

Friday, February 13, 2015

Crackle Polish Challenge #10 - Purple Monochromatic Shatter Mani

2015 Crackle Polish Challenge Manicure #10

Featured crackle application:
Tone on tone shatter application, using different opacities to create contrast.

Featured crackle polish:
OPI 'Super Bass Shatter'

Shatter polish manicure featuring a base layer of translucent purple polish, partially covered with purple shatter polish from the tips to approximately mid-nail. The ring finger features a single purple nail art rhinestone at the base,
Purple Monochromatic Shatter Mani

Polishes Used:
OPI 'Super Bass Shatter', and OPI Sheer Tints 'Don't Violet Me Down'


OPI 'Super Bass Shatter', and OPI Sheer Tints 'Don't Violet Me Down'

Today's manicure pairs 2 versions of essentially the same colour. Usually with crackle manicures, you see two different colours paired together, obviously so that the base polish showing through the cracks will appear as a different colour than the cracked polish on top.  Monochromatic Crackle manis are frequently done, however you will usually see a pairing of two different shades of the same colour, (for example light pink and dark pink, like in my shattered heart mani) -rarely do you see the exact same shade of the exact same colour.  

That's what makes today's mani a little different. I've used 2 medium-dark purples in this shatter mani, but to create the contrast needed to make the crackle effect worthwhile, I've used the shade in formulations with different finishes. The base polish is translucent, while the crackle topcoat is opaque.

I am surprised by how much I like this manicure! It's very simple, but fun, pretty, and slightly edgy all at once!

Wednesday, February 11, 2015

Crackle Polish Challenge #9 - Negative Space Stamping over Pink on Pink Shatter

2015 Crackle Polish Challenge Manicure #9

Featured crackle application:
Stamping a negative space image over a background of crackle polish so that the objects created by the stamped image end up crackle patterned.

Featured crackle polish:
China Glaze's Crackle Glaze in 'Broken Hearted'

Nail stamping manicure featuring small, light pink hearts with medium pink crackle texture, evenly interspersed over a black background
Negative Space Stamping over Pink on Pink Shatter

Polishes Used:
China Glaze Crackle Glaze 'Broken Hearted'
OPI 'Pink Friday'
Konad Special Polish in Black

Plate Used:
PUEEN55

I really like the finished look of this mani. This manicure also gave me some new insight on how to take better advantage of the negative space etched images in my stamping plate collection. I usually don't use those images on my plates, because previously, I never really clued in to the advantages of stamping the background colour polish over most of the foreground colour polish except for the design you want, when usually you could just as easily stamp the design in the foreground colour over the background colour. 

Now, I finally get it! Negative space stamping gives you more possibilities, because it allows you to use a pattern or texture as your base coat, or maybe even a sheer colour, (or anything else that is difficult to stamp over another colour), and have that ultimately be the pattern/texture/colour of the design. For example, if I wanted to get the same look of today's mani, without negative space stamping, I would have to stamp crackled hearts over a black background. To do this, I would have to first make sure that the light pink polish was opaque enough that the black won't show through it, (or use multiple coats of the light pink, which would present even more of a technical challenge), stamp light pink hearts over the black, and then apply the crackle polish individually to each heart. That would be way more time consuming, and might not even work without the right light pink polish!

Another interesting technical thing I did with this mani, was using thin, short strokes when I applied the crackle polish, so the cracks would be finer. This way, the smaller cracks would look more proportional on the small hearts. 

Here's a variation of this manicure that I did on my left hand:

Nail stamping manicure featuring small, light pink hearts with medium pink crackle texture, evenly interspersed over a black background, on the thumb, ring finger and pinky. The Index and middle fingers feature the same pink hearts interspersed over a silver background, and then stamped with a interlocking heart outline pattern
Negative Space Stamping over Pink on Pink Shatter - Variation

Originally, I didn't want to have a lot of contrast in my final design, so instead of using black polish, I tried to stamp a silver polish, China Glaze 'I'd Melt for You', over the pink on pink crackle base. That didn't quite work out, because there was not enough contrast! In order to salvage the design (I really didn't want to have to start all over again) I ended up stamping a heart outline image from plate PUEEN41 over it. By the way, this is what I call a 'peace sign' mani, because the index and middle fingers, the fingers used to make a peace sign, are different than the rest of the nails - now, I'm not sure if anyone else uses this term, but that's how I think about it!

OPI 'Pink Friday', China Glaze 'Broken Hearted', China Glaze 'I'd Melt for You', and Konad Special Polish in Black
Polishes Used

Monday, February 9, 2015

Crackle Polish Challenge #8 - Teal and Gold Crackle Sandwich

2015 Crackle Polish Challenge Manicure #8

Featured crackle application:
Using crackle polish and jelly polish to make a 'crackle sandwich'

Featured crackle polish:
Sally Hansen's Crackle Overcoat in 'Antiqued Gold'

Crackle Sandwich manicure featuring a staircase shaped application of Gold Crackle Polish sandwiched in between 2 layers of a Jelly polish. The ring finger accent nail features teal and green glitter polish stamped with an abstract gold 'scribble' design
Teal and Gold Crackle Sandwich

Polishes Used:
Sally Hansen Crackle Overcoat 'Antiqued Gold'
Sally Hansen Color Foil 'Liquid Gold'
Sally Hansen Complete Salon Manicure 'Mermaid's Tale'
Zoya 'Frida'

Sally Hansen Crackle Overcoat 'Antiqued Gold'; Sally Hansen Color Foil 'Liquid Gold'; Sally Hansen Complete Salon Manicure 'Mermaid's Tale'; and Zoya 'Frida'
Polishes Used
Plate Used:
Konad M70

This 'Crackle Sandwich' was created by sandwiching a staircase shaped application of 'Antiqued Gold' in between 2 layers of 'Frida'. The ring finger accent nail was done with a base coat of 'Mermaid's Tale' stamped with the scribble image from Konad M70, using 'Liquid Gold'.

I really love this manicure! So far, based on the results of this challenge, I'm pretty sold on the idea of keeping all of my metallic crackle polishes handy for nail art.  I've been especially impressed with both of the gold crackles that I've used, this one, and the Nicole by OPI shatter from this post.

I think this sandwich technique really updates the crackle look by toning it down a bit, but still letting the texture shine through.This is something that I can definitely see myself trying again!


Saturday, February 7, 2015

Crackle Polish Challenge #7 - Shattered Heart Mani

2015 Crackle Polish Challenge Manicure #7

Featured crackle application:
Using crackle polish to make a decal

Featured crackle polish:
Sally Hansen's Crackle Overcoat in 'Fuchsia Shock'

A 5 picture collage showing a black and pink nail stamping manicure. All 5 nails were painted with a translucent, dark grey base. The thumbnail was then double stamped with 2 images, one in black and the next in pink. The pointer and pinky are just stamped with black, with a pink nail art rhinestone added. Middle finger: pink shard glitter. Ring finger: Lt pink heart decal with medium pink shatter polish over it.

Polishes Used:
Sally Hansen Crackle Overcoat in 'Fuchsia Shock'
Sally Hansen 'Big Smoky Topcoat'
Sally Hansen Xtreme Wear 'Rouge Rush'
Sally Hansen Insta-Dri 'Presto Pink'
China Glaze 'Feel the Breeze'

Plate Used:
Pueen Celebration Collection 'Fireworks Festival'
PUEEN41

Today's crackle technique involved making a stamping decal out of dried crackle polish.  To do this, I started by painting a couple coats of my base polish, 'Feel the Breeze', a light pink creme polish, over a stamper. When that was fully dry, I painted a layer of 'Fuchsia Shock' over it, and allowed that to dry.  When the stamper was completely dry, I carefully peeled off the polish, and then cut two heart shapes out of the dried polish.

After painting my nails with the sheer black polish, 'Big Smoky Top Coat', I placed the decals over the slightly wet nails, and then added a layer of topcoat in order to get the decal to adhere to my nail. I finished up with a little stamping, glitter, and rhinestones on my other nails.

On the bottom right corner of the collage, you can see a variation of the decal that I did on my right hand. Not only is the heart decorated with shatter nail polish, but this heart is also cracked into three pieces, and slightly separated to reinforce the shattered heart theme. I really like this variation because it takes advantage of one of the special features of decals - you can manipulate their shape, and placement.

All in all, I really like how this mani turned out. I love how the shards of 'Rouge Rush' glitter echo the 'shattered' theme, as well as how awesome-looking the double stamping on my thumb turned out - I may have to do an entire mani like this! I also think that this use of shatter polish really does add something special to the overall look of the mani.

Friday, January 30, 2015

Crackle Polish Challenge #6 - Sparkly Snakeskin

2015 Crackle Polish Challenge Manicure #6

Featured crackle application:
Using crackle polish over areas of a pattern to accent the stamped design

Featured crackle polish:
Sally Hansen's Crackle Overcoat in 'Sage Smash'

Nail Stamping Manicure using China Glaze What are you A-freight of?, Essie 'Take it Outside', and Sally Hansen 'Sage Smash'
Sparkly Snakeskin Mani
Polishes Used:
Sally Hansen Crackle Overcoat 'Sage Smash'
China Glaze 'What are you A-freight of?'
Essie 'Take it Outside'

Plate Used:
Moyou London Pro Collection XL - 04

Today I have a quick post to share, using the same crackle glitter from last weeks mani, 'Sage Smash'.

I was doing a little experimenting with this snakeskin design, and came up with the idea for this mani. However, the stamping on my other fingers didn't turn out really well, and I didn't like the look enough to go back and get it right (too neutral for my tastes!), so I only took a picture of the thumb, since it came out the best.

I used the crackle polish here to accent the middle sections of the snakeskin pattern, which otherwise would be all brown.  I like how it adds some green, but the cracks allow the brown underneath to show through. Using crackle polish in this way can add a little depth and dimension to certain areas of stamped images.

Sally Hansen Crackle Overcoat 'Sage Smash', China Glaze 'What are you A-freight of?', and Essie 'Take it Outside'
Polishes Used

Wednesday, January 28, 2015

Crackle Polish Challenge #5 - Test Mani

2015 Crackle Polish Challenge Manicure #5

Featured crackle application: Using Crackle polish as regular polish by using multiple coats

Featured crackle polish: Sally Hansen's Crackle Overcoat in 'Sage Smash'

OK, so I realize that this is a little bit of a cheat since the whole challenge was to use each one of my crackle polishes to experiment with creative new ways to use the shatter effect. However, 'Sage Smash' is pretty much an exact dupe of last post's featured polish, China Glaze's 'Jade-d'. So this is my work-around from having to use essentially the same crackle polish twice!

Test using chartreuse crackle glitter polish as a regular polish. Ring finger is painted with the glitter polish, middle finger has the polish applied in crackle form over a light putty green polish. Index and pinky are painted with the light putty green polish, with gold stars stamped on top.
Experiment: Crackle Glitter Polish as Regular Polish
Polishes Used:
OPI 'Stranger Tides',
Sally Hansen Color Foil 'Yellow Gold',
and Sally Hansen Crackle Overcoat 'Sage Smash'

Plate Used:
Mash Nails plate Mash-49

The photo above is the result of a test I did using 3 coats of the crackle glitter polish 'Sage Smash' on my ring finger. The coverage ended up being quite nice.  If you look very, very closely, you may see minor cracks in the surface, but they are not very noticeable. I did use one coat of topcoat to add some shine, because this polish (as with most crackle polishes) dries matte. The middle finger shows one coat of the same polish, crackled over 'Stranger Tides'.

OPI 'Stranger Tides', Sally Hansen Color Foil 'Yellow Gold', and Sally Hansen Crackle Overcoat 'Sage Smash'
Polishes Used
In order to minimize cracking, I tried apply the polish in a way that was totally opposite of how I normally do in order to promote cracking: I used several brush strokes for each coat (maybe about 5-7), and I also tried to avoid waiting until the previous coat was completely dry before I put the next coat on. Apparently, if the previous layer is slightly tacky, the crackle polish sticks to it, and doesn't crack as much.

I also did swatches using some of the crackle polishes that I've already used in the challenge. They also worked! The following polish swatches were all applied directly to the nail wheel, with no top coat or base coat. Unfortunately, I no longer remember if it was either 2 or 3 coats that I used for these swatches:

Swatches: OPI's 'Silver Shatter' and 'Turquoise Shatter', and Nicole by OPI's 'Gold Texture' used as regular polish
Swatches of 3 Crackle Polishes used as Regular Polish

The gold is Nicole by OPI's 'Gold Texture, which I used in challenge #3, the silver is OPI's 'Silver Shatter' from challenge #2, and the blue is OPI's 'Turquoise Shatter' from challenge #1.

If you look really closely at the gold swatch, you can see a little bit of texture at the tip, however, it wasn't that noticeable, and I'm sure it would be even less of an issue with topcoat. 

So there you have it, it looks like it is possible to use crackle polishes as regular polish with careful application, multiple coats, and some topcoat! Of course, results may vary with different polishes, but this experiment shows that it's at least something to try out if there's a crackle polish in your collection that you love the colour of, but don't want to use the crackle effect.