Showing posts with label multi-coloured. Show all posts

Sunday, February 23, 2020

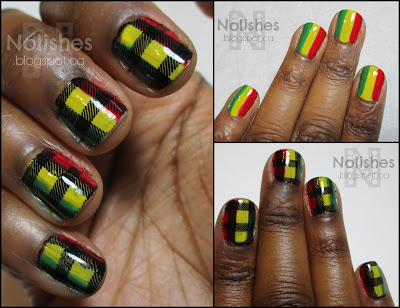
Red, Yellow, Green and Black Plaid Nails

Revlon 'Revlon Red', Maybelline Color Show 'Fierce n Tangy, Revlon 'Posh', and Bundle Monster 'Straight up Black', black stamping polish.

Polishes Used
Revlon ‘Revlon Red’
Maybelline Color Show ‘Fierce N Tangy’
Revlon ‘Posh’
Bundle Monster ‘Straight Up Black’
Stamping Plate Used
ÜberChic Beauty 'Pretty in Plaid'

I'm really excited to share today's post, because I finally got a chance to do some nail art!!! Even better, I was able to use a couple Revlon polishes for this manicure, so it also continues the theme of the last 6 posts, where I've been rediscovering the polishes in my Revlon collection.

I used a 'buffalo check' plaid stamping image from the ÜberChic Beauty 'Pretty in Plaid' stamping plate. For the base colours, I used red, yellow, and green creme polishes, and I stamped the plaid image in black. Since I stamped the buffalo check image over a red, yellow, and green base, my nickname for this look is my 'Buffalo Soldier Check' manicure 😉.  Here are a few more shots of the manicure, and a nice shot of the base layer prior to stamping:

Revlon 'Revlon Red', Maybelline Color Show 'Fierce n Tangy, Revlon 'Posh', and Bundle Monster 'Straight up Black', black stamping polish.

This manicure was so much fun to create! I really love the final look, and the striped base looked pretty cool as well!  I may have to create a mani with vertical stripes one day soon... Below, I have a collage with my bottle shots, as well as label shots showing the names and numbers of all of the polishes I used.

Revlon 'Revlon Red', Maybelline Color Show 'Fierce n Tangy, Revlon 'Posh', and Bundle Monster 'Straight up Black', black stamping polish.

The polishes used were: Revlon 'Revlon Red', Maybelline Color Show 'Fierce n Tangy, Revlon 'Posh', and Bundle Monster 'Straight up Black', black stamping polish.

Wednesday, August 7, 2019

Water-Marble Style Leadlighting Mani featuring Essie's 'Glazed Days' Collection

Essie ‘Glazed Days’,  Essie ‘Sweet Not Sour’,  Essie ‘Confection Affection’,  Sally Hansen Insta-Dri ‘Silver Sweep’ (new formula),  Essie ‘Sweet Supply’,  Maniology ‘Straight Up Black’,  Essie ‘But First, Candy’, Essie ‘Ooh La Lolly’, and What’s Up Nails stamping plate B002

Polishes Used
Polishes Used
Essie ‘Glazed Days’
Essie ‘Sweet Not Sour’
Essie ‘Confection Affection’
Sally Hansen Insta-Dri ‘Silver Sweep’*
Essie ‘Sweet Supply’
Maniology ‘Straight Up Black’
Essie ‘But First, Candy’
Stamping Plates Used
Essie ‘Ooh La Lolly’
What’s Up Nails plate B002
* New Formula                

Today, I have a manicure to share using the Essie 'Glazed Days' collection realeased for Summer 2019. This collection of very saturated jelly polishes lends itself quite well to a variety of nail art applications. It's been a while since I posted some nail art on my blog, so when I purchased the set, I was so excited to be able to get back to playing with polishes to create some beautiful manicures! 

For this mani, I used the Leadlighting technique, to create a look similar to a stained glass window. I started out with a silver base. I then stamped over the base with a black stamping polish, using one of the water-marble images from What's Up Nails plate B002.  Afterwards, I coloured over the silver portions between the black lines using different colours of polish from the 'Glazed Days' collection.

Below, is a picture of the materials I used to create the look:

Essie ‘Glazed Days’,  Essie ‘Sweet Not Sour’,  Essie ‘Confection Affection’,  Sally Hansen Insta-Dri ‘Silver Sweep’ (new formula),  Essie ‘Sweet Supply’,  Maniology ‘Straight Up Black’,  Essie ‘But First, Candy’, Essie ‘Ooh La Lolly’, and What’s Up Nails stamping plate B002

It was so much fun creating this manicure. I really love how it turned out - I even got a really nice compliment on my nails! Below, I've included a collage of some additional shots of the manicure:

Essie ‘Glazed Days’,  Essie ‘Sweet Not Sour’,  Essie ‘Confection Affection’,  Sally Hansen Insta-Dri ‘Silver Sweep’ (new formula),  Essie ‘Sweet Supply’,  Maniology ‘Straight Up Black’,  Essie ‘But First, Candy’, Essie ‘Ooh La Lolly’, and What’s Up Nails stamping plate B002

Sunday, December 9, 2018

Reveal Mani with Multi-Coloured Shatter Base

Today I have what I like to call a 'Reveal Mani' to share. I use the term reveal mani, to describe a manicure where I start with a base decorated with an abstract print or pattern, and then stamp a negative space image over it to reveal the patterned base as abstract patterned shapes.


For this manicure, I started with a white base and then used 3 different shatter polishes in turquoise, gold, and blue, to create a multi-coloured abstract look. Then, to add a bit of sparkle, I added a holographic glitter polish to my ring finger. Below I have a picture of the base before the stamping.


I stamped over this base using black stamping polish and 2 different negative space images form Messy Mansion's Lily Anna Plate LA07. Overall, I really like how the circle and square pattern on my index and middle fingers turned out, but I had a little bit of trouble with the star image. Images with lots of negative space can be tricky to pick up since there's so much more area to fill with polish, which increases the chances of not picking all of it up cleanly. I wasn't in the mood to try multiple times to ensure perfect image transfers, so I just left well enough alone.  For the most part, the star images look pretty good, but they are not as clean and crisp as I would like.

Polishes Used

Polishes Used
China Glaze 'White on White'
OPI 'Turquoise Shatter'
Nicolie by OPI 'Gold Texture'
OPI 'Blue Shatter'
Maniology 'Straight Up Black' Stamping Polish
Urban Outfitters 'Afterhours'
Plate Used: Lily Anna Plate LA07

Below, I have a cool close-up shot of the Holographic glitter polish that I used, 'Afterhours'. The lighting and angles that I used for the manicure photos above didn't capture the beauty of the polish, so I wanted to share a photo that did.  

Close shot of 'Afterhours'

Monday, December 3, 2018

Christmas Glitter Mani

Today's manicure represents one of the few times that I've recreated a manicure in the last few years. I've actually been planning to recreate this mani for almost one year now. I'll get in to that later, but first, here is the picture:

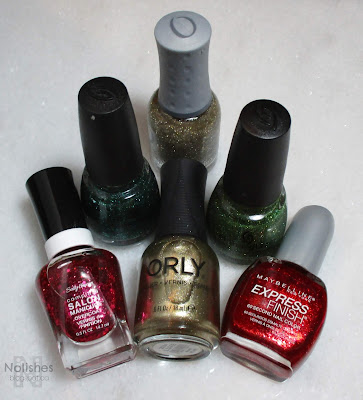
Glitter mani in traditional Christmas colours using Sally Hansen CSM 'Strawberry Shields', China Glaze 'Pine-ing For Glitter', Orly 'Halo', Orly 'Luxe', China Glaze 'This is Tree-mendous', and Maybelline 'Red Comet'


Polishes Used
Sally Hansen Complete Salon Manicure 'Strawberry Shields'
China Glaze 'Pine-ing For Glitter'
Orly 'Halo'
Orly 'Luxe'
China Glaze 'This is Tree-mendous'
Maybelline Express Finish 'Red Comet'


I wore this look to my office holiday gathering last year, and received lots of compliments. At the time, I wasn't updating my blog and as a result, I didn't have all of my equipment ready to even take a picture that could be used for the blog at a later time. I hoped to get everything set up again so that I could post the mani, but of course, during the busy holiday season I didn't get a chance to do that. 

So, I decided that I would try to recreate the mani at a later time and post it then. Originally I was hoping for right after Christmas, but then I was busy with all of the Boxing Week sales. By the time things settled down, it was too late to do a Christmas manicure that season! I decided to put the polishes aside, and wait until next Christmas to recreate and post the mani. So finally, after a year of anticipation - I've completed my mission! LOL!  

Sally Hansen CSM 'Strawberry Shields', China Glaze 'Pine-ing For Glitter', Orly 'Halo', Orly 'Luxe', China Glaze 'This is Tree-mendous', Maybelline 'Red Comet'

Even though it is essentially a basic glitter mani, I really like how it turned out. It's fun and funky because of the colourful glitters, yet there's a classic charm to it as well due to the traditional Christmas colours.

As for the technical aspects of the mani, I used 3 coats of the dark green glitter 'Pine-ing For Glitter' on my pointer finger, one coat of orly 'Luxe' as a base and one coat of Orly 'Halo' on my middle finger, two coats of Maybelline 'Red Comet' as a base, and once coat of Sally Hansen -Strawberry Shields' on my thumb and ring fingers, and two coats of China Glaze 'This is Tree-mendous' on my pinky.  I used a peel off base coat to aid with removal, and a glossy quick-dry top coat on top to smooth and shine the glitters.

Photos of Christmas Glitter Manicure using traditional Christmas colors

Now that I've completed the mani, I can finally put the polishes away... but now that I've blogged about this and have the details here, I'm inspired to maybe try to make this my Christmas tradition mani going forward!  We'll see how that works out, and how long the polishes last, but that definitely sounds like a fun tradition to start, especially after the quirky story of why I've worn the same manicure two Christmas seasons in a row!

Sunday, October 14, 2018

Red, White, Blue and Gold Plaid Manicure

This manicure was my attempt at recreating more of a traditional plaid using Red, White, Navy Blue, and Gold polishes:


In the past, I've done pink plaid in my 'Pink and White Pink Ribbon Mani', and yellow plaid in my 'Clueless Inspired Manicure'. I really liked those manicures, but since I have never done a plaid manicure using more traditional colours, I decided to give that a try.

For this manicure, I used the following polishes:

OPI 'Incognito in Sausalito', Sally Hansen Color Foil 'Liquid Gold', OPI 'Dutch Tulips', and Konad Special Nail Polish - White
Polishes Used

Polishes Used
Stamping Plates Used
OPI 'Incognito in Sausalito'
Moyou London Hipster Collection - 05
Sally Hansen Color Foil 'Liquid Gold'
Moyou London Hipster Collection - 06
OPI 'Dutch Tulips'
Clear Jelly Stamper Stamping Plate:
Konad Special Nail Polish - White
             'Got Plaid?' Plate CjS-56

The stamping on my index finger came out a little wonky, but overall, I really like the way the manicure turned out! In addition to the polishes mentioned, I also topped the look off with a matte topcoat (Essie's 'Matte about You') in order to make the finished result appear a bit more fabric like.

Saturday, September 12, 2015

Analogous Colour Scheme Skittle Mani

Today I have a simple impromptu manicure to share:

Manicure with nails painted in metallic gold, shimmery pastel mint green, and pastel blue nail polishes

Recently, I decided that I wanted to try use my 'Borghese Rapido' polishes a bit more, since hadn't been using them that frequently. That decision was the inspiration for today's manicure, where I use three different Borghese Rapido shades to create a simple skittle mani.

Borghese Rapido ‘Lira’, Borghese Rapido ‘Menta’, and Borghese Rapido ‘Castello Blue’

Polishes Used
Borghese Rapido ‘Lira’
Borghese Rapido ‘Menta’
Borghese Rapido ‘Castello Blue’

The main feature of this manicure is the colour combination of the different nail polishes. These colours look great combined because yellow, green, and blue are adjacent to each other on the colour wheel, and create an 'analogous' colour scheme when used together. I originally wanted to do some nail stamping over the look, but I never got around to doing it. Even so, I still think that the look holds up despite the lack of any added embellishments.

Monday, June 1, 2015

OPI Color Paints Leadlight Mani

Today I have a nail stamping manicure created using the 'leadlight technique' to share with you. For this mani I used the new OPI Color Paints Collection that has recently been released for summer 2015:

nail stamping manicure created using the 'leadlight technique', and OPI Color Paints: OPI Color Paints ‘Pen and Pink’, OPI Color Paints ‘Magenta Muse’, OPI Color Paints ‘Chromatic Orange’, OPI Color Paints ‘Primarily Yellow’, OPI Color Paints ‘Landscape Artist’, OPI Color Paints ‘Turquoise Aesthetic’, OPI Color Paints ‘Indigo Motif’, OPI Color Paints ‘Purple Perspective’, and OPI Color Paints ‘Silver Canvas’

It's been a while since I've done a manicure like this. I usually try to avoid doing full-hand leadlight manicures, since they tend to be very time-consuming. However, I was really excited to try out the entire line of OPI 'Color Paints', so I made an exception!

I first found out about the 'Color Paints' collection sometime in April, and learned that it was supposed to launch in early May. I was so eager to try these polishes, that I actually began hunting for them in different beauty supply stores near the end of April (just in case they were put out early!). I had no such luck. In fact, compared to other OPI collections, these polishes were relatively hard for me to get a hold of. A lot of the places that I usually go to buy OPI polishes don't seem to have them (...yet?). Perhaps that will change as we get a little further into the season.

Around the first or second week of May, I finally saw them on display in one of my favourite beauty supply stores. At the time, they only had a small display featuring only one each of the full sized colours, and 4 bottles of 'Silver Canvas'. Unfortunately, the one bottle of 'Magenta Muse' was sold out, so I could only purchase the other colours, and continue the hunt for the missing bottle. Funnily enough, that same colour was also sold out at the only other place I was able to find these at the time - and their display originally contained 3 of each colour! It took about another 2 weeks for me to finally be able to acquire that last polish - I ended up getting it when the first store I went to eventually got the larger '3 of each' display.

OPI Color Paints ‘Pen and Pink’, OPI Color Paints ‘Magenta Muse’, OPI Color Paints ‘Chromatic Orange’, OPI Color Paints ‘Primarily Yellow’, OPI Color Paints ‘Landscape Artist’, OPI Color Paints ‘Turquoise Aesthetic’, OPI Color Paints ‘Indigo Motif’, OPI Color Paints ‘Purple Perspective’, and OPI Color Paints ‘Silver Canvas’. Below: Sally Hansen Xtreme Wear 'Celeb City', Konad Special Polish in Black, and OPI 'In True Stefani Fashion'

Polishes Used
Polishes Used (Cont’d)
OPI Color Paints ‘Pen and Pink’
Sally Hansen Xtreme Wear ‘Celeb City’
OPI Color Paints ‘Magenta Muse’
Konad Special Polish in Black
OPI Color Paints ‘Chromatic Orange’
OPI ‘In True Stefani Fashion’
OPI Color Paints ‘Primarily Yellow’

OPI Color Paints ‘Landscape Artist’

OPI Color Paints ‘Turquoise Aesthetic’
Plate Used
OPI Color Paints ‘Indigo Motif’
Messy Mansion Leadlight Lacquer Plate A06
OPI Color Paints ‘Purple Perspective’

OPI Color Paints ‘Silver Canvas’


As for my first impressions, I am quite pleased with the collection as a whole. The polishes worked really well for leadlighting, and that was the main use I had in mind when getting them. Also, I really like the 'foil wrapper' look that you get when you layer these translucent colours over a silver base. Normally I would use a white base for leadlighting, so this is a new idea for me, and I love it! My favourite colour in the collection is 'Turquoise Aesthetic' - it's a gorgeous shade, and it looks absolutely amazing layered over the silver base.

The only colour that I have a minor complaint about is 'Purple Perspective'. I find that it is almost a little too highly pigmented so you have to be really careful to not use too thick of a coat or else the purple doesn't 'glow' as much over the silver base, and reads almost as black. 'Indigo Motif' was the second trickiest one to work with due to the intensity of the pigment, but even with a slightly thick application, it still reads as blue, although it won't 'glow' as much.

Collage showing nail stamping manicure created using the 'leadlight technique', and OPI Color Paints: OPI Color Paints ‘Pen and Pink’, OPI Color Paints ‘Magenta Muse’, OPI Color Paints ‘Chromatic Orange’, OPI Color Paints ‘Primarily Yellow’, OPI Color Paints ‘Landscape Artist’, OPI Color Paints ‘Turquoise Aesthetic’, OPI Color Paints ‘Indigo Motif’, OPI Color Paints ‘Purple Perspective’, and OPI Color Paints ‘Silver Canvas’

And as for the manicure, I like how it turned out. It's colourful and fun, and again, it's something new for me because of the foil look that the silver base gives. The manicure is really busy, because the driving force behind my colour selection was to use all 9 colours from the collection, however, due to the success I had with this trial mani, I can't wait to start experimenting with these polishes using smaller colour palettes, and less intricate designs!
Friday, May 29, 2015

Pastel Neon Paisley Skittles Mani

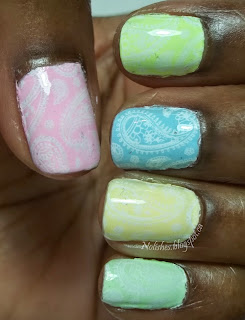
In my last post, I did a simple manicure using 'Hot-Hot-Hot Pants' one of the colours from the Color Club 'Poptastic Pastel Neons' collection. For this manicure, I decided to use the remaining colours that I owned from the collection to create this paisley-printed skittles mani:

Nail stamping manicure featuring light pink, yellow, green and blue pastel neon polishes, stamped with white paisley print

In my last post, I mentioned an embellishment idea that I had, to use with these bright pastel colours. The idea was to stamp over them with white stamping polish, as I have done in this manicure. White seems to be the perfect colour for combining with these 'Pastel Neon' colours - it keeps the look fun and light and doesn't overpower the already eye-catching colours.

Originally, I was thinking about using simple white stripes for the stamping image, however, I've already used my stripe plates for a few manicures, while so many other plates in my collection have gone unused. So I decided to try something else. I chose my paisley-themed Messy Mansion plate mainly because I just recently purchased it and was excited to give it a try!

Color Club ‘Feathered Hair out to There', Color Club ‘Disco’s not Dead’, Color Club ‘Under the Blacklight’, Color Club ‘Til the Record Stops’, Color Club ‘Meet me at the Rink’, and Konad Special Polish in White

Polishes Used
Plate Used
Color Club ‘Feathered Hair out to There’       

Color Club ‘Disco’s not Dead’

Color Club ‘Under the Blacklight’
Messy Mansion  MM48 ‘Paisley Theme’
Color Club ‘Til the Record Stops’

Color Club ‘Meet me at the Rink’

Konad Special Polish in White


I like the end result, but the only problem is that there isn't a lot of contrast with the delicate white lines of the paisley print stamped over the yellow and light green shades, so it's hard to see the details of the stamped image. In retrospect, a stamping image with thicker lines would have probably worked a little better. Polka dots would have been lovely as well!