Showing posts with label Bundle Monster/Maniology. Show all posts

Sunday, February 23, 2020

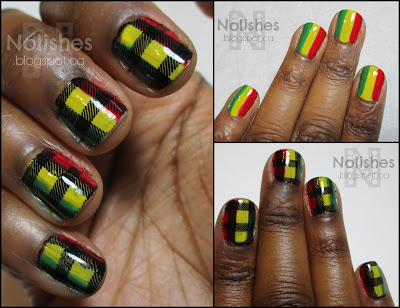
Red, Yellow, Green and Black Plaid Nails

Revlon 'Revlon Red', Maybelline Color Show 'Fierce n Tangy, Revlon 'Posh', and Bundle Monster 'Straight up Black', black stamping polish.

Polishes Used
Revlon ‘Revlon Red’
Maybelline Color Show ‘Fierce N Tangy’
Revlon ‘Posh’
Bundle Monster ‘Straight Up Black’
Stamping Plate Used
ÜberChic Beauty 'Pretty in Plaid'

I'm really excited to share today's post, because I finally got a chance to do some nail art!!! Even better, I was able to use a couple Revlon polishes for this manicure, so it also continues the theme of the last 6 posts, where I've been rediscovering the polishes in my Revlon collection.

I used a 'buffalo check' plaid stamping image from the ÜberChic Beauty 'Pretty in Plaid' stamping plate. For the base colours, I used red, yellow, and green creme polishes, and I stamped the plaid image in black. Since I stamped the buffalo check image over a red, yellow, and green base, my nickname for this look is my 'Buffalo Soldier Check' manicure 😉.  Here are a few more shots of the manicure, and a nice shot of the base layer prior to stamping:

Revlon 'Revlon Red', Maybelline Color Show 'Fierce n Tangy, Revlon 'Posh', and Bundle Monster 'Straight up Black', black stamping polish.

This manicure was so much fun to create! I really love the final look, and the striped base looked pretty cool as well!  I may have to create a mani with vertical stripes one day soon... Below, I have a collage with my bottle shots, as well as label shots showing the names and numbers of all of the polishes I used.

Revlon 'Revlon Red', Maybelline Color Show 'Fierce n Tangy, Revlon 'Posh', and Bundle Monster 'Straight up Black', black stamping polish.

The polishes used were: Revlon 'Revlon Red', Maybelline Color Show 'Fierce n Tangy, Revlon 'Posh', and Bundle Monster 'Straight up Black', black stamping polish.

Sunday, September 22, 2019

Blue and Silver Stamped Manicure featuring China Glaze 'Dorothy Who'


Polishes Used
China Glaze ‘Dorothy Who?’
Sally Hansen Color Foil ‘Sterling Silver’
Stamping Plate Used
Maniology/Bundle Monster ‘Chic Peek’ BM-XL476
ÜberChic Beauty Love and Marriage – Plate 02

Here's a little mani that I threw together with a glitter polish that I had handy, and some nearby stamping plates! This is the first time that I've used my bottle of China Glaze's 'Dorothy Who', so I'm glad I was able to take this one off the untried list... It truly is a lovely shade of blue! 

China Glaze 'Dorothy Who?', and Sally Hansen Color Foil 'Sterling Silver'

After painting my nails with the polish, I wanted to jazz the look up a bit with a little stamping. I had used the ÜberChic Beauty Love and Marriage 02 plate for my last manicure, the Burgundy and Gold Stamped Mani, and had not put the plate away yet, so I decided to use it again for this manicure. The negative space heart stamped image on my middle finger is from that plate. On my ring finger, I stamped a textural image from my Bundle Monster Chic Peek BM-SL476 plate.

Thursday, August 15, 2019

Essie 'Silk Watercolors' and 'Glazed Days' Collections Comparison

Essie 'Silk Watercolor' collection: Essie ‘Highest Bidder’, Essie ‘Point of Blue’, Essie ‘Love Sheen’, Essie ‘No Shrinking Violet’, Essie ‘Blush Stroke’, Essie ‘White Page’, Essie ‘Art New-Beau’, Essie ‘Muse, Myself', Essie ‘Pen & Inky’.  Essie 'Glazed Days' collection: 'Glazed Days' (red), 'Confection Affection' (orange), 'Sweet Supply' (yellow), 'But First, Candy' (green), 'Ooh La Lolly' (blue), and 'Sweet not Sour' (purple)

For today's post, I wanted to do a quick comparison between the two iterations of Essie's Jelly Polish collections: Essie's 'Silk Watercolors' collection from 2015, and Essie's 'Glazed Days' collection from 2019. To see reviews on the collections separately, you can click the links on the collection names in the previous sentence.

Overall, I really like both collections, and think that they actually complement eachother really well. Because of the different formulas, and hues, I'm happy to have both sets in my collection.  

I noticed that the silk watercolor collection has a slightly thinner, and slightly less vibrant formula, which lends itself a bit better to blending and layering applications. For example, blending a watercolour-type abstract pattern on the nails, or layering designs between coats of the jelly polish, as is done with 'pond' manicures.

By contrast, the 'Glazed Days' Collection seems to be more vibrant and the formula is a bit thicker, which lends itself a bit better to nail art applications where more full coverage is important, like 'leadlighting'.  None of the shades are exact dupes of eachother, so combined, the 2 collections provide a total of 14 rainbow shades!

Below I have samples of nail art that use all of the polishes in both collections. On the 'Glazed Days' portion of the collage, the polishes are layered over a silver background (Sally Hansen's 'Silver Sweep').

Essie 'Silk Watercolor' collection: Essie ‘Highest Bidder’, Essie ‘Point of Blue’, Essie ‘Love Sheen’, Essie ‘No Shrinking Violet’, Essie ‘Blush Stroke’, Essie ‘White Page’, Essie ‘Art New-Beau’, Essie ‘Muse, Myself', Essie ‘Pen & Inky’.  Essie 'Glazed Days' collection: 'Glazed Days' (red), 'Confection Affection' (orange), 'Sweet Supply' (yellow), 'But First, Candy' (green), 'Ooh La Lolly' (blue), and 'Sweet not Sour' (purple)

Wednesday, August 14, 2019

Leadlighting Manicure featuring Essie's Silk Watercolor Collection

Manicure featuring Essie's Silk Watercolor Collection: Essie ‘Highest Bidder’, Essie ‘Point of Blue’, Essie ‘Love Sheen’, Essie ‘No Shrinking Violet’, Essie ‘Blush Stroke’, Essie ‘White Page’, Essie ‘Art New-Beau’, Maniology ‘Straight Up Black’, Essie ‘Muse, Myself’, Essie ‘Pen & Inky’, and stamping plate Moyou London Trend Hunter - 01

Polishes Used
Polishes Used
Essie ‘Highest Bidder’
Essie ‘Point of Blue’
Essie ‘Love Sheen’
Essie ‘No Shrinking Violet’
Essie ‘Blush Stroke’
Essie ‘White Page’
Essie ‘Art New-Beau’
Maniology ‘Straight Up Black’
Essie ‘Muse, Myself’
Stamping Plate Used
Essie ‘Pen & Inky’
Moyou London Trend Hunter - 01

Manicure featuring Essie's Silk Watercolor Collection: Essie ‘Highest Bidder’, Essie ‘Point of Blue’, Essie ‘Love Sheen’, Essie ‘No Shrinking Violet’, Essie ‘Blush Stroke’, Essie ‘White Page’, Essie ‘Art New-Beau’, Maniology ‘Straight Up Black’, Essie ‘Muse, Myself’, Essie ‘Pen & Inky’, and stamping plate Moyou London Trend Hunter - 01

After reviewing my purchase of Essie's 'Glazed Days' collection which was released earlier this year, I decided to go back and do a manicure using Essie's 'Silk Watercolor' collection that I purchased back when it was released in 2015. 

Essie's Silk Watercolor Collection: Essie ‘Highest Bidder’, Essie ‘Point of Blue’, Essie ‘Love Sheen’, Essie ‘No Shrinking Violet’, Essie ‘Blush Stroke’, Essie ‘White Page’, Essie ‘Art New-Beau’, Essie ‘Muse, Myself’, and Essie ‘Pen & Inky’
Essie 'Silk Watercolor' Collection
I never did a complete review of the 'Silk Watercolor' collection when I purchased it. However, I did feature one of the shades in a blog post. It was the pink shade, 'Blush Stroke', which I used for a 'Pond' manicure. Here's a link to that post. 

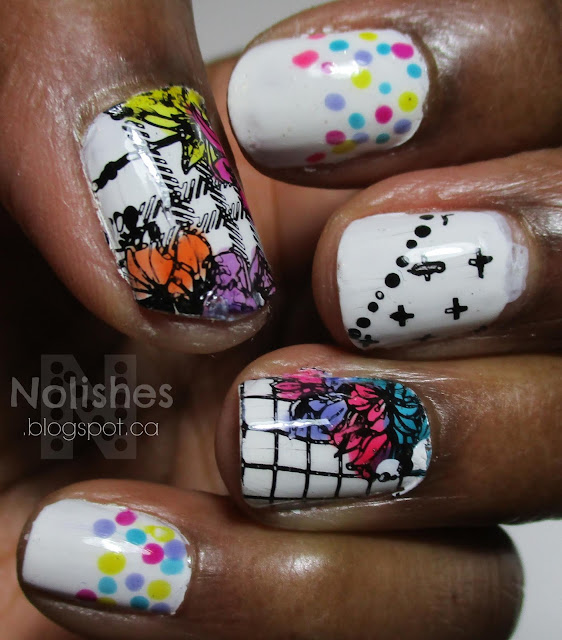
For today's manicure, I decided to use all of the shades from the collection to create a cute, colourful look. I started with 'White Page' as my white base colour, and then stamped two different floral images on my thumbs, and ring fingers. The images were from Moyou London stamping plate 'Trend Hunter - 01', and the black stamping polish I used was Maniology's 'Straight Up Black'. I also stamped the cross pattern on my middle fingers from a portion of one of the images on the same plate using the same polish. 

Next, I coloured in the flower portions of the images with each of the colours from the 'Silk Watercolor' collection using the 'leadlight technique', which involves using a dotting tool (or any other tool or brush that can transfer polish) to place the transparent jelly polishes over different parts of the image. After this, I embellished the image on my middle finger with some black dots, and then added multi coloured dots on the bottom portion of my index, and pinky fingers. The multi-coloured dots were also made with the 'Silk Watercolor' collection. I completed the look by using a quick dry, glossy top coat in order to smoothe everything out, and add shine.

Below, is a collage with a few additional shots of the manicure:

Manicure featuring Essie's Silk Watercolor Collection: Essie ‘Highest Bidder’, Essie ‘Point of Blue’, Essie ‘Love Sheen’, Essie ‘No Shrinking Violet’, Essie ‘Blush Stroke’, Essie ‘White Page’, Essie ‘Art New-Beau’, Maniology ‘Straight Up Black’, Essie ‘Muse, Myself’, Essie ‘Pen & Inky’, and stamping plate Moyou London Trend Hunter - 01

Here are some of my thoughts about the 'Silk Watercolor' collection. I'm quite pleased with the colour saturation from the jelly polishes in the collection. The jellies look great over the white polish even with only one coat, which is really important for leadlighting. The white polish is pretty much your standard white polish. It performs well, but if you already have a white polish that you like, I don't see a specific need to get this one.

I also really like the colour range. There are more warm shades in the collection than cool shades, and I find that a lot of the colours are sort of 'in-between' shades, as opposed to 'true' shades ie 'pinky-red' as opposed to 'true' red. This works well for me, as I already have jelly polishes that are more classic shades, so these polishes are a great addition to my collection.

The 'Silk Watercolor' formula is really good as well. The jelly polishes are on the slightly thinner side, and have enough pigment to perform well for leadlighting, as well as on their own, as seen in my 'pond' manicure. Of course, I haven't used all of the jellies on their own yet, so I'm estimating the performance based on 'Blush Stroke', the one I've used (sort of) on it's own, as well as my experience with using all of the polishes in this manicure. 

All in all, really like these polishes. I really enjoyed creating this look, and I love how it turned out. I even got a couple compliments on this manicure! 
Sunday, August 11, 2019

Water-Marble Style Leadlighting Mani 2 featuring Essie's 'Glazed Days' Collection

Manicure created using polishes from Essie's 'Glazed Days' collection: Essie ‘Glazed Days’,  Essie ‘Sweet Not Sour’,  Essie ‘Confection Affection’,  Sally Hansen Insta-Dri ‘Silver Sweep’ (new formula),  Essie ‘Sweet Supply’,  Maniology ‘Straight Up Black’,  Essie ‘But First, Candy’, Essie ‘Ooh La Lolly’, and What’s Up Nails stamping plate B002

Today I have another leadlighting manicure created using Essie's Glazed Days Collection, and my water-marble stamping plate B002 from What's Up Nails.

Polishes Used
Polishes Used
Essie ‘Glazed Days’
Essie ‘Sweet Not Sour’
Essie ‘Confection Affection’
Sally Hansen Insta-Dri ‘Silver Sweep’*
Essie ‘Sweet Supply’
Maniology ‘Straight Up Black’
Essie ‘But First, Candy’
Stamping Plates Used
Essie ‘Ooh La Lolly’
What’s Up Nails plate B002
                                                                                                                      *new formula

Essie ‘Glazed Days’,  Essie ‘Sweet Not Sour’,  Essie ‘Confection Affection’,  Sally Hansen Insta-Dri ‘Silver Sweep’ (new formula),  Essie ‘Sweet Supply’,  Maniology ‘Straight Up Black’,  Essie ‘But First, Candy’, Essie ‘Ooh La Lolly’, and What’s Up Nails stamping plate B002

Basically, the steps I took to create this manicure were the same as for the manicure I described in my last post. The main difference is that I used different stamping images from the stamping plate. The middle finger accent nail was also featured in an earlier post in which I did a quick review on the Essie 'Glazed Days' collection. You can click here to see that post.

Overall, I was really pleased with how this manicure turned out as well (even with the small smudge on my thumb!). I really like how these jelly polishes look over a silver base. Below, I've included a few additional close-up shots of my fingernails.

close up shots of manicure created using polishes from Essie's 'Glazed Days' collection: Essie ‘Glazed Days’,  Essie ‘Sweet Not Sour’,  Essie ‘Confection Affection’,  Sally Hansen Insta-Dri ‘Silver Sweep’ (new formula),  Essie ‘Sweet Supply’,  Maniology ‘Straight Up Black’,  Essie ‘But First, Candy’, Essie ‘Ooh La Lolly’, and What’s Up Nails stamping plate B002

Sunday, December 9, 2018

Reveal Mani with Multi-Coloured Shatter Base

Today I have what I like to call a 'Reveal Mani' to share. I use the term reveal mani, to describe a manicure where I start with a base decorated with an abstract print or pattern, and then stamp a negative space image over it to reveal the patterned base as abstract patterned shapes.


For this manicure, I started with a white base and then used 3 different shatter polishes in turquoise, gold, and blue, to create a multi-coloured abstract look. Then, to add a bit of sparkle, I added a holographic glitter polish to my ring finger. Below I have a picture of the base before the stamping.


I stamped over this base using black stamping polish and 2 different negative space images form Messy Mansion's Lily Anna Plate LA07. Overall, I really like how the circle and square pattern on my index and middle fingers turned out, but I had a little bit of trouble with the star image. Images with lots of negative space can be tricky to pick up since there's so much more area to fill with polish, which increases the chances of not picking all of it up cleanly. I wasn't in the mood to try multiple times to ensure perfect image transfers, so I just left well enough alone.  For the most part, the star images look pretty good, but they are not as clean and crisp as I would like.

Polishes Used

Polishes Used
China Glaze 'White on White'
OPI 'Turquoise Shatter'
Nicolie by OPI 'Gold Texture'
OPI 'Blue Shatter'
Maniology 'Straight Up Black' Stamping Polish
Urban Outfitters 'Afterhours'
Plate Used: Lily Anna Plate LA07

Below, I have a cool close-up shot of the Holographic glitter polish that I used, 'Afterhours'. The lighting and angles that I used for the manicure photos above didn't capture the beauty of the polish, so I wanted to share a photo that did.  

Close shot of 'Afterhours'