Showing posts with label Cheeky Beauty. Show all posts

Tuesday, May 5, 2015

Cinco de Mayo Manicure 2015

Today I have a Cinco de Mayo manicure to share!

Nail stamping manicure featuring white base stamped in copper with Mexican themed images. The ring finger accent nail features a copper base topped with a white and silver micro-glitter mix, an emerald green glitter polish, a red glitter polish, and then stamped stamped with the words 'Viva Mexico' in white.
Cinco de Mayo Manicure
I kind of did this one in a rush, so there are so many things that I would change about it if I had to do it again! I do like the overall look though, and it also inspired another manicure idea which I hope to do shortly. Here are the polishes that I used to create this look:

Polishes Used:
Plates Used:
China Glaze ‘White on White’
Cheeky Jumbo Plate 1 ‘Viva Mexico’
L.A. Girl Glitter Addict ‘Animate’

Konad Special Polish ‘White’

L.A. Girl Glitter Addict ‘Purge’

China Glaze ‘The Outer Edge’

Essie ‘Penny Talk’


China Glaze ‘White on White’, L.A. Girl Glitter Addict ‘Animate’, Konad Special Polish ‘White’, L.A. Girl Glitter Addict ‘Purge’, China Glaze ‘The Outer Edge’, and Essie ‘Penny Talk’
Polishes Used
I absolutely love this Cheeky Beauty 'Viva Mexico' plate! The designs are so bold and intricate, and they look fantastic stamped on the nail. I really love how the white and copper stamping of the full nail images from this plate turned out. However, I would have loved to be able to spend a little more time designing the accent nail.

I ended up using 'Penny Talk' as a copper base coat,  and then topping it with three different glitters: 'The Outer Edge', a white and silver micro-glitter polish; 'Animate', a red glitter; and 'Purge', an emerald green glitter. I then covered everything with some top coat, and then stamped the script images. I like the idea of using the different glitters, but the way I used them, the individual glitter polishes get lost in the mix, and even worse, 'The Outer Edge', the most delicate glitter of the bunch, can barely be seen!

 I realized after the fact that I could have done a three colour glitter gradient to help the glitters really stand out, and also to be a little more reminiscent of the Mexican Flag. Then I could have stamped over the white part in the centre with the writing in black. I also don't think I would go with the copper base if I had to do it again. Here are some close-up shots of the accent nails:

Right and left ring finger accent nails featuring a copper base topped with a white and silver micro-glitter mix, an emerald green glitter polish, a red glitter polish, and then stamped stamped with the words 'Viva Mexico' (left), and 'Fiesta' (right) in white.
Accent Nails
The best thing about a manicure that doesn't turn out the way you had hoped, is that it is so easy to take what you learned and apply it to the next one!

Monday, May 4, 2015

Cinco de Mayo Manicure

Here's a manicure I did for Cinco de Mayo, 2014:

Cinco de Mayo Nail Stamping Manicure in Black, Gold, Red, White and Green. Stamped using Cheeky's Jumbo Plate 1 'Viva Mexico', and Moyou London's Pro XL Collection plate 06.
Cinco de Mayo Manicure
Unfortunately, I no longer remember exactly which polishes I used to create this look. I used black nail polish for the base colour on all of my fingers except for my ring fingers. I then stamped these fingers with gold nail polish using images from Cheeky's Jumbo Plate 1, 'Viva Mexico'. On my ring fingers, I used the same gold nail polish as the base colour.  I then stamped the ring fingers with the Aztec print image from Moyou London's Pro XL Collection plate 06. I created a red, white, and green gradient by filling the engraving with a drop of each colour before swiping and picking up the image.

I really like this manicure, but I especially love how the accent nails turned out.  You can barely recognize the Aztec print, instead, it looks like a distressed surface with bits of gold peaking through. So awesome! I definitely want to try this technique again!

Saturday, January 3, 2015

New Year's Mani

Happy New Year! Hope you all enjoyed the holidays. Today, I have my New Year's mani to share:

New Year's themed nail stamping manicure featuring a deep blue shimmery fleck polish stamped with New year's themed images in silver.
New Year's Mani
I went for a basic nail stamping manicure with a couple of nail art rhinestones to dress it up a touch. The base polish is China Glaze's 'Blue Year's Eve', and the stamping polish is Sally Hansen Insta-Dri 'Silver Sweep' (old formula).  The plates I used were Bundle Monster BM-H14 (the clock on my middle finger, and the fireworks on my thumb), and Cheeky's Jumbo Plate 6 'Happy Holidays' (the 'Happy New Year' script collage on my ring finger).

China Glaze 'Blue Year's Eve', Sally Hansen 'Silver Sweep'

I really like the way this manicure turned out. A great variation that I thought of after the fact, was that instead of the rhinestones, I could have added a little sparkle to the unstamped nails with a silver glitter gradient starting from the tips.

Anyway's I'm looking forward to another year of fun nail art! Thanks for dropping by, and all the best in 2015!

Sunday, December 21, 2014

Snowy Pine Forest Mani

Today I have another holiday themed manicure to share.

nail stamping manicure featuring forest green pine trees over white background with silver snowflakes - left handnail stamping manicure featuring forest green pine trees over white background with silver snowflakes - right hand

Polishes Used:
China Glaze 'White on White'
China Glaze 'I'd Melt for You' (2014 Holiday Twinkle Collection)
China Glaze 'The Outer Edge' (Limited Edition 'The Giver' Collection)
Maybelline Color Show 'Walk in the Park'

Plate Used:
Cheeky Jumbo Plate 6 'Happy Holidays'

China Glaze 'White on White', China Glaze 'I'd Melt for You', China Glaze 'The Outer Edge', and Maybelline Color Show 'Walk in the Park'
Polishes Used
This look was inspired by a beautifully decorated Christmas tree I saw in a mall I visited recently. It was covered in large spherical ornaments, some in solid white and the rest in solid silver. They also had these gorgeous silver-coloured sculptures of grazing reindeer circled all around it. The entire scene was so elegant - I really wish I had taken a picture!

I really like how this manicure turned out. However, I do have one small regret with my left thumb. I put a coat of 'The Outer Edge', a silver and white micro-glitter, over the finished nail, before I realized that the accent nails look better without it. I also used way too much, not realizing how dense the glitter particles were.  It ended up almost completely obscuring the tree! I was in no mood to start all over again, so I tried to carefully double stamp another tree directly on top of the old one. It seemed to turn out alright, so I just went with it. I ended up getting a couple of compliments on this manicure, (which is always nice!) so I guess the boo-boo wasn't that big of a deal after all.

This is the first time that I used 'I'd Melt for You', a silver metallic polish from China Glaze's recent holiday line. I love it!!!  This might be a new replacement for Sally Hansen Insta-Dri 'Silver Sweep' as my go-to silver!  Ever since Sally Hansen changed the formula of 'Silver Sweep' I was really worried about finding a replacement - and my last bottle of the old formula 'Silver Sweep' is about two-thirds empty. So I'm really glad this polish came along when it did.

I do have other silver polishes, but what I really love about 'Silver Sweep' (and now also 'I'd Melt for You') is that they don't dry lightning fast like some other metallic silver polishes. With some of my highly reflective silver polishes, you have to work really quickly, so the polish doesn't dry in the grooves of the image plate, before you get a chance to pick it up with your stamper!

I ended up wearing this manicure way longer than I wanted to - I wore it for 5 days! I love the mani, but I have so many ideas that I'd like to get in before Christmas, that I probably shouldn't have worn this more than a couple days! I had a really hectic week, and most evenings, I honestly didn't feel like doing my nails.

Anyways, I'm gaining even more inspiration and motivation to crank out holiday manicures now that we're getting even closer to Christmas, so stay tuned to see what I come up with!

Saturday, December 20, 2014

Christmas Skittles Mani

Today I have a holiday themed manicure to share:

Christmas Themed Nail stamping manicure using light and dark green, red, gold, and white nail polishes. Stamped with images of presents, candy canes, bells, and trees.Christmas Themed Nail stamping manicure using light and dark green, red, gold, and white nail polishes. Stamped with images of presents, stockings, bells, and trees.


Polishes used:
OPI 'You Are So Outta Lime!', Sally Hansen 'On Pines and Needles', Revlon 'Bewitching', OPI 'Honey Rider', Sally Hansen Color Foils 'Liquid Gold', and Konad Special Polish in White.

Plate used:
Cheeky Jumbo Plate 6 'Happy Holidays'.

OPI 'You Are So Outta Lime!', Sally Hansen 'On Pines and Needles', Revlon 'Bewitching', OPI 'Honey Rider', Sally Hansen Color Foils 'Liquid Gold', and Konad Special Polish in White.
Polishes Used
Truthfully, this manicure didn't really turn out the way I had envisioned. I think it probably would have looked better to have put another dark green nail stamped with metallic gold on my ring finger, instead of the textured gold accent polish I used.

On a positive note, I really love the way my index fingers turned out!  I used the decal stamping method, and I really love how the 4 colours work together.

Friday, November 28, 2014

Black Friday Mani

It's Black Friday! Of course, I had to do an appropriately themed mani:

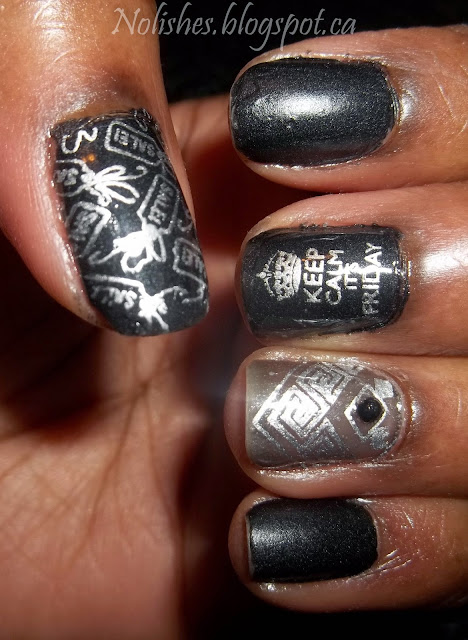
Black Friday themed nail stamping manicure using semi-matte black, silver, and sheer black nail polishes from OPI and Sally Hansen
Black Friday Mani

Polishes Used:
OPI '4 in the Morning'
Sally Hansen 'Big Smoky Top Coat'
Sally Hansen Insta-Dri 'Silver Sweep'

Plates Used:
Moyou London Artist Collection plate 17
Moyou London Rebel Collection plate 05
Cheeky 'Summer Collection' plate CH55

To achieve this look, I reused my ring finger accent nail from my previous mani, and painted my remaining nails black using '4 in the Morning'. I stamped the sale tag image on my thumb using plate CH55. Then, I stamped the 'Keep Calm it's Friday' image from Rebel plate 05 on my middle finger, as a second accent.
OPI '4 in the Morning', Sally Hansen 'Big Smoky Top Coat', and Sally Hansen 'Silver Sweep'
Polishes Used
Overall, I really like the end result. I love how the ring finger accent nail stands out from the look, but also really fits in with the look. The best part is that since I reused part of my previous manicure to create this one, I was able to put this look together really quickly!

It was also really fun shopping for black Friday nail polish deals while wearing my black Friday mani!  My huge score for the day was getting bottles of Orly, China Glaze, and Finger Paints polishes at Sally Beauty Supply for only one dollar each! I truly felt like a kid in a candy store!

Friday, October 31, 2014

Halloween Skittles Mani

I'm so happy that I was able to create another Halloween-themed manicure to share with you today! Here is the finished mani:

Halloween Themed Nail Stamping Manicure using Orange, Black, Silver, White and Yellow Nail Polishes (Right Hand)Halloween Themed Nail Stamping Manicure using Orange, Black, Silver, White and Yellow Nail Polishes (Left Hand)

The polishes I used were:
Sally Hansen Insta-Dri in 'Lightening' and 'Silver Sweep'
Konad Special Polish in both black and white
Sinful Colours 'Citrine'
NYC 'Black Lace Creme'
China Glaze 'White on White'

I wanted to use traditional Halloween colours, so I chose orange, yellow, black, white and silver. Overall, I'm happy with the colour choices. However, I feel that the yellow background on my right thumb stands a bit too much apart from the rest of the look.  I really wanted to have yellow inside the pumpkins to represent the glow from a burning candle, but now I really wish I had used black as the base, and perhaps used advanced stamping technique to fill the pumpkin's eyes, nose and mouth with the yellow.

The stamping plates I used were:
Bundle Monster plates BM-H06, BM-H07, and BMH08
Cheeky Jumbo Plate 6 'Happy Holidays'
Konad plate M13

Halloween Themed Nail Stamping Manicure using Orange, Black, and Yellow Nail Polishes (Thumb Only)
Halloween Skittles Mani - Left Thumb

I`m quite pleased with how this manicure turned out. There is no shortage of Halloween themed plates in the world of nail stamping, so there are many cute, fun, and spooky images to choose from. I still have a few more plates that I didn't get a chance to use, so if I have the time, I just might do one more Halloween mani for the weekend. If not, the plates will just have to wait until next year!

Halloween Themed Nail Stamping Manicure using Orange, Black, Silver, White and Yellow Nail Polishes (Right Fingers)
HAPPY HALLOWEEN!!!

Monday, July 14, 2014

Sally Hansen Color Foils

Sally Hansen Color Foils (Complete Collection): Pink Platinum, Titanium Flush, Rose Copper, Minted Metal, Cobalt Chrome, Purple Alloy, Leaden Lilac, Liquid Gold, Yellow Gold, and Sterling Silver
Sally Hansen Color Foils (Complete Collection)

A few weeks ago, I ran around in a mad frenzy trying to purchase sufficient quantities of the limited edition Sally Hansen Color Foil Nail Makeup collection. A local drugstore chain had all Sally Hansen products on sale, so I purchased the entire collection on the first day of the promotion. As the week went by I convinced myself that I needed backup bottles of my 3 favorite colors from the collection (Liquid Gold, Yellow Gold, and Sterling Silver) - and that's when all of the running around began.

The majority of the drugstores I visited only had a display of 20 polishes - 2 bottles of each of the 10 shades in the collection. I'm pretty lucky that the collection was fairly new and just coming to the shelves in all of the stores, because in most cases nothing was sold out.  I was the first person to buy any of them in the first store I visited, and the display itself looked relatively untouched (no annoying test strokes all over the cardboard). 

Most of my enthusiasm for these polishes is because they work well for nail stamping. For most of the colors (6 to be exact), although I think they are beautiful, I don't really like the way the polish looks on my nails.  I don't see myself ever doing a full manicure with anything other than Rose Copper, Liquid Gold, Yellow Gold, and Sterling Silver.  However I can definitely see myself getting a lot of use out of all of these polishes as stamped accents over other polishes, and maybe an accent nail here and there. Here are all of the colors swatched:

Sally Hansen Color Foil Swatches: Pink Platinum, Titanium Flush, Rose Copper, Minted Metal, Cobalt Chrome, Purple Alloy, Leaden Lilac, Liquid Gold, Yellow Gold, and Sterling Silver
Sally Hansen Color Foil Swatches
 
From left to right we have Pink Platinum, Titanium Flush, Rose Copper, Minted Metal, Cobalt Chrome, Purple Alloy, Leaden Lilac, Liquid Gold, Yellow Gold, and Sterling Silver.

Here are some stamped mani looks that I came up with so far:
Sally Hansen Color Foil Nail Stamping Demo Manicure using OPI polishes 'Don't Touch My Tutu' and 'Pirouette My Whistle', stamped with a 'Leaden Lilac' accent decal
OPI polishes Don't Touch My Tutu and Pirouette My Whistle, stamped with a Leaden Lilac accent decal

Sally Hansen Color Foil Nail Stamping Demo Manicure using OPI 'Chic from Ears to Tail' stamped with 'Liquid Gold', and Finger Paints 'Go Baroque' on accent nail
OPI Chic from Ears to Tail stamped with Liquid Gold, and Finger Paints Go Baroque on accent nail

Sally Hansen Color Foil Nail Stamping Demo Manicure using OPI 'Shocking Pink' stamped with 'Sterling Silver', and a 'Sterling Silver' accent nail
OPI Shocking Pink stamped with Sterling Silver, and a Sterling Silver accent nail
Prior to the mad dash to get these metallic polishes, I was obsessed with neon nail polishes. I wanted to try to incorporate the two looks together, so that's where I came up with the neon pink and silver mani pictured above.  The image I used for the pattern was from Cheeky Jumbo plate A.
The light pink and gold mani was stamped with Moyou London's Artist plate 03, and the star decal on the otherwise demure white and silver sparkle mani is from BM-005.

As a whole, I really love this collection. The polishes stamp so well, and I'm ecstatic that I finally have a wide range of metallic-finish coloured polishes to create stamped manis with. I only started nail stamping in late 2013, so I missed out on the China Glaze Romantique collection (2009), and the Kiko Mirror collection (spring 2013).  It's been frustrating checking out other blogs, and seeing all of the stamping possibilities that coloured metallic polishes can provide, but not being able to get my hands on these popular, sold out, limited edition collections.  You can see now why I was so eager to snap up these Sally Hansen beauties as soon as the opportunity presented itself!

Also, I can certainly say that without a doubt, the 2 gold shades in the collection are now my favorite golds for stamping. The silver is amazing too, but there have always been a lot of great silver stamping polishes on the market.  All in all I'm really satisfied with this purchase!