Showing posts with label Bundle Monster. Show all posts

Sunday, August 11, 2019

Water-Marble Style Leadlighting Mani 2 featuring Essie's 'Glazed Days' Collection

Manicure created using polishes from Essie's 'Glazed Days' collection: Essie ‘Glazed Days’,  Essie ‘Sweet Not Sour’,  Essie ‘Confection Affection’,  Sally Hansen Insta-Dri ‘Silver Sweep’ (new formula),  Essie ‘Sweet Supply’,  Maniology ‘Straight Up Black’,  Essie ‘But First, Candy’, Essie ‘Ooh La Lolly’, and What’s Up Nails stamping plate B002

Today I have another leadlighting manicure created using Essie's Glazed Days Collection, and my water-marble stamping plate B002 from What's Up Nails.

Polishes Used
Polishes Used
Essie ‘Glazed Days’
Essie ‘Sweet Not Sour’
Essie ‘Confection Affection’
Sally Hansen Insta-Dri ‘Silver Sweep’*
Essie ‘Sweet Supply’
Maniology ‘Straight Up Black’
Essie ‘But First, Candy’
Stamping Plates Used
Essie ‘Ooh La Lolly’
What’s Up Nails plate B002
                                                                                                                      *new formula

Essie ‘Glazed Days’,  Essie ‘Sweet Not Sour’,  Essie ‘Confection Affection’,  Sally Hansen Insta-Dri ‘Silver Sweep’ (new formula),  Essie ‘Sweet Supply’,  Maniology ‘Straight Up Black’,  Essie ‘But First, Candy’, Essie ‘Ooh La Lolly’, and What’s Up Nails stamping plate B002

Basically, the steps I took to create this manicure were the same as for the manicure I described in my last post. The main difference is that I used different stamping images from the stamping plate. The middle finger accent nail was also featured in an earlier post in which I did a quick review on the Essie 'Glazed Days' collection. You can click here to see that post.

Overall, I was really pleased with how this manicure turned out as well (even with the small smudge on my thumb!). I really like how these jelly polishes look over a silver base. Below, I've included a few additional close-up shots of my fingernails.

close up shots of manicure created using polishes from Essie's 'Glazed Days' collection: Essie ‘Glazed Days’,  Essie ‘Sweet Not Sour’,  Essie ‘Confection Affection’,  Sally Hansen Insta-Dri ‘Silver Sweep’ (new formula),  Essie ‘Sweet Supply’,  Maniology ‘Straight Up Black’,  Essie ‘But First, Candy’, Essie ‘Ooh La Lolly’, and What’s Up Nails stamping plate B002

Wednesday, August 7, 2019

Water-Marble Style Leadlighting Mani featuring Essie's 'Glazed Days' Collection

Essie ‘Glazed Days’,  Essie ‘Sweet Not Sour’,  Essie ‘Confection Affection’,  Sally Hansen Insta-Dri ‘Silver Sweep’ (new formula),  Essie ‘Sweet Supply’,  Maniology ‘Straight Up Black’,  Essie ‘But First, Candy’, Essie ‘Ooh La Lolly’, and What’s Up Nails stamping plate B002

Polishes Used
Polishes Used
Essie ‘Glazed Days’
Essie ‘Sweet Not Sour’
Essie ‘Confection Affection’
Sally Hansen Insta-Dri ‘Silver Sweep’*
Essie ‘Sweet Supply’
Maniology ‘Straight Up Black’
Essie ‘But First, Candy’
Stamping Plates Used
Essie ‘Ooh La Lolly’
What’s Up Nails plate B002
* New Formula                

Today, I have a manicure to share using the Essie 'Glazed Days' collection realeased for Summer 2019. This collection of very saturated jelly polishes lends itself quite well to a variety of nail art applications. It's been a while since I posted some nail art on my blog, so when I purchased the set, I was so excited to be able to get back to playing with polishes to create some beautiful manicures! 

For this mani, I used the Leadlighting technique, to create a look similar to a stained glass window. I started out with a silver base. I then stamped over the base with a black stamping polish, using one of the water-marble images from What's Up Nails plate B002.  Afterwards, I coloured over the silver portions between the black lines using different colours of polish from the 'Glazed Days' collection.

Below, is a picture of the materials I used to create the look:

Essie ‘Glazed Days’,  Essie ‘Sweet Not Sour’,  Essie ‘Confection Affection’,  Sally Hansen Insta-Dri ‘Silver Sweep’ (new formula),  Essie ‘Sweet Supply’,  Maniology ‘Straight Up Black’,  Essie ‘But First, Candy’, Essie ‘Ooh La Lolly’, and What’s Up Nails stamping plate B002

It was so much fun creating this manicure. I really love how it turned out - I even got a really nice compliment on my nails! Below, I've included a collage of some additional shots of the manicure:

Essie ‘Glazed Days’,  Essie ‘Sweet Not Sour’,  Essie ‘Confection Affection’,  Sally Hansen Insta-Dri ‘Silver Sweep’ (new formula),  Essie ‘Sweet Supply’,  Maniology ‘Straight Up Black’,  Essie ‘But First, Candy’, Essie ‘Ooh La Lolly’, and What’s Up Nails stamping plate B002

Sunday, December 16, 2018

Ice Crystal Mani using Nicole by OPI 'Rich in Spirit' and China Glaze 'Snow Globe'

Today I have another 'Project Polish' manicure to share. This mani uses 2 of my 'Project Polish' polishes: Nicole by OPI 'Rich in Spirit' and China Glaze 'Snow Globe'. I'm calling it the 'Ice Crystal' Mani:

Manicure using Nicole by OPI 'Rich in Spirit' and China glaze 'Snow Globe'

Polishes Used
Stamping Plate Used
Nicole by OPI 'Rich in Spirit'
Bundle Monster Winter Kingdom -
China Glaze 'Snow Globe'
Plate BM-XL485
Konad white stamping polish (not shown)


I really like how this manicure turned out. The overall effect is very Icy and Wintry. It was a nice change to do a seasonal manicure in December that is winter-themed as opposed to holiday themed. Below I have a few additional shots of the manicure that show a bit more of the details of the stamped images.

Ice Crystal Mani - Thumb Close-up

Ice Crystal Mani - Ring, Middle, and Index fingers
The more I use 'Rich in Spirit' the more I appreciate it's beauty and versatility. It really is just a cool toned silver, so it works in so many different applications - pretty much anywhere that I would typically use a silver polish. With that in mind, one of my most used polishes is Sally Hansen 'Silver Sweep', mainly because I use it a lot for stamping. Hmmm, this is now giving me the idea to experiment with using 'Rich in Spirit' as a stamping polish.  Stay tuned to see how that works out in a future post!

Sunday, October 28, 2018

Sparkly Halloween Jack-o-Lantern Mani

Today I have a Halloween Manicure to Share:

Manicure using a coppery-orange metallic foil polish, and an orange glitter, stamped with images of jack-o-lanterns in black. There are also some white and black nail gems accenting some nails.


I really wanted to do a Jack-o-Lantern manicure, and at first, I thought I would use a typical creme orange polish, and an orange glitter.  However, as I was looking through my collection for the orange glitter, I came across a glittery metallic coppery-orange polish that I thought would look amazing with the orange metallic glitter polish. I decided to use the two polishes for more of a Glam-o-Lantern look!

Here are the polishes I used:

Bottle shots of OPI 'A Woman's Prague-ative', Bundle Monster Stamping Polish 'Straight Up Black', and OPI 'Orange You Fantastic!'
Polishes Used

Polishes Used
OPI 'A Woman's Prague-ative'
Bundle Monster 'Straight Up Black'
OPI 'Orange You Fantastic!'

The orange metallic foil polish, 'A Woman's Prague-ative' is from OPI's Euro Centrale Collection from Spring 2013. The orange glitter polish 'Orange You Fantastic' was from OPI's Summer 2014 Coca-Cola Collection. I really can't get over how nice they look paired together!

For this manicure, my thumb, middle and ring finger on both hands are painted with a layer of 'A Woman's Prague-ative', and then with 2 layers of the glitter polish. When looking at it in real life, the glittery combination would sparkle through the full nail jack-o-lantern images stamped in black over the middle and ring finger nails. Unfortunately, that doesn't quite translate in the picture, so I just thought I'd mention it.

Below, are rotated images of my thumbnails which provide a better view of the cute Jack-o-Lantern Faces I stamped from Moyou London's 'Festive Collection' - plate 29.

Glittery 'thumb-o-lanterns' created with coppery orange polish, and orange glitter base, each stamped with a cute jack-o-lantern face image.
My 'Thumb-o-Lanterns'

The stamped image on my middle fingers was from Bunny Nails plate HD-C, and the stamped image on my ring fingers was from ÜberChic Beauty plate Halloween-03.

Stamping Plates Used
Moyou London Festive Collection - 29
ÜberChic Beauty 'Halloween-03'
Bunny Nails Plate HD-C

All in all, I absolutely love the way this manicure turned out. I normally try not to repeat manicures, but I could definitely see myself using this polish combination again to do another 'Glam-o-Lantern' manicure in the future!

Wednesday, October 24, 2018

Autumn Leaves Mani using China Glaze 'Aut-umm I Need That'

I recently purchased China Glaze's 'Aut-umm I Need That' from the Fall 2018 'Ready to Wear' collection. I normally am not drawn to brown polishes, but Aut-umm...'s beautiful shimmer that seems to reflect all of the greens, oranges, reds and golds of the changing fall leaves, caught my eye, and compelled me to purchase it!  Not only that, I also decided that I simply must do a 'fall leaves' manicure using this polish as soon as possible!

This manicure is the result:

Brown manicure using advanced stamping technique to apply coloured leave decals to accent some of the fingers. Amber coloured gems are used on accents for the other fingers.
Autumn Leaves Mani
I used 'Aut-umm I Need That' as the base colour for all of my nails, and then I used bundle monster plate BM-S321 (from the 'Botanicals Collection') to create fall leaf decals using the advanced stamping technique. The leaves are outlined in gold, and then filled in with various autumn colours.

First, here's a close up bottle shot of 'Aut-umm I Need That' which shows the beautiful shimmer:

Close up Bottle shot of China Glaze 'Aut-umm I Need That', nail polish


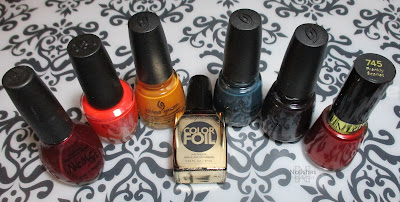
And here's a shot of all seven polishes I used to create this manicure:

Nicole by OPI 'Boys 'N Berry', OPI 'Atomic Orange', China Glaze 'Accent Piece', Sally Hansen 'Liquid Gold', China Glaze 'Baroqe Jungle', China Glaze 'Aut-umm I Need That', Revlon 'Frankly Scarlet'
Polishes Used

Polishes Used
Nicole by OPI 'Boys 'N Berry'
OPI 'Atomic Orange'
China Glaze 'Accent Piece'
Sally Hansen Color Foil 'Liquid Gold'
China Glaze 'Baroque Jungle'
China Glaze 'Aut-umm I Need That'
Revlon 'Frankly Scarlet' (745)

 I'm so happy with the way the manicure turned out! After applying the 6 leaf decals I created to 3 fingers on each hand, I applied amber coloured nail gems to the other two fingers to accent the look. Below I have included a couple of shots of my left hand.


Just for fun, I've included a link to my 'Fall Colours Mani' from 2014 where I used the 'Leadlight Technique to colour in a full nail stamping image from a different bundle monster plate, BM-H11.

Sunday, September 23, 2018

Blue and Gold manicure using Quo by Orly 'Celestial Star'

Today I have a quick 'remix mani' to share:


Polishes Used
Quo by Orly 'Celestial Star'
Sally Hansen Color Foil 'Yellow Gold'


I kept my ring finger the same from my previous 'Venetian Marble Mani', and painted over the other fingers with a deep blue sparkly polish from Quo by Orly, called 'Celestial Star'. I did a bit of stamping on the thumb (not shown), and middle finger, using an image from Bundle Monster + Magically Polished Collaboration plate BM-XL205. The polish I stamped with was Sally Hansen Color Foil in 'Yellow Gold'.  I also embellished the middle finger by painting a diagonal section in gold over the stamp, and then dotting along the edge with the blue polish.

This was one of those situations when my previous manicure was showing a bit of chipping on a few nails, but I didn't feel like removing my nail polish and starting fresh with a new manicure. Hence the remix mani, where I salvage or touch up any nails that still look fine, and paint over and/or embellish the rest!

I believe that the 'Celestial Star' polish was also untried, so I'm happy that I got to use it. I bought it years ago, along with 2 others from the same collection (the others were called 'Turquoise Moonlight', and 'Night Sky'). From what I can see on line, it looks like they came out around 2011. I noticed the polishes when I was organizing my collection recently. All 3 of them looked like they were thickening and evaporating in the bottles, even though I don't recall ever having used them (I may have years ago, and forgotten perhaps?), and the bottles seemed to be completely closed. I noticed this with a few other glitters, foils, and crackles. It seems that my creme polishes hold up relatively well over the years, but on occasion, some of the special effect polishes will thicken and/or dry out.

In addition to the 3 Quo by Orly polishes I just mentioned, I found 7 others that this appeared to be happening to. I put them aside to do a 'Project Polish' with - a challenge to use them up within a certain time period by putting them into heavy rotation. This may be a little tricky though, since they are all special effect polishes. I'm going to have to get creative to still be able to incorporate nail art while using polishes as my manicure base! I'll try to do a more detailed post later with pictures of the polishes.

Saturday, August 1, 2015

Pink and Blue Double Stamped Mani

Blue jelly polish base stamped with navy blue floral outline pattern, and then with a pink abstract heart pattern. Accent ring finger is covered with pink matte glitter instead of the second stamping of pink over the blue base.

Today's manicure is a reconfiguration of a manicure that I did earlier this year. During the 2015 Crackle Polish Challenge, I did a manicure called the 'Shattered Heart Mani'. It featured a crackle polish decal, glitter, and double stamping over a translucent polish base. Even though the main concept behind the manicure was to showcase the crackle polish decal, the feature that I ended up liking the most was the double stamped design that I used on my thumbnails. I even mentioned in that post that "I may have to do an entire mani like this!". Well, I finally ended up doing it!

Polishes Used
Plates Used
Nfu-Oh NFU JS30 (Royal Blue)
Bundle Monster Secret Garden Collection:
OPI ‘On Pinks & Needles’
BM-721
OPI ‘I Saw… U Saw… We Saw… Warsaw’
Pueen Love Elements Collection:
Sally Hansen Insta-Dri ‘Presto Pink’
PUEEN41

Nfu-Oh NFU JS30 (Royal Blue), OPI ‘On Pinks & Needles’, OPI ‘I Saw… U Saw… We Saw… Warsaw’, and Sally Hansen Insta-Dri ‘Presto Pink’

In order to switch things up a bit, I used a blue jelly polish from Nfu-Oh's Jelly Syrup Series as the base, and a dark blue polish ('I Saw...' from OPI's Spring 2013 Euro Centrale Collection) for the first layer of the stamping design. Also, for the first layer of stamping, I used a different stamping plate from the one I used the first time around. The polish and plate that I used for the top layer of stamping were the exact same as the original manicure.

I wanted to do something a little different for my ring finger, so instead of stamping the pink top layer over the blue base, I used an awesome pink matte glitter polish from OPI's Brights 2015 Collection called 'On Pinks and Needles'. The shade of pink of the glitters, and of the stamping polish are almost a perfect match!

I really love how this look turned out! I don't like to repeat looks, but I don't think I'm quite done with this particular style just yet. I would like to try a version with brighter colours, and perhaps experiment a bit more with different combinations of patterns that will work well together! 
Collage featuring extra shots of the manicure

Saturday, July 11, 2015

Neon Green and Blue Print Mani

I threw together this fun and vibrant look because I wanted to try out this awesome neon green nail polish that I bought recently:

Essie 'Vibrant Vibes', and Sally Hansen Insta-Dri 'In Prompt Blue', stamped with Bundle Monster BM-402

Polishes Used
Plate Used
Essie ‘Vibrant Vibes’
Bundle Monster BM-402
Sally Hansen ‘In Prompt Blue’

The neon green polish is 'Vibrant Vibes' from Essie's Summer Neons 2015 Collection. I stamped over it with Sally Hansen Insta-Dri 'In Prompt Blue' using a tribal print image from Bundle Monster plate BM-402. It's not the best stamping job ever, but I do like how the colour combo looks!

Sally Hansen Insta-Dri 'In Prompt Blue', and Essie 'Vibrant Vibes'

Saturday, July 4, 2015

Independence Day Nails!

Happy Independence Day, to those of you in or from the USA!

Today, I have a 4th of July inspired manicure to share:

Nail stamping manicure in red white and blue with glitter, and stamped Independence Day themed designs

Polishes Used
Plates Used
Nicole by OPI ‘Make U Smile’

OPI ‘Color so Hot it Berns’

China Glaze ‘White on White’
Bundle Monster BM-H25
Nicole by OPI ‘It’s up to You’

Sally Hansen ‘Silver Sweep’


Nicole by OPI ‘Make U Smile’, OPI ‘Color so Hot it Berns’, China Glaze ‘White on White’, Nicole by OPI ‘It’s up to You’ and Sally Hansen Xtreme Wear ‘Silver Sweep’

I really like how this manicure turned out! I've really been trying to tone my designs down lately. I find that it's more of a challenge to communicate a theme with as few elements as possible, so it has been really fun trying to meet that challenge by keeping my stamping manicures more simple and streamlined.

Now, that's not to say that I will never again do manicures which use a lot of patterns, techniques, or colours - because those are certainly a lot of fun to do too! But for now, I'm enjoying this more edited approach.

Collage of Nail stamping manicure in red white and blue with glitter, and stamped Independence Day themed designs

Anyways, that's it for today. Thanks for stopping by!

Wednesday, July 1, 2015

Canada Day Nails!

It's Canada Day!!!

Today I have a Canada Day inspired manicure to share with you:

Red and white nail stamping manicure with nails stamped geometric print on ring and middle fingers. The ring finger accent nail is white stamped with red, with a diagonal stripe of silver on one corner.

Polishes Used
Plates Used
OPI ‘Color so Hot it Berns’
China Glaze ‘White on White’
Bundle Monster BM-604
Sally Hansen ‘Silver Sweep’

OPI ‘Color so Hot it Berns’, China Glaze ‘White on White’, and Sally Hansen ‘Silver Sweep’


Last year I did a maple leaf themed manicure with tons of filler patterns. You can see it in the picture below. The stamping isn't perfect, and the design is a little busy. At the time, I had only been nail stamping for a few months or so, and my skills were kind of shaky. Unfortunately, I no longer remember which polishes I used, as this was done just before I started the blog so I didn't really take note. 


This year I wanted to simplify, and just use the colours of the Canadian flag as the inspiration. I chose a geometric design, and only stamped it on 2 fingers. I really love this low key interpretation!


Thanks for stopping by! And a very happy Canada Day to all those who are celebrating!

Sunday, April 19, 2015

Grey, Orange, and Blue Water Marble and Stamping Mani

Due to the huge supply of water marble nail decals that I whipped up recently, today, I have yet another water marble manicure to share!


In addition to the water marble decal on my ring finger, I also did a little stamping and dotting on my middle finger. I can't even emphasize how much I really love this manicure. I like how toned down, yet fun and interesting the final look is. I would definitely say this is one of my favourite looks I've done so far this year.

NYC 'Water Street Blue', NYC 'Deep Breath', NYC 'Spring Street', NYC 'NY Blues', and NYC 'Sidewalkers'
Polishes Used:
NYC 'Water Street Blue'
NYC 'Deep Breath'
NYC 'Spring Street'
NYC 'NY Blues'
NYC 'Sidewalkers'

Plate Used:
Bundle Monster BM-212


I'm really excited about designing more mixed manicures like this one using my remaining water marble decals along with other nail art techniques. This has been so much fun, and I'm loving the results!

Thursday, April 16, 2015

Rainbow Flower Power Mani

Today I'm sharing the results of a technique that I've been interested in trying for quite some time now, but haven't gotten around to until recently...  My first water-marble manicure!

Nail stamping manicure featuring a rainbow coloured water marble base stamped with flower images in black. An index finger accent nail is left unstamped, and features bands of the colours of the rainbow.
Rainbow Flower Power Mani
Polishes Used:
NYC 'Times Square' (red)
NYC 'Spring Street' (orange)
NYC 'Lexington Yellow'
NYC 'High Line Green'
NYC 'NY Blues'
NYC 'Prince Street' (purple)
Konad Special Polish in Black

Plates Used:
Bundle Monster Plate BM-016
Gals Plate GA34

NYC Times Square, NYC Spring Street, NYC Lexington Yellow, NYC High Line Green, NYC NY Blues, NYC Prince Street, and Konad Special Polish in Black
Polishes Used
This was so much fun to do! Instead of the traditional water-marbling technique, I used a modified version that I recently learned about while doing some research. I've decided to do a separate post with more information on that, in the near future.

After the rainbow water marbling was applied to my nails, I decided tone down the look with some stamping. The end result looks very 'sixties inspired' to me. It wasn't intentional, but I decided to roll with it - which is why I decided to call it the 'Rainbow Flower Power Mani'!

collage of additional photos of the manicure
Rainbow Flower Power Mani -
Additional Photos

Monday, March 30, 2015

Crackle Polish Challenge #20 - Blue Crackle Dotticure

2015 Crackle Polish Challenge Manicure #20

Featured crackle application:
Using crackle polish for a dotted manicure

Featured crackle polish:
OPI 'Blue Shatter'
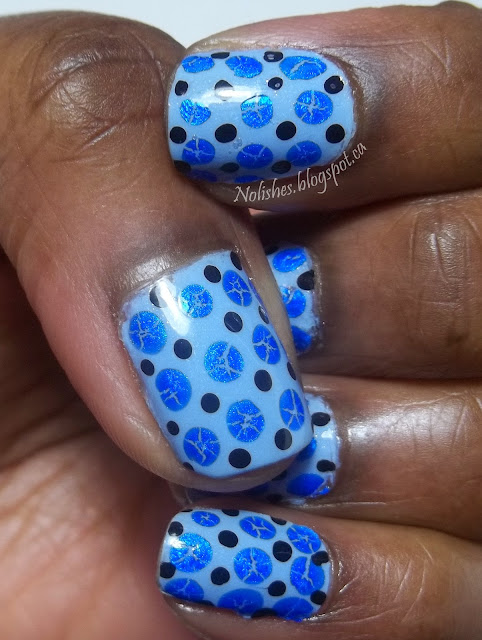
Manicure using a dotting tool to create dots in 2 sizes and 2 colours. The larger dots were made using blue crackle polish to give an interesting effect, and the smaller dots were made with black polish.
Blue Crackle Dotticure
Polishes Used:
Konad Special Polish in Black
OPI 'Blue Shatter'
Essie 'Rock the Boat'
Konad Special Polish in Black, OPI 'Blue Polish', and Essie 'Rock the Boat'

I'm really pleased with the way this dotted crackle effect turned out! The cracks on the blue shimmery dots kind of resemble the edges of the facets on the surface of a cut blue sapphire. It's like there are small gemstones all over my nail!

The only thing I was a little disappointed with is that I had trouble getting the crackle polish to work on 2 of my nails. The very first attempt with crackle dotting was done on the 3 fingers prominently displayed in the picture above. I was originally going to do something else with my other two fingers, but changed my mind (more on that later). When I went back to dot the remaining 2 fingers, for some reason, I couldn't get the polish to crack any more! I even went back and started from scratch 3 separate times, but could not recreate the effect.

When I first tried it, I didn't put much thought into it - I was experimenting, so I didn't pay too much attention to my technique. I just put a small blob of polish on the back of a piece of plastic, and started dotting. It worked fine. When It came out beautifully, and I later decided that wanted to continue doing it, I just could not recreate the results.  It was so frustrating! I may have to try again with a different polish. Here are some additional shots of the manicure:

Manicure using a dotting tool to create dots in 2 sizes and 2 colours. The larger dots were made using blue crackle polish to give an interesting effect, and the smaller dots were made with black polish.

On my left hand, I did a different crackle mani using the same colours.  Originally, my plan for both hands was to do a stamped hounds-tooth design (from Bundle Monster plate BM-322) on my middle and ring fingers, and use the dot design only for the thumb, index and pinky fingers.  I painted my nails with 'Rock the Boat', and did the crackle stamping on the accent fingers of both hands. I started doing the dots on the right hand. When I finished, I didn't like the way the 2 designs looked together, so I decided to nix the hounds-tooth and just do the same dot design on the ring and middle fingers (as mentioned above, this is where it all started to go wrong!).

When I got to my left hand, I didn't want to remove the hounds-tooth because I liked the way it looked, so I just decided to do another design on the remaining three fingers that worked with the hounds-tooth pattern. Here's the finished result:

Alternate Version Blue Crackle Mani
Using BM-322
Since this manicure also features a crackle polish technique that I am now using for the second time, I think I should go ahead and acknowledge it.  I'm calling it the 'Crackle Curve'. It's the sweep of crackle nail polish that starts at or near the base of one corner of the nail, and ends up at the top corner of the opposite side of the nail. The other time I used this technique was in the Pink, Red, and White Valentine's Day Mani. So to make it official:

2015 Crackle Polish Challenge Manicure #20.5 - Blue Houndstooth Crackle Manicure:

Featured crackle application:
The 'Crackle Curve' technique

Featured crackle polish:
OPI 'Blue Shatter'

Stay tuned for my next post which will be the final instalment of the 2015 Crackle Polish Challenge!
Saturday, January 24, 2015

Crackle Polish Challenge #4: Dark Green and White Geometric Mani

2015 Crackle Polish Challenge Manicure #4

Featured crackle application: Filling swaths of negative space in a nail stamping manicure

Featured crackle polish: China Glaze's Crackle Glaze in 'Jade-d', a chartreuse glitter crackle polish.

Nail stamping manicure with ultra dark green nail polish with various geometric line patterns stamped in white on thumb, middle and ring fingers. Some of the Negative space between the white lines is filled with gold-green crackle glitter. The 2 unstamped fingers each have a yellow nail art rhinestone placed bottom centre
Dark Green and White Geometric Mani
Polishes Used:
Deborah Lippmann 'Billionaire'
China Glaze Crackle Glaze 'Jade-d'
Konad Special Polish in White

Plate Used:
Bundle Monster BM-604

Deborah Lippmann 'Billionaire', China Glaze Crackle Glaze 'Jade-d', and Konad Special Polish in White
Polishes Used
Overall, I like how this manicure turned out. This is the first time that I ever used 'Billionaire', and 'Jade-d'. I really like 'Billionaire' as it's an excellent alternative to black nail polish - still edgy, but with a touch of sophistication. However, I'm still on the fence about whether or not I like how the crackle glitter looks in this manicure. I think the application method of filling negative space with crackle polish is a great idea, however, I wonder if the effect might have been better with a crackle creme polish instead of a glitter.

To me, the crackle effect doesn't really seem to stand out all that much in this manicure. I feel that the glitter is already eye-catching enough, so the sparkle distracts your eye from the cracks. In addition, the dark green polish on the bottom layer shows through the translucent base of the crackle glitter, which also seems to take away from the crackle effect. Perhaps the crackle glitter would look better with a lighter colour?

I also found it hard to get consistent cracking with this polish. My thumb showed a lot of the shatter effect, my ring finger has a bit, however, on my middle finger the cracks are barely noticeable. In fairness, the lack of shatter on my middle finger could have been due to application, since I had to use a dotting tool to put it on. Incidentally, I happen to think the middle finger looks the best, due to the minimal cracking!

Another shot of the manicure described above
Dark Green and White Geometric Mani
I'm going to have to play around with 'Jade-d' some more to figure out how to use it best, especially since I actually have two bottles of chartreuse crackle glitter - this one, and another from Sally Hansen called 'Sage Smash' (see picture below). They are pretty much exact dupes, but I really love the colour so I want to find ways to use it that highlight the shade. I have an idea that I'm testing that could be a great solution for this - but more about that in my next post!!

Picture of 2 bottles of nail polish: China Glaze Crackle Glaze in 'Jade-d', and Sally Hansen Crackle Overcoat in 'Sage Smash'
Chartreuse Crackle Glitter Polishes: Jade-d, and Sage Smash