Showing posts with label M.L. Artist Design Series. Show all posts

Thursday, August 13, 2015

Pink Floral Pond Mani

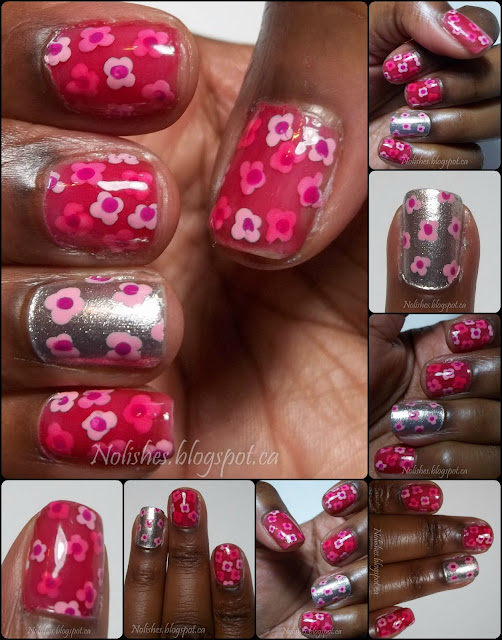
For today's manicure, I decided to try out a 'Pond' manicure for the first time. This style of manicure involves sandwiching designs between layers of tinted jelly polish, to create a submerged item effect.
I decided to do a monochromatic look, so I used a medium pink jelly polish for the base, and then used a repeating four-petalled flower design, made using a dotting tool and two shades of pink polish.

Manicure featuring pink jelly nail polish with dotted pink flowers sandwiched between the layers. The ring finger has a silver base covered with dotted pink flowers. Dotted flowers are light pink with dark pink centres.

I really like how this look turned out - it is super-girly, fun, and vibrant! I also really like the polishes I chose. I used 3 Essie polishes that were newly released for summer 2015. The two crème polishes, 'Coacha'Bella' and 'Groove is in the Heart', were from Essie's Summer Neons collection, while the jelly polish, 'Blush Stroke', is from Essie's Silk Watercolor collection. The other polish I used was one of my silver standby's: Sally Hansen Xtreme Wear 'Celeb City'. I really love how sparkly, and reflective this polish is. I use it quite frequently as a silver base polish underneath my nail art.

Essie ‘Blush Stroke’, Essie ‘Coacha’Bella’, Essie ‘Groove is in the Heart’, and Sally Hansen Xtreme Wear 'Celeb City'

Polishes Used
Essie ‘Blush Stroke’
Essie ‘Coacha’Bella’
Essie ‘Groove is in the Heart’
Sally Hansen Xtreme Wear ‘Celeb City’

This look has really inspired me to try out more pond manicures. There were a couple really notable jelly polish collections released this summer: OPI's 'Color Paints' collection, and Essie's 'Silk Watercolor' collection. Since I purchased both collections, I have a lot of options for creating some lovely pond manicures, and I can't wait to try them out!

Here are some more shots of the completed manicure.
Extra Shots of the completed manicure

Thursday, November 27, 2014

Sheer Black Manicure with Black and Silver Chevrons - Using Moyou London Artist Plate 17

After close to 3 months, my Moyou London Artist Collection Design Series is finally coming to an end. Here is the final manicure of the challenge, featuring Artist Collection plate 17:

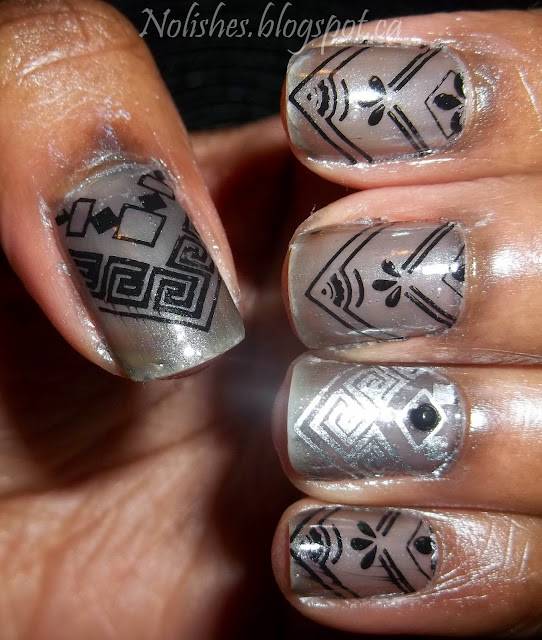
Nail Stamping manicure with a sheer black base, stamped with a variety of chevron designs in black and silver nail polish.
Sheer Black Manicure with Black and Silver Chevrons
Polishes Used:
Sally Hansen 'Big Smoky Top Coat'
Konad Special Polish in Black
Sally Hansen 'Silver Sweep'

This was a relatively easy manicure to do. I used a the 'Big Smoky Top Coat' as my base coat, and simply stamped the images over the sheer base. The hardest part of the process was trying to line up the patterns to centre them on each nail. To make this a little easier, I used a large squishy stamper so that I could simply press my nail onto the image, rather than roll the image onto my nail (as I would usually do with the smaller, harder stampers that I usually use). I finished the look off with top coat, and then placed a small black nail art stud on each ring finger.

Picture of thumbnail manicured with sheer black base nail polish, and stamped with a black chevron greek key image. Inside that chevron, is a smaller one made up of a symmetrical chain of geometric shapes.
Sheer Black Mani - Left Thumb
I think that this type of manicure would look great with a black french tip to frame the look. However, since my nails are kind of short, and the image is long enough to take up the majority of my nail, if I did a french tip it would either touch, or partially cover the tip of the chevron - which to me, is a crucial element of this design. However, even without the french tip, I still really like the way this manicure turned out.

And so here I am, officially at the end of my design challenge! I really enjoyed creating these manicures, and I'm glad that I've forced myself to jump right in and not delay in using these amazing plates from my collection.

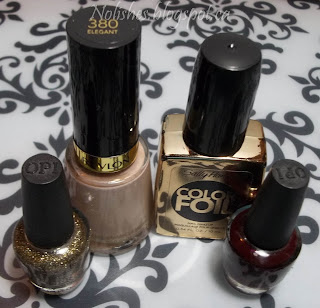
Sally Hansen 'Big Smoky Top Coat', Konad Special Polish in Black, and Sally Hansen 'Silver Sweep'
Polishes Used
As I mentioned in my last post, out of the 17 plates currently in the Artist collection, there are 3 that I don't own. I have no plans to get them, but if that changes, or if new plates are released that I end up purchasing, I'll probably continue with the challenge. For now however, I'm going to take some time to enjoy the freedom of designing manicures using whatever plate I feel like, whenever I want to! 


Wednesday, November 26, 2014

Mondrian Mani 2 - Using Moyou London Artist Plate 16

Today I have another instalment of the Moyou London Artist Collection Design Challenge:

Nail stamping manicure inspired by the artwork or Piet Mondrian. Designed using Moyou London Artist collection plate 16, and white, black, red, blue, and yellow polishes from China Glaze, Essie, Konad, and Nfu Oh.Nail stamping manicure inspired by the artwork or Piet Mondrian. Designed using Moyou London Artist collection plate 16, and white, black, red, blue, and yellow polishes from China Glaze, Essie, Konad, and Nfu Oh.

This manicure was done using Plate 16 from the Moyou London Artist Collection, and is the second last manicure in my challenge!

When I did my original 'Mondrian Inspired Mani' a few months ago, I mentioned that I wanted to try it again with a darker blue jelly nail polish. I've since acquired China Glaze's 'Ride the Waves', a beautiful deep blue jelly, so I'm happy that I now have the opportunity to use it as I revisit the same theme with a different plate.

Polishes Used:
Essie 'Jelly Apple'
Nfu Oh NFU JS19
China Glaze 'Ride the Waves'
China Glaze 'White on White'
Konad Special Polish in Black

With this manicure, I used the decal method of nail stamping (aka advanced nail stamping technique) to colour in the multi-coloured accent nails. I decided to use the decal method because when I did the first version of this mani, I tried colouring with the 'leadlight' technique and found that it was hard to keep the highly pigmented jelly polishes from going over the black lines.

The black lines are supposed to be crisp, and clean, and they are an important part of the design. When they are partially obscured with polish, the look does not have the same visual impact.  You can see an example of this in the picture of my right hand, above. On my right ring finger, I had to leadlight the larger section of blue to correct a small boo-boo caused when I was applying the decal to my nail. The blue polish covers a bit of the black line, and takes a bit away from the look.

Now, these are things that are barely noticeable when wearing the manicure in real life, but of course they are a lot more noticeable in close-up still photos with flash! 

Another thing I changed this time around, was that I tried to tone the look down a bit by adding white and black nails. I actually like this version a lot better because of this simplification. The contrast between the multi-coloured, and neutral nails makes the look more interesting, and also helps the multi-coloured nails stand out more.

I really can't believe the challenge is almost over! Currently, there are a total of 17 plates in the Artist Collection. Right now, I own 14 of them: all except for plates 6, 8, and 15. This manicure based on plate 16 is the 14th manicure that I've completed for the challenge (I did two manicures using plate 4 because I wasn't fully satisfied with my first one - you can check out both versions here and here). My next post will be the 15th and final manicure in the challenge, using plate 17. Stay tuned!

Sunday, November 16, 2014

Gold and White Klimt Inspired Mani - Using Moyou London Artist Plate 14

This is my 3rd last manicure from my Moyou London Artist Collection Design Series. It has been a lot of fun to do, but honestly, I'm glad that it is almost over! It will be great to not have any sort of obligation to do a particular manicure, and to just be free to create based on how I'm feeling. On the other hand, it has been a welcome change having a bit structure, and I've enjoyed giving myself the opportunity to use plates that I otherwise might have delayed using.

Today's manicure is very toned down and simplified compared to the majority of my other 'Artist Collection' manicures. I just needed a bit of a change from the multi-coloured, decaled, skittles manicures that I have been doing lately! Here is the finished mani:

Nail stamping manicure with white Gustav Klimt inspired images (from Moyou London Artist 14) stamped over a gold/pink duochrome base. Gold solid ring finger accent nail, embellished with a touch of rose gold glitter.Nail stamping manicure with white Gustav Klimt inspired images (from Moyou London Artist 14) stamped over a gold/pink duochrome base. Gold solid ring finger accent nail, embellished with a touch of rose gold glitter.

Polishes Used:
Deborah Lippmann 'Sugar Daddy'
Maybelline Color Show 'Gilded Rose'
Konad Special Polish in White

Deborah Lippmann 'Sugar Daddy', Mabelline Color Show 'Gilded Rose', and Konad Special Polish in White
Polishes Used - 'Sugar Daddy', 'Gilded Rose', and Konad White Special Polish

I used 'Sugar Daddy' as the base colour for all of my nails. Using the Gustav Klimt inspired Moyou London Artist Collection 14 plate, I stamped 8 different images in white over the rose/gold duochrome base. I left my ring fingers solid, but embellished the tips with a touch of 'Gilded Rose', a rose gold glitter.

This is my first time using a Deborah Lippmann polish. I've owned 'Sugar Daddy' for a few months now, but I never got around to using it. I'm quite pleased with the consistency and the coverage - for this manicure, I'm only wearing one coat! I also love how cute the bottle is!

I also really love how well 'Sugar Daddy', and 'Gilded Rose' go together. 'Gilded Rose' is practically the glitter version of 'Sugar Daddy'!  Because of this, using it on the tip of my accent finger kept the look monotone, but gave a bit of texture. I just adore the effect.

In the pictures above, the images of my thumbs are upside down, and partially obscured by the flash of my camera, here's a better look at them:

Nail stamping manicure with white Gustav Klimt inspired images (from Moyou London Artist 14) stamped over a gold/pink duochrome base. Nail stamping manicure with white Gustav Klimt inspired images (from Moyou London Artist 14) stamped over a gold/pink duochrome base.

All in all, I really love this manicure. The best part about it is that it was relatively quick and easy to do! Stay tuned for the final two instalments of the design series!

Saturday, November 15, 2014

Gaudí Inspired Mani - Using Moyou London Artist Plate 13

After several interruptions, I’ve finally managed to get back to my Moyou London Artist Collection Design Series! With Thanksgiving, Breast Cancer Awareness, Halloween, Movember and Remembrance Day I had a bunch of themed manicures to get done in a short period of time, so there weren’t really a lot of opportunities to continue the series until now.

Today’s manicure was completed using Moyou London Artist Collection plate 13. The plate is inspired by the work of Spanish architect Antoni Gaudí. Here is the finished manicure:
Nail Stamping manicure created using Moyou London Artist 13, in green, blue, navy, purple and gold.
Gaudí Inspired Manicure
Polishes Used:
Sally Hansen Insta-Dri 'I-rush Luck'
Sinful Colors 'Endless Blue'
Maybelline Color Show 'Midnight Blue'
Maybelline Color Show Holographic 'Bold Gold'
Sally Hansen Insta-Dri 'Grape Going!'
Konad Special Polish in Black

Other than the gold accent polish, I tried to choose colours in the same colour family, with medium to dark intensity. However, the flash on my camera is making the nail polish on my index finger, 'Endless Blue', look a lot brighter in the picture than it does in real life. It's actually more of a slightly-darker-than-medium blue.

Nail Stamping manicure created using Moyou London Artist 13, in green, blue, navy, purple and gold.

On my ring finger, I used the decal method to add colour to the lizard and mosaic tile stamp for the accent nail. It might be fun to try this lizard again doing a multi-coloured mosaic tile look, by painting each of the sections with a different colour of nail polish. It would be very time-consuming, but I think it would look pretty cool!

Overall, I'm happy with the way that this manicure turned out. I rarely do 5 different base colours, so I was a little nervous about whether or not this mani would have a unified look at the end - I think it does! The accent nail does a good job of tying everything together.

I only have 3 more plates to do from the Moyou London Artist Collection (I don't have the entire collection), so I hope to finish up with the challenge in the coming weeks - stay tuned!

Nail Stamping manicure created using Moyou London Artist 13, in green, blue, navy, purple and gold.
Gaudí Inspired Manicure

Saturday, October 25, 2014

Metallic Green, Gold & Black Mani - Using Moyou London Artist Plate 7

This is the 8th official manicure I've done as part of my Moyou London Artist Collection DesignSeries. I purchased this plate within the last few weeks, so even though I was trying to present the series in numerical order for the plates that I owned, this manicure is out of order because I didn't own the plate at the time I finished the manicure for plate number 6.

Here’s the finished manicure:

Metallic Green, Gold & Black Manicure featuring nail stamping images from Moyou London Artist Collection Plate 07
Metallic Green, Gold & Black Mani

The plate has an Egyptian theme, but I wanted to create something that played with the patterns on the plate, and not just the images (which would have been the obvious choice). My manicure for Artist Collection Plate #4, which was based on the artwork of Gustav Klimt, was designed the same way.

The colours I used were:
Wet’n’Wild Wild Shine in Caribbean Frost
Sally Hansen Color Foil in Liquid Gold
Konad Special Polish in Black

I absolutely love the vivid colour of the green, but I found it kind of slow drying with more than one coat. I learned this the hard way after unsalvageably smudging my twice-coated nails, and having to start again! Luckily, the polish gives pretty decent coverage with one coat, so I didn't mind the slow dry issue so much - the second time around!

Overall, I like the design of this manicure, although the execution could have been a bit better. If I had to do it over, instead of the black dots on the thumb and ring finger, I would have used 3 or 4 black rhinestones in a half moon pattern – but I didn't think of that until after I had already applied the black dots. However by this point, after the troubles I had with the polish drying time, I wasn't in the mood to start over!

Sunday, September 28, 2014

Black Jelly and Gold Mani - Using Moyou London Artist Plate 11

Today's manicure was designed using Moyou London Artist Collection Plate 11, and is the 6th official instalment of my Moyou London Artist Collection Design Series:

Black Jelly and Gold Manicure Using Moyou London Artist Collection Plate 11. Polishes used: OPI 'Wondrous Star', Nfu Oh Jelly Syrup Series NFU JS01, and Sally Hansen Color Foil in 'Yellow Gold'
Black Jelly and Gold Mani

The polishes that I used were:

OPI 'Wonderous Star' on my ring finger;
Nfu Oh's NFU JS01 from the Jelly Syrup Series as the base coat on all of my other fingers;
and Sally Hansen's Color Foil in 'Yellow Gold' as the stamping polish over the black jelly base coat.

I came up with the idea for this colour scheme by playing off of the one I used in my last post, 'White and Silver Cherub Mani'. I kind of did the inverse of those colours - a sheer black instead of the sheer white base I used last time, and gold instead of the silver that I used (I don't know if gold and silver are technically inverses, but I'm sure you catch my drift!).

I'm really liking how the 'Wonderous Star' glitter accent nail works with the rest of the mani.  The gold glitters in the polish are light, and more yellow toned rather than brassy so it works well with the Sally Hansen 'Yellow Gold' polish. Also, the little black glitters help tie in the Nfu Oh black jelly base polish. 

Moyou London Artist Collection Plate 11
Moyou London Artist Plate 11

This plate is one of the most beautiful ones that I own, but now that I've actually used it, I realize that one of my favorite elements on the plate, the skull-painted face of the lady, is pretty much impossible for me to use on my finger nails. My nails are usually short to medium length, so I most likely won't be able to fit the entire face on one of them. I think that even with a longer nail, a lot of the image would still be too wide for me to use. Perhaps I can get creative and find a way to juxtapose the image on two adjacent nails or something...  I'll have to play with it some more to see what I can come up with.

Friday, September 26, 2014

White and Silver Cherub Mani - Slightly Modified

Just wanted to do a quick post to show a small change that I did to the Cherub mani that I had on:

White and Silver Nail Stamping Cherub Mani, version 2. Stamped with Moyou London Artist Collection Plate 10. Polishes Used: Sally Hansen 'Silver Sweep', Konad Special Polish in 'White', and OPI 'Don't Touch My Tutu'.
White and Silver Cherub Mani - Slightly Modified

Previously, I had a glittered nail polish (Essie's 'Hors d'Oeuvres') on my pinky. I simply changed the accent nail to a different stamped image from the same Moyou London Artist Collection 10 plate that I used for the other fingers. I just wanted to pare the look down a little bit to make it softer.

Once again, the nail polishes used were: Sally Hansen Insta-Dri in 'Silver Sweep', Konad Special Polish in 'White', and OPI 'Don't Touch My Tutu'.

Thursday, September 25, 2014

White and Silver Cherub Mani - Using Moyou London Artist Plate 10

Today's manicure is one that I have really been looking forward to creating for quite some time. Moyou London's Artist collection 10 plate is exceedingly gorgeous, and it presents so many design possibilities. The instant I saw the plate, I knew I had to have it. I purchased the plate 7 months ago, and even though I was so excited to have it, it is only now that I am only getting around to using it for a proper mani! Without further ado, here is the finished manicure:

White and Silver Nail Stamping Cherub Manicure. Stamped with Moyou London Artist Collection Plate 10, using Sally Hansen 'Silver Sweep', Essie 'Hors D'oeuvres', Konad Special Polish in 'White', and OPI 'Don't Touch My Tutu'.
White and Silver Cherub Mani

I used the following polishes for this mani:
Konad Special Polish in White for the stamping,
Sally Hansen Insta-Dri in 'Silver Sweep' for the french tips,
Essie 'Hors D'oeuvres' for the accent pinky nail,
and OPI 'Don't Touch My Tutu' as the base colour on all of my other fingers.

For this manicure, I used only 2 stamping plates: BM-419 for the silver french tips, and of course, Moyou London Artist Collection 10.

White and Silver Nail Stamping Cherub Manicure (Left Thumb). Stamped with Moyou London Artist Collection Plate 10, using Sally Hansen 'Silver Sweep', Konad Special Polish in 'White', and OPI 'Don't Touch My Tutu'.
White and Silver Cherub Manicure (Left Thumb)

White and Silver Nail Stamping Cherub Manicure (Right Thumb). Stamped with Moyou London Artist Collection Plate 10, using Sally Hansen 'Silver Sweep', Konad Special Polish in 'White', and OPI 'Don't Touch My Tutu'.
White and Silver Cherub Manicure (Right Thumb)
I absolutely love how this turned out! I usually don't like to repeat manicures, however I'm already thinking of slight variations I can make if I ever do try this again. I may try another version with no accent nail, for a slightly more demure look. And of course, it would also look fabulous with a classic white french tip.

I'm equally excited to work with the next plate in my Moyou London Artist Collection Design Challenge: Moyou London Artist Plate 11. This is another plate that was pretty much love at first sight for me, but sadly, it still has its protective blue coating on, while sitting in my plate storage box! Stay tuned to see what I come up with!

Monday, September 22, 2014

Pink Tribal Mani - Using Moyou London Artist Plate 09

One thing that I've started becoming more aware of, is the importance of editing design choices. Because I'm still sort of new at stamping, I'm still really enthusiastic about it. I've noticed that sometimes I go a little stamping crazy when designing manicures.  I'm starting to see the importance of using restraint. Just because you can stamp every finger, it doesn't mean you have to! That's where I was coming from when I created this instalment of the Moyou London Artist Plate challenge:

Pink Tribal Manicure, Using Moyou London Artist Collection Plate 09. Polishes used: Sinful Colors in 'Boom Boom' and 'Cream Soda'; Konad Special Polish in Black; and Sally Hansen 'Silver Sweep'.
Pink Tribal Mani

The polishes I used for this manicure were:
Sinful Colors 'Boom Boom' and 'Cream Soda'; Konad Special Polish in Black; and Sally Hansen 'Silver Sweep'.

I used the decal technique to place the stamp on the accent finger. I'm a little annoyed that the decal on my left hand is slightly off centre. The nail was slightly tacky when I laid down the decal, so it stuck to the nail right away. As a result, I didn't get a chance to reposition it. 

Pink Tribal Manicure, Using Moyou London Artist Collection Plate 09. Polishes used: Sinful Colors in 'Boom Boom' and 'Cream Soda'; Konad Special Polish in Black; and Sally Hansen 'Silver Sweep'.

It's funny, but the dots of peach on the completely fuchsia nails were a total afterthought - but I think they look so good! While I was colouring in my decal, I put a few too many drops of peach polish on the corner of the stamping plate that I was using as a palette. I'm not a big fan of waste, so I tried to figure out a way to use up the extra polish. That's when I got the idea of adding the dots.  I really like how it ties the whole manicure together. 

Tuesday, September 16, 2014

Birth of Venus Mani - Using Moyou London Artist Plate 05

Today's manicure was inspired from Sandro Botticelli's classic painting 'Nascita di Venere' or 'The Birth of Venus'.  This is the 3rd instalment of my design series using my Moyou London Artist Plates. Today's plate was Moyou London's Artist Plate 05, which is also inspired from the painting. I pulled colors and motifs from the original painting, and incorporated 5 images from different parts of the Moyou Plate. Here is the finished manicure:

Birth of Venus Nail Stamping Manicure - Using Moyou London Artist Plate 05, Moyou London Kitty Collection Plate 02, and Moyou London Sailor Collection Plate 01. Polishes Used: Maybelline New York Color Show 'Walk in the Park', Essie 'Sew Psyched', Sally Hansen Color Foil 'Rose Copper', DRK Nails 'Metallic Brown' Stamping Polish, Sally Hansen Xtreme Wear 'Breezy Blue', Revlon 'Urban', Rimmel 'Black Satin', Essie 'Rock the Boat', NYC 'French Tip White', Sally Hansen Complete Salon Manicure 'Almost Almond', OPI 'Y'all Come Back Ya Hear?', and NFU Oh Jelly Syrup Series NFU JS16.
Birth of Venus Mani

The pinky represents the tree canopy in the upper right quadrant of the painting, while the ring finger represents the robe that the handmaid is waiting to cover Venus with. The clamshell on the middle finger represents Venus' mode of transportation in the painting, and fittingly, it is stamped over wave images. The index finger represents the blowing winds and falling flowers to the left of Venus, and of course we have Venus' face on the thumb.

Here are the plates and polishes I used:
Plates:
Moyou artist collection plate 05, Moyou London Kitty Collection Plate 02 (flower image on index finger), Moyou London Sailor Collection Plate 01 (Clamshell image on middle finger).

Polishes:
Not including base and top coat, I used 12 different polishes to achieve this look. Here they are listed  by the finger on which the polish is one of the base or main colours:
Pinky: Maybelline New York Color Show 'Walk in the Park', and Essie 'Sew Psyched'
Ring Finger: Sally Hansen Color Foil 'Rose Copper', DRK Nails 'Metallic Brown' Stamping Polish
Middle finger: Sally Hansen Xtreme Wear 'Breezy Blue', Revlon 'Urban', and Rimmel 'Black Satin'
Index Finger: Essie 'Rock the Boat', and NYC 'French Tip White'
Thumb: Sally Hansen Complete Salon Manicure 'Almost Almond', OPI 'Y'all Come Back Ya Hear?', and NFU Oh Jelly Syrup Series NFU JS16.

Birth of Venus Nail Stamping Manicure - Using Moyou London Artist Plate 05, Moyou London Kitty Collection Plate 02, and Moyou London Sailor Collection Plate 01. Polishes Used: Maybelline New York Color Show 'Walk in the Park', Essie 'Sew Psyched', Sally Hansen Color Foil 'Rose Copper', DRK Nails 'Metallic Brown' Stamping Polish, Sally Hansen Xtreme Wear 'Breezy Blue', Revlon 'Urban', Rimmel 'Black Satin', Essie 'Rock the Boat', NYC 'French Tip White', Sally Hansen Complete Salon Manicure 'Almost Almond', OPI 'Y'all Come Back Ya Hear?', and NFU Oh Jelly Syrup Series NFU JS16.
Birth of Venus Mani

This manicure was very time-consuming. I used a lot of different materials and techniques to achieve the look, and I also had a lot of failed attempts and revisions of my original plan.

One of the techniques that I used was the decal method. This was done on the middle finger, where I made a stamped decal of a clamshell.This is the first time I've incorporated this technique into a manicure. All in all, it worked well, except for on my left hand where I had a slight problem when placing the decal over my freshly top-coated nail (which also had a stamped background image underneath). I ended up having to lift and reposition the decal, which caused the background to get a little smudged on that finger. Next time, I'm going to wait until the polish is completely dry before I place the decal.

I also want to point out that I really like the combination of 'Sew Psyched' with 'Walk in the Park' on my pinky.  I would love to do another manicure featuring these two colours - they look so good together!

Tuesday, September 9, 2014

Navy, Taupe, and Gold Mani - Using Moyou London Artist Plate 04

This is my second attempt at designing a manicure using Moyou London's Artist collection plate 04:

Navy, Taupe, and Gold Nail Stamping Manicure - Using Moyou London Artist Plate 04. Polishes Used: OPI 'Did You 'Ear About Van Gogh', Sally Hansen Color Foil in 'Liquid Gold', and Pure Ice nail polish in 'Party Hard'
Navy, Taupe, and Gold Mani - Left

This time around, I wanted to try to incorporate multiple images from the plate, since I only used one image during my first attempt. The final manicure looks a little busy, but I like it! Just before I did this manicure I had to cut my nails even shorter than they already were, due to a few chipped nails. I was really disappointed about having to do that, because it's so hard for me to grow my nails out. However, one positive thing about cutting them is that with shorter nails, I find that you can get away with a lot more patterns and colours. With less surface area, the 'busy-ness' doesn't seem as overwhelming!

Navy, Taupe, and Gold Nail Stamping Manicure - Using Moyou London Artist Plate 04. Polishes Used: OPI 'Did You 'Ear About Van Gogh', Sally Hansen Color Foil in 'Liquid Gold', and Pure Ice nail polish in 'Party Hard'
Navy, Taupe, and Gold Mani - Right

The polishes I used for this manicure were: OPI 'Did You 'Ear About Van Gogh', Sally Hansen's Color Foil in 'Liquid Gold', and Pure Ice nail polish in 'Party Hard'. Honestly, every time I use 'Liquid Gold' for stamping, I fall a little more in love with it! I think it looks so stunning when stamped - like intricately cut gold foil. I also really like the way that the dark blue base colour on my thumbs and ring fingers serves as a great background to showcase the gold stamping - it really helps it stand out.

OPI 'Did You 'Ear About Van Gogh', Sally Hansen's Color Foil in 'Liquid Gold', and Pure Ice nail polish in 'Party Hard'

Now that I'm finished with this plate, I'm really excited about moving on to the next plate in my Moyou London Artist Collection Design Series. Artist Collection 05 is gorgeous, and presents so many possibilities! Stay tuned...

Sunday, September 7, 2014

Orange and Gold Mani - Using Moyou London Artist Plate 04

Today's manicure was supposed to be the second in my design series using the Moyou London Artist Collection plates. My goal was to create a manicure featuring Artist Collection plate 04. However, I've decided that I want to try another manicure with this plate, as this one doesn't fully capture the essence of the plate. I had such a horrendous experience creating this mani - but before I get into it, here's the picture:

Orange and Gold Nail Stamping Manicure - Using Moyou London Artist Plate 04. Polishes used: OPI 'Where Did Suzy's Man-go?', Sinful Colors 'Energetic Red', and OPI 'All Sparkly and Gold'
Orange and Gold Mani

The polishes I used were OPI's 'Where Did Suzy's Man-go?', Sinful Colors' 'Energetic Red', and I reused my gold glitter accent finger from my last manicure, and ended up adding the same polish to my middle finger to cover a messed up nail. The glitter was OPI's 'All Sparkly and Gold'.

I started this manicure late at night, and I was super tired (that always seems to be the start of my manicure disaster stories!).  I had just finished applying the second coat of my base colour, and decided to lie down and watch TV for a bit while it dried. So now, I'm going to fast forward to the part where I woke up hours later with smudged nail polish, imprinted with bed sheet cross-hatching!

Now, just so you know, I hate removing nail polish. I find it to be such a hassle that I try to avoid doing it if I can get away with it. So instead of removing the messed up polish, I decided to try to salvage the mani by touching up with another coat. After that dried, I tried stamping with my original stamping colour choice - a nice coral polish. However, that didn't work out because the polish wasn't pigmented enough to show up well over the mango colour.  I switched to 'energetic red' on the remaining nails, however I wound up with a few misapplied stamps due to me trying to cut corners to speed up the process (my patience was running very thin at that point!).

After all of these mishaps, I decided to try to use nail polish remover to take off only the top layer of polish, and leave a fresh base coat to start stamping on. It worked, so then I had to stamp my nails all over again. This time, I tried a different pattern idea for my middle fingers, but it didn't look very nice when completed (hence the glitter cover-up).

After I finished stamping and applying top coat, instead of waiting for my nails to dry completely, I started to put away the stamping materials I used. That's how I ended up with the little smudged area on my index finger.  Now by this point I was completely over the manicure, and was not the least bit interested in redoing the nail to fix the smudge!

In the end, I was kind of relieved to have at least a semi-decent mani to show for all of that trouble, however I don't want to move on to the next plate in the series without doing a proper job with this one. For my next post, I hope to have a beautiful mani to share using this same plate.

Friday, September 5, 2014

Burgundy, Taupe, and Gold Mani - Using Moyou London Artist Plate 02

I've decided that I want to go through each of the Moyou London Artist plates that I own, and design my next several manicures based on them.  There are so many beautiful plates in the collection that I was so excited about when I first bought them, but still haven't gotten around to using yet!  It's such a shame that these gorgeous plates are sitting in my storage box, unused. So, in order to rectify this situation, I'm doing a design series.

Now, I've already used a couple plates from the Artist collection and posted those manicures. (Artist 01 was used in the Mondrian Inspired Mani, and one of the pictures in the Color Foils Review used Artist 03). So the first untried plate was Moyou Artist Collection 02. Here's what I came up with:

Burgundy, Taupe, and Gold Nail Stamping Manicure - Using Moyou London Artist Plate 02. Polishes used: OPI 'Visions of Love', OPI 'All Sparkly and Gold', Revlon 'Elegant', and Sally Hansen Color Foil in 'Liquid Gold'
Burgundy, Taupe, and Gold Mani

In keeping with the theme of using stuff that I previously never got around to using, most of the polishes that I used for this manicure were also previously untried. It's really satisfying to knock a few of those off the list, too! I used two OPI polishes for this manicure, 'Visions of Love', and 'All Sparkly and Gold' (both from the Mariah Carey Holiday Collection). I also used Revlon 'Elegant' (#380), and Sally Hansen Color Foil in 'Liquid Gold'. 'Liquid Gold' is the only one of these polishes that has graced my nail beds before. 

OPI 'All Sparkly and Gold', Revlon 'Elegant', Sally Hansen Color Foil 'Liquid Gold', and OPI 'Visions of Love'
Polishes Used
I love 'All Sparkly and Gold'. It really does live up to its name, and it was very easy to apply. It had great coverage after only the first coat! I really liked 'Visions of Love', as well. It's a very lovely shade, and I was really impressed with how well it stamped. When I first painted it over the image plate it looked sort of translucent, so I was worried the stamp wouldn't show up very well. It turned out not to be a problem, as the polish is highly pigmented, so the colour does shine through.
I only had mini bottles of these 2 polishes, as they were both part of the OPI Mariah Carey 4 Piece Mini Holiday Collection. After this manicure, I was so taken with both shades that I immediately went on-line and ordered full size bottles of both. Revlon 'Elegant' is a great neutral colour that I can see myself using a lot as the base for nail art designs.

Burgundy, Taupe, and Gold Nail Stamping Manicure - Using Moyou London Artist Plate 02. Polishes used: OPI 'Visions of Love', OPI 'All Sparkly and Gold', Revlon 'Elegant', and Sally Hansen Color Foil in 'Liquid Gold'
Burgundy, Taupe, and Gold Mani

This look really reads as an autumn manicure to me, because of the deep reddish brown, and the gold. So it was kind of appropriate since I did it on Labour Day, the 'unofficial end of summer'.  I wasn't going for the whole autumnal vibe, it just happened - but it also just happened to work, so I'm happy!


Wednesday, August 6, 2014

Mondrian Inspired Mani

Today, I have a manicure inspired by the style of Dutch Painter Piet Mondrian:

Mondrian Inspired Nail Stamping Mani - Right, using Moyou London Artist Collection plate 01. Polishes Used: NYC 'French Tip White', Konad Black Special Polish, Essie 'Jelly Apple', Nfu Oh Jelly Syrup Series NFU JS19, and OPI Sheer Tints 'I Can Teal You Like Me'.
Mondrian Inspired Mani - Right

Mondrian Inspired Nail Stamping Mani - Left, using Moyou London Artist Collection plate 01. Polishes Used: NYC 'French Tip White', Konad Black Special Polish, Essie 'Jelly Apple', Nfu Oh Jelly Syrup Series NFU JS19, and OPI Sheer Tints 'I Can Teal You Like Me'.
Mondrian Inspired Mani - Left

To achieve this look, I started with a white base of NYC 'French Tip White'. Then, I used Konad Black Special Polish to stamp the grid pattern from Moyou London Artist Collection plate 01.
The nail polishes I used to fill in the blocks of colour were Essie 'Jelly Apple', Nfu Oh NFU JS19 (bright yellow), and OPI Sheer Tints 'I Can Teal You Like Me'.  

I was a little disappointed with the blue not being intense enough for the look I was going for, so I may have to try this again after I find the perfect 'true blue' jelly!

Monday, July 14, 2014

Sally Hansen Color Foils

Sally Hansen Color Foils (Complete Collection): Pink Platinum, Titanium Flush, Rose Copper, Minted Metal, Cobalt Chrome, Purple Alloy, Leaden Lilac, Liquid Gold, Yellow Gold, and Sterling Silver
Sally Hansen Color Foils (Complete Collection)

A few weeks ago, I ran around in a mad frenzy trying to purchase sufficient quantities of the limited edition Sally Hansen Color Foil Nail Makeup collection. A local drugstore chain had all Sally Hansen products on sale, so I purchased the entire collection on the first day of the promotion. As the week went by I convinced myself that I needed backup bottles of my 3 favorite colors from the collection (Liquid Gold, Yellow Gold, and Sterling Silver) - and that's when all of the running around began.

The majority of the drugstores I visited only had a display of 20 polishes - 2 bottles of each of the 10 shades in the collection. I'm pretty lucky that the collection was fairly new and just coming to the shelves in all of the stores, because in most cases nothing was sold out.  I was the first person to buy any of them in the first store I visited, and the display itself looked relatively untouched (no annoying test strokes all over the cardboard). 

Most of my enthusiasm for these polishes is because they work well for nail stamping. For most of the colors (6 to be exact), although I think they are beautiful, I don't really like the way the polish looks on my nails.  I don't see myself ever doing a full manicure with anything other than Rose Copper, Liquid Gold, Yellow Gold, and Sterling Silver.  However I can definitely see myself getting a lot of use out of all of these polishes as stamped accents over other polishes, and maybe an accent nail here and there. Here are all of the colors swatched:

Sally Hansen Color Foil Swatches: Pink Platinum, Titanium Flush, Rose Copper, Minted Metal, Cobalt Chrome, Purple Alloy, Leaden Lilac, Liquid Gold, Yellow Gold, and Sterling Silver
Sally Hansen Color Foil Swatches
 
From left to right we have Pink Platinum, Titanium Flush, Rose Copper, Minted Metal, Cobalt Chrome, Purple Alloy, Leaden Lilac, Liquid Gold, Yellow Gold, and Sterling Silver.

Here are some stamped mani looks that I came up with so far:
Sally Hansen Color Foil Nail Stamping Demo Manicure using OPI polishes 'Don't Touch My Tutu' and 'Pirouette My Whistle', stamped with a 'Leaden Lilac' accent decal
OPI polishes Don't Touch My Tutu and Pirouette My Whistle, stamped with a Leaden Lilac accent decal

Sally Hansen Color Foil Nail Stamping Demo Manicure using OPI 'Chic from Ears to Tail' stamped with 'Liquid Gold', and Finger Paints 'Go Baroque' on accent nail
OPI Chic from Ears to Tail stamped with Liquid Gold, and Finger Paints Go Baroque on accent nail

Sally Hansen Color Foil Nail Stamping Demo Manicure using OPI 'Shocking Pink' stamped with 'Sterling Silver', and a 'Sterling Silver' accent nail
OPI Shocking Pink stamped with Sterling Silver, and a Sterling Silver accent nail
Prior to the mad dash to get these metallic polishes, I was obsessed with neon nail polishes. I wanted to try to incorporate the two looks together, so that's where I came up with the neon pink and silver mani pictured above.  The image I used for the pattern was from Cheeky Jumbo plate A.
The light pink and gold mani was stamped with Moyou London's Artist plate 03, and the star decal on the otherwise demure white and silver sparkle mani is from BM-005.

As a whole, I really love this collection. The polishes stamp so well, and I'm ecstatic that I finally have a wide range of metallic-finish coloured polishes to create stamped manis with. I only started nail stamping in late 2013, so I missed out on the China Glaze Romantique collection (2009), and the Kiko Mirror collection (spring 2013).  It's been frustrating checking out other blogs, and seeing all of the stamping possibilities that coloured metallic polishes can provide, but not being able to get my hands on these popular, sold out, limited edition collections.  You can see now why I was so eager to snap up these Sally Hansen beauties as soon as the opportunity presented itself!

Also, I can certainly say that without a doubt, the 2 gold shades in the collection are now my favorite golds for stamping. The silver is amazing too, but there have always been a lot of great silver stamping polishes on the market.  All in all I'm really satisfied with this purchase!