Tuesday, April 28, 2015

Grey, Dark Teal, and Blue 60's Print Mani

Today I have a very simple stamping manicure to share with you.


To add a little something extra into the basic design, I decided to add a third color by doing a bit of dotting on the middle finger, and I used the advanced stamping technique to incorporate the third colour into the stamp on my ring finger.

In retrospect, I wish I had used the stamp on my middle finger on all of my nails for a fun, uniform print. I really love how that print looks with these 3 colours! Here is the information on the colours I used:

Polishes Used:
Plate Used:
Sally Hansen Insta-Dri ‘Navy Fleet’
Moyou London Time Traveller Collection:
Sally Hansen Insta-Dri ‘Brisk Blue’
                 Back to the 60’s - 04
Nubar ‘Marble Tower’


Overall, I really like this manicure. It's very similar to another one I did recently, and absolutely adored. I was also pleasantly surprised with how much I really like these 60's inspired patterns from the Moyou London 'Back to the 60's' plate 4. It was one of those situations where I mainly bought the plate for one pattern that I decided I simply had to have - a classic quatrefoil pattern - and was just sort of impartial to the other patterns on the plate. Initially when I was designing this manicure, I reached for the plate to use the quatrefoil pattern, but then the 2 patterns that I ended up using caught my eye, so I switched gears and used them instead!

Sunday, April 26, 2015

Mani-Swap: Pink, Purple, and Glitter Combo

I recently did a mani-swap with an amazing friend of mine who is also a nail polish enthusiast. I designed a manicure for her to wear using polishes from her collection, and she designed one for me to wear using polishes from my collection. Here is the super-cute manicure she designed for me:

Skittles manicure with purple, fuchsia, and coral polishes covered in a purple, fuchsia,and orange glitter. Accent nail is covered with a traditional metallic glitter with lilac, pink, and plum tones.

It's so exciting to be exposed to different styles and combinations like this! This mani is so bright and fun - I love it! Also, I've really started embracing my glitters again, now that I have the peel-off base coat, so it's great to be able to do another glitter mani! I also really like how she used all of the colours from 'Let the Beat Drop' as the base colours for the manicure. Here are the polishes from my collection that she chose for the manicure:

Polishes Used:
Maybelline Color Show 'Pink Shock'
China Glaze 'Let the Beat Drop'
Essie 'Jamaica Me Crazy'
Misa 'Bubblepop'
OPI 'Blush Hour'

Maybelline Color Show ‘Pink Shock’, China Glaze ‘Let the Beat Drop’, Essie ‘Jamaica Me Crazy’, Misa ‘BubblePop’, and OPI ‘Blush Hour’

Another great thing about this manicure is that all of these polishes were previously 'untrieds' in my collection. Now, 'Bubblepop' and 'Let the Beat Drop' are pretty new - I've only owned them for about a month or less - but the others I've had for at least a year or two! It feels really great to get these off the untried list!

Now, as for my first impressions with the polishes - I'm really in love with both of the glitters! The main glitter, 'Let the Beat Drop' is from the new Summer 2015 China Glaze 'Electric Nights' Collection. I instantly snapped up all 3 of the neon matte glitters the moment I laid eyes on them at one of the beauty supply stores that I pretty much live in! LOL!!! I used one of them, 'Point me to the Party' in a previous mani, and I can't wait to try something out with the other, 'Can I Get an Untz Untz' (a blue, green and purple neon matte glitter).The other glitter in this manicure, 'Blush Hour' was from OPI's 'Spotlight on Glitters' collection which I believe was released around March 2014. It's so beautiful! I can't wait to play around with this one some more!

'Jamaica Me Crazy' is such a sassy, funky purplish-pink, and the cheeky name just takes the cake! This has always been a sentimental favourite for me, but now that I've tried the colour and love it, it's just a plain old favourite! 'Bubblepop' is such a summery, shimmery, gorgeous shade of coral, and 'Pink Shock' is a really nice super-pigmented fuchsia jelly. If you couldn't tell, I really love all of these colors!

Additional shots of the Mani Swap Manicure

This was such a fun experience! I just want to send a big shout out to my friend. Thanks for designing this gorgeous manicure!

Saturday, April 25, 2015

Wet n Wild Wild Shine Nail Colour

I dropped in to the pharmacy earlier this week, and as usual went browsing in the nail polish aisle. I was really excited to see that not only did they have the new Wet n Wild Wild Shine Nail Polishes, but they were also on sale for $1.50 (down from $1.99). I had heard about these polishes from various nail vloggers on YouTube, but I wasn't sure if they were available in Canada yet, so I was really excited to find them! There were a lot of bright, fun colours available, and for the price, I couldn't resist purchasing 12 of the polishes! So today, I'm doing a review on these polishes.

‘Red Red’, ‘Lavender Crème’, ‘Tickled Pink’, ‘Blazed’, ‘Nuclear War’, ‘D’oh!’, ‘Be More Pacific’, ‘Putting on Airs’, ‘Who is Ultra Violet?’, ‘Grape Minds Think Alike’, ‘Ready to Propose’, and ‘Yo Soy’
Wet n Wild Wild Shine Nail Polishes
Here are the colour names of the polishes (listed left to right):

Upper Row: Warm Colours
Lower Row: Cool Colours & Neutrals
‘Red Red’
‘Be More Pacific’
‘Lavender Crème’
‘Putting on Airs’
‘Tickled Pink’
‘Who is Ultra Violet?’
‘Blazed’
‘Grape Minds Think Alike’
‘Nuclear War’
‘Ready to Propose’
‘D’oh!’
‘Yo Soy’

First off, I really like the look of the packaging. They are so modern, and fun! The only problem I had with the packaging is that when I was swatching the polishes on my nail wheel, I had an incident where the black top of one of the polishes separated from the brush that was supposed to be attached to it, leaving the brush in the bottle. It wasn't that difficult to reattach - I had to lift the brush out of the bottle, place it back in (but not pushed all the way back down), and then place the lid over it and screw them both back into the bottle (see graphic below). It was a little inconvenient, but was easily fixed, and something I can overlook for a budget brand of polish.

Lift brush out of bottle, lower brush but not all the way, lightly place cap over brush, screw shut
How to Reattach Cap to Nail Polish Brush
As for the actual polish. I was quite pleased with the application. The polish was a little on the thick side, but not so much as to pose a problem. Actually, the thickness may have turned out to be a really good thing - all of the swatches below were done with only one thick coat of polish! The only one that really could've used an extra coat was the coral shade 'Blazed'. It's the fourth from the left in the swatch wheel below. In the picture, you can see how it looks a little sheer, and there's a bit of patchiness. In addition to the swatches, I also used one of the the colours for a full manicure. 'Putting on Airs' was used during my 'Earth Day Mani', and I had a similar experience to the test swatches.

‘Red Red’, ‘Lavender Crème’, ‘Tickled Pink’, ‘Blazed’, ‘Nuclear War’, ‘D’oh!’, ‘Putting on Airs’, ‘Be More Pacific’, ‘Who is Ultra Violet?’, ‘Grape Minds Think Alike’,  ‘Yo Soy’, and ‘Ready to Propose’

One thing that I was slightly disappointed with, is that I don't know if all of the colours are widely available here in Canada - or perhaps the drug store chain where I found them does not carry all of the colours. I later went to another location looking to see if they had more shades, but was out of luck. I counted 20 slots on the display at the stores I went to, but I recall seeing at least 24 polishes in the line on YouTube. I did a little googling, and from what I found, it looks like there may be as many as 27 different shades. 

I really wanted this beautiful kelly green shade I had seen called 'Do Pass Go', but couldn't find it in both stores I went to.  Some others I wanted but couldn't find were 'Dreamy Poppy', 'Grasping at Strawberries', and 'She Sells'. I'll keep an eye out for them at different drug stores. Hopefully I'll be able to find them eventually.

All in all, I'm quite satisfied with my purchase, and am looking forward to creating beautiful nail art with these new budget-friendly additions to my collection!

Friday, April 24, 2015

Drug Store Essie Haul!!!

A couple months ago, I came across an amazing deal on some Essie nail polishes at a local drug store. They were clearing out selected polishes for $2.00! Since I've managed to publish a daily blog post for a streak of 10 posts now, I wanted to continue the streak, but I love my current manicure too much to change it! So I thought I'd blog about this haul. It's something I had been meaning to do for a while, but never got around to.

'Chills and Thrills', 'Style Cartel', 'Fall in Line', 'The Perfect Cover Up', 'Partner in Crime', and 'Haute as Hello'
Essie Haul
The colours I got were:
'Chills & Thrills' from the Summer 2014 Too Taboo Collection
'Style Cartel' from the fall 2014 Dress to Kilt Collection
'Fall in Line' from the fall 2014 Dress to Kilt Collection
'The Perfect Cover Up' from the fall 2014 Dress to Kilt Collection
'Partner in Crime' from the fall 2014 Dress to Kilt Collection
'Haute as Hello' from the Essie Summer 2010 collection

These were the only colours I was able to find at this price. Luckily, I happen to like all of them! Below are the swatches of each colour.

'Chills and Thrills', 'Style Cartel', 'Fall in Line', 'The Perfect Cover Up', 'Partner in Crime', and 'Haute as Hello'

My favourite of the bunch is 'Haute as Hello' because I love bright colours. The dried polish seems to have a bit of a dull finish compared to the others. I wouldn't go so far as to say that it dried matte, or even semi-matte, but you can see the difference in the light reflection in the swatches above. 'Haute as Hello' is the coral swatch on the far right, and the reflection of the light is a bit more diffused than all of the other swatches. Now, this doesn't really bother me because I usually topcoat all of my manicures any ways, but I thought it was worth mentioning.

My next two favourites are 'Fall in Line', the medium toned greyish-green third from the left; and 'The Perfect Cover Up', the dark greyish-teal third from the right. I find colours like this really interesting - I really love when it takes more than a word or two to describe a polish colour!

Overall, I'm thrilled to add each of these to my collection - especially at this fantastic price!

Thursday, April 23, 2015

Happy Belated Earth Day!

Yesterday, I didn't get a chance to put up an earth day manicure, because I really wanted to try out my new peel-off base coat. So today, I have a belated Earth Day mani to share with you!

Earth Day inspired manicure made using a light blue base polish, stamped with black map imagery on the pinky, middle and index fingers. The thumb and ring finger are stamped with green continent images.
Earth Day Mani

Polishes Used
Plate Used
Wet n Wild Wildshine ‘Putting on Airs’
Moyou London Scholar Collection - 07
Konad Special Polish in Black

Sally Hansen Insta-Dri 'I-rush Luck'


Wet n Wild Wildshine 'Putting on Airs', Sally Hansen Insta-Dri 'I-rush Luck', and Konad Special Polish in Black
Polishes Used

I really like how this manicure turned out! The colours are perfect, and I love the images from the Moyou Scholar plate. I honestly couldn't stop staring at my nails all day! I love how the map imagery on the pinky, middle and index fingers look exactly like a page out of an atlas, while the thumb and ring fingers look exactly like little globes. I love when a manicure is both quick and easy to do, but the end result is so cute, and memorable!

This is also my first time using one of the new reformulated and redesigned Wet n Wild Wildshine polishes. I really like the look of the new bottles - such a great improvement! I was also pretty happy with the formula of this polish. It was just a touch on the thick side, but not to the point where it caused any problems. In fact, I'm hoping that the thickness would make these polishes good for stamping!

Wednesday, April 22, 2015

Purple Glitter Mani & Peel-Off Base Coat Review

Today I have another impromptu mani to share. This one was done using only glitter polishes!

Full glitter mani with multi purple and holographic glitter polish on all fingers except ring finger, which is covered in a purple, aqua, and silver glitter polish
Purple Glitter Mani
Polishes Used:
Sally Hansen Insta-Dri 'Grape Shifter'
NYC Strip Me Off Base Coat
Picture Polish 'Mardi Gras'

Sally Hansen Insta-Dri 'Grape Shifter', NYC Strip Me Off Base Coat, and Picture Polish 'Mardi Gras'

Now, normally I wouldn't do a complete glitter manicure, just because it is such a pain to have to remove it with nail polish remover. Because of this, I really have neglected a lot of my glitter polishes, only using them for an accent nail here and there.

I'd heard about peel off base coats designed to solve the problem of having to remove glitter and textured polishes, but I never really got around to trying one out until today. So far, I'm pretty happy with my first peel off base coat experience! The polish came off fairly easily, and there was no visible damage to my nails.

There were a few things that I was slightly disappointed with. The first is that the polish didn't come off in one sheet, as I had assumed it would. Ultimately, the removal was still a vast improvement over using nail polish remover, so this didn't really bother me all that much. The second minor issue, was that I feel like it took a lot longer for the polish to dry. The surface seemed susceptible to nicks and dents for about an hour or so.

The third issue I had with the base coat, was that I started showing tip-wear by the end of day 1 of the manicure - that's a lot earlier than I normally would. And finally, the fourth issue I had with the base coat was that it left a slight residue on the nails which I could only fully remove with nail polish remover. However, it did come off fairly easily with the nail polish remover.

Ultimately, most of the issues I had relate to diminished staying power of the nail polish caused by the base polish. But in a way, that's exactly what the strip off base polish was designed to do, so I can't really fault it for making the manicure more fragile! At the end of the day, I'm glad that I didn't have to scrub at my nails with cotton balls soaked in remover for 2-4 minutes per nail. That's a time savings of approximately 20-40 minutes!

The brand that I used for today's base coat was NYC. I recently purchased OPI's 'Glitter Off', and also, a dear friend of mine generously whipped me up a batch of home-made Peel-Off base coat, using non-toxic white school glue, and water. I'm looking forward to trying these out too in the near future!

Tuesday, April 21, 2015

Impromptu Mani: Blue and Silver Filigree

Today I have a quick and easy impromptu mani to share.

A basic nail stamping manicure created with a dark teal base polish stamped with a dense filigree pattern in silver.
Blue and Silver Filigree Mani

I got a few chips on my previous mani, and decided on a quick polish change. I didn't have much time or inspiration, so I just grabbed a stamping plate and two nearby polishes, and got to work!

Polishes Used:
Revlon Brilliant Strength 'Beguile'
Sally Hansen Insta-Dri 'Silver Sweep'

Plate Used:
Moyou London Cookbook Collection - 04

Revlon Brilliant Strength 'Beguile', and Sally Hansen Insta-Dri 'Silver Sweep'

I really like how it turned out! I really love these types of dense filigree patterns. To me, they are the perfect mix of showy, and elegant!

Monday, April 20, 2015

Purple Water Marble and Stamping Mani

Today, I have yet another water marble decal mani to share:

Purple Water Marble and Stamping Mani. Accent colours are teal, bright blue and grey. The water marble has bands of all 4 colours, and is only on the ring finger. The middle finger is the only one stamped with a geometric design, with a multi-colour polish application. The pinky is covered in purple glitter, and the thumb and index fingers are solid light purple.
Purple Water Marble and Stamping Mani

Polishes Used:
Finger Paints 'Violaceous Vase'
NYC 'Water Street Blue'
China Glaze 'Lotus Begin'
NYC 'Sidewalkers'
NYC 'Prince Street'
NYC 'NY Blues'

Plate Used:
Pueen PUEEN 57

Finger Paints 'Violaceous Vase', NYC 'Water Street Blue', China Glaze 'Lotus Begin', NYC 'Sidewalkers', NYC 'Prince Street', and NYC 'NY Blues'

I really love the colour palette of this manicure!  Lotus begin is such a lovely light purple, and the other colours work beautifully with it! It was also really fun to do a multi-coloured stamp for the first time in a while. I used the effect on my middle finger, and I love the way it turned out!

Sunday, April 19, 2015

Grey, Orange, and Blue Water Marble and Stamping Mani

Due to the huge supply of water marble nail decals that I whipped up recently, today, I have yet another water marble manicure to share!


In addition to the water marble decal on my ring finger, I also did a little stamping and dotting on my middle finger. I can't even emphasize how much I really love this manicure. I like how toned down, yet fun and interesting the final look is. I would definitely say this is one of my favourite looks I've done so far this year.

NYC 'Water Street Blue', NYC 'Deep Breath', NYC 'Spring Street', NYC 'NY Blues', and NYC 'Sidewalkers'
Polishes Used:
NYC 'Water Street Blue'
NYC 'Deep Breath'
NYC 'Spring Street'
NYC 'NY Blues'
NYC 'Sidewalkers'

Plate Used:
Bundle Monster BM-212


I'm really excited about designing more mixed manicures like this one using my remaining water marble decals along with other nail art techniques. This has been so much fun, and I'm loving the results!

Saturday, April 18, 2015

Water Marble Decal Mani: Gold, Red, Blue, and Green

Today I have another water marble decal manicure to share:

Water marble decal mani using gold fleck base polish, and featuring sections of red, blue, and green water marble selectively placed on the nail.

My last manicure ended up looking very 60's, and funnily enough, this one is very 70's looking to me... apparently, I'm just moving my way along through the decades! Again, this wasn't intentional. I did the water marbling separately, and paired the gold base polish with it after the fact.

Polishes Used: 
NYC 'Times Square'
NYC 'Water Street Blue'
Misa 'Epiphany'
NYC 'NY Blues'
NYC 'High Line Green'

Misa 'Epiphany', NYC 'Times Square', NYC 'High Line Green', NYC 'NY Blues', and NYC 'Water Street Blue'

This manicure really highlights one of the benefits of making water marble decals over the traditional water marbling method: You have way more control with placement. With decals, you can cut the marbled polish sheets into any shape you want, and layer it over your base polish in creative ways. This also allows you to use a lot more of the decal sheet, since you can find use for even little scraps of marbled polish.

I made around 20 water marble decals during my experiment with this technique. I'm not sure how long they will last, so I'm going to attempt to use them up over the next several manicures. Stay tuned to see what I come up with!

Friday, April 17, 2015

Water Marbling Made Easy

Today's post is all about making water marble decals. This is an awesome water marbling technique that I recently learned about. It's mentioned on a number of other blogs, and there are even some great YouTube videos about it, but I just wanted to share my experience with the technique here.

Nail polish water marble pattern using orange, teal, grey, and bright blue polishes to make a flower

I've always wanted to try water-marbling, but prior to finding out about this method, I had only seen it done the traditional way - and that method seemed like so much trouble! Basically, several drops of nail polish are dropped into a container to form a bullseye pattern, a design is drawn into the rings of the bullseye using a pointed object, the nails are dunked into the wet design, and the excess polish is gathered from the surface and discarded before the nails are removed. 

Although this method produces very beautiful multi-coloured patterns, I was discouraged from trying it due to the large amount of wasted polish, and the huge mess created by dunking your hand into wet polish (you can tape off your fingers, or use liquid latex - but still...). The water marble decal technique starts out the exact same as the regular method, except instead of dunking your fingers, you allow the polish to harden on the surface of the water, and then lift out the water marble decal, and lay it on some paper towel to dry until you are ready to use it. When you are ready, you can then cut the decal into nail sized sections, and attach them to your manicure using topcoat!

For me, this method is such an improvement. It greatly reduces the waste factor since you have more control over which sections, and how much of the pattern you use. Also, it's way less messy because there's no dipping - just cutting and pasting! You also have more control as to exactly what you use on the nail, and where you put it. The only drawback I've noticed is that you have to be really careful when lifting the hardened decal from the water. You want to avoid ripping the decal, or having the decal fold over onto itself. I just used my fingers, but I find it helps to grasp it by at least two separate points, so you have a little more control. I've had a pretty high success rate this way, with only a few partially ruined decals.

Shot of about 20 or so finished nail polish water marble decals in a variety of colours and patterns
Decals Galore!!!
Polishes Used:
NYC 'Times Square'
NYC 'Spring Street'
NYC 'Lexington Yellow'
NYC 'Times Square', NYC 'Spring Street', NYC 'Lexington Yellow', NYC 'High Line Green', NYC 'NY Blues', NYC 'Water Street Blue', NYC 'Prince Street', NYC 'Lincoln Square Lavender', NYC 'Lafayette Pink', and NYC 'Sidewalkers'NYC 'High Line Green'
NYC 'NY Blues'
NYC 'Water Street Blue'
NYC 'Prince Street'
NYC 'Lincoln Square Lavender'
NYC 'Lafayette Pink'
NYC 'Sidewalkers'


Another tip is that I chose to use inexpensive polishes that come in bright, fun colours. The line of polishes that I used retails for approximately a dollar to a dollar fifty at discount department stores, and I had a complete rainbow of colours in my collection. Even though there is less waste than with traditional water marbling, there is still some waste, so I just feel more comfortable using my cheaper stuff.

Another reason for this is that it's super fun to do, so you may find that once you start, you may keep going until you have a bunch of decals.  When I had finished playing, the fill line of my previously unused polishes had gone down by about an eight of an inch! Now that is not really all that much polish in the grand scheme of things, especially considering the large amount of decals that I made, however it's not every day that you use that much polish in one sitting!

Below I have a brief pictorial tutorial to show the steps in the process (sorry for the lack of continuity - I never snapped pictures of a single decal all the way through the steps, so each shot features a random decal!):

Steps: Make traditional water marble decal, but leave to harden; lift out of water and let dry; tools used; cut decal into desired shape; apply to nail with topcoat; finished product

On a final note, I just wanted to mention that this is my 100th post! I'm so excited to have reached this milestone. Thanks for stopping by!

Thursday, April 16, 2015

Rainbow Flower Power Mani

Today I'm sharing the results of a technique that I've been interested in trying for quite some time now, but haven't gotten around to until recently...  My first water-marble manicure!

Nail stamping manicure featuring a rainbow coloured water marble base stamped with flower images in black. An index finger accent nail is left unstamped, and features bands of the colours of the rainbow.
Rainbow Flower Power Mani
Polishes Used:
NYC 'Times Square' (red)
NYC 'Spring Street' (orange)
NYC 'Lexington Yellow'
NYC 'High Line Green'
NYC 'NY Blues'
NYC 'Prince Street' (purple)
Konad Special Polish in Black

Plates Used:
Bundle Monster Plate BM-016
Gals Plate GA34

NYC Times Square, NYC Spring Street, NYC Lexington Yellow, NYC High Line Green, NYC NY Blues, NYC Prince Street, and Konad Special Polish in Black
Polishes Used
This was so much fun to do! Instead of the traditional water-marbling technique, I used a modified version that I recently learned about while doing some research. I've decided to do a separate post with more information on that, in the near future.

After the rainbow water marbling was applied to my nails, I decided tone down the look with some stamping. The end result looks very 'sixties inspired' to me. It wasn't intentional, but I decided to roll with it - which is why I decided to call it the 'Rainbow Flower Power Mani'!

collage of additional photos of the manicure
Rainbow Flower Power Mani -
Additional Photos

Wednesday, April 15, 2015

Neon Rainbow Glitter Mani

I recently purchased China Glaze 'Point Me to the Party' from their new 'Electric Nights' collection for summer 2015. I was so eager to try it out that decided to throw together a simple glitter mani.

White frost base polish topped with silver micro glitter, and then a neon rainbow glitter

Polishes Used:
Sally Hansen Diamond Strength 'Diamonds'
China Glaze 'Point Me To The Party'
Revlon 'Pure Pearl'

Sally Hansen Diamond Strength 'Diamonds', China Glaze 'Point Me To The Party', and Revlon 'Pure Pearl'

My first idea for this manicure, was to use a white creme polish as the base, and then put the neon glitter over it. However, since the look was so simple, I decided to try to do something a little different.  I decided to try out a white frost polish as the base, and then I put a silver micro-glitter over it. Then I put the neon glitter over all of that.

Truthfully, I'm a little disappointed with the way the mani turned out. I really don't like how bumpy the base looks. I had to use 2 coats of the white, one coat each of the glitters, and the topcoat over all of that.  I'm not sure if the 5 coats caused bubbling, or if the micro-glitter has taken on the appearance of bubbles, - or perhaps both.  However, I really do like the glitter - it's so bright and fun!

Tuesday, April 14, 2015

The 2015 Crackle Polish Challenge Summary

Now that the 2015 Crackle Polish Challenge is over, I want to use today's post to summarize my thoughts, feelings, and findings over the past few months.

Collage featuring all 22 of my 2015 Crackle Polish Challenge Manicures

As some of my readers may already know, I recently finished a self-imposed challenge to design manicures for each of the 20 bottles of crackle polish in my nail polish collection. The goal was to use each bottle in a different, creative way that updates the traditional crackle polish manicure. Prior to the challenge, the bottles had not been used for over three years. I was tired of ignoring them, so the challenge came about as my attempt to start using them again – without looking like I had just stepped out of 2011!

Sally Hansen Crackle Overcoat: Cherry Smash, Fuchsia Shock, Antiqued Gold, Sage Smash, Distressed Denim, and Vintage Violet; China Glaze Crackle Glaze: Broken Hearted, Cracked Medallion, Jade-d, and Cracked Concrete; OPI: Red Shatter, Pink Shatter, Turquoise Shatter, Blue Shatter, Navy Shatter, Super Bass Shatter, White Shatter, Silver Shatter, and Black Shatter; and Nicole by OPI 'Gold Texture'
My Crackle Polish Collection
My first post about the challenge was published Jan 9th, and the last post about it was published April 3rd. This project lasted exactly 12 weeks - that's close to 3 months! In total, I posted 22 crackle manicures, although there were also other vetoed ideas, and unsuccessful experiments. All told, that's a lot of time spent wearing, applying, and thinking about crackle polish! I definitely have learned a few things from the experience.

First and foremost, this experiment has made me appreciate the artistic value of crackle topcoat! It's a great tool to have in your bag of tricks, and can be used to create gorgeous nail art - the key is to think outside of the box with application and techniques to avoid looking dated. It helps to think of crackle polish as part of your manicure, as opposed to something you use for a ‘crackle manicure’. In other words, use it as part of a concept or theme, as opposed to it being the entire focus.

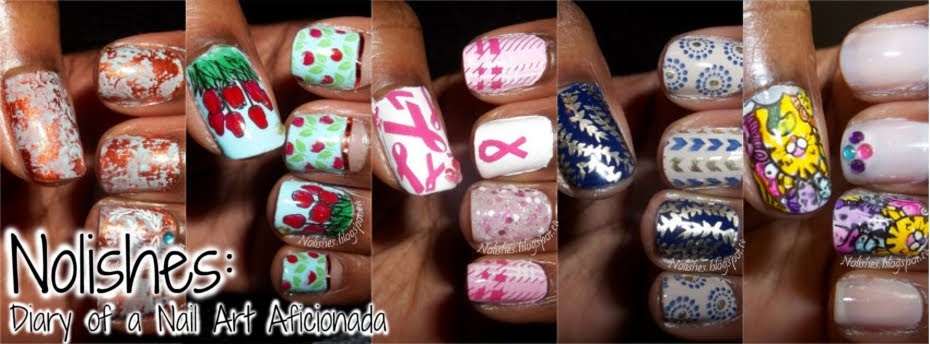
Some of my favourite techniques from the challenge did precisely this. I feel the uses went beyond a crackle manicure, and instead created nail art that just happened to use crackle polish. As a result, I'm looking forward to being able to incorporate these techniques into my nail art going forward. Here are my top five crackle applications from the challenge:

1) Using a negative space nail stamping image over a crackle background
2) Using crackle polish to create a graffiti art effect
3) Using crackle polish and jelly polish to make a 'Crackle Sandwich'
4) Using crackle polish for a dotted manicure
5) Using crackle polish to make nail decals

Negative Space Stamping over Pink on Pink Shatter, Rainbow Graffiti Mani, Teal and Gold Crackle Sandwich, Blue Crackle Dotticure, and the Dragonfly Double Crackle Mani
Left to Right: My Top 5 Crackle Polish Applications from the Challenge
I also have two honourable mentions from the challenge. These didn't necessarily transform the crackle polish into anything new, but they did tone down the look in such a way that the crackle polish does not overwhelm all of the other design elements of the manicure. I can also see myself using these techniques again in future manicures:

6) The 'Crackle Curve' technique
7) Using crackle polish to help embellish an accent nail

Blue Hounds-tooth Crackle Manicure, and the Blingy Turquoise and Gold Mani
Left to Right: My Top 2 Honourable
Mentions From the Challenge
Another thing I learned from this challenge, is to not get caught in the trap of feeling that you can't use something just because it isn't on trend. You can always add your own creativity and style into how you use any cosmetic product, and by doing that, you can make almost anything work. At the start of the challenge, when faced with the prospect of wearing crackle polishes for my next 20 manicures, I was originally worried about looking unfashionable and/or not loving my manicures. However, throughout the challenge, I actually got compliments on some of my nail looks, and even more importantly - I really loved how a lot of the manicures turned out!

This challenge also taught me to not let anything cramp your style. When I first thought of the challenge, I was also a little worried about not being able to add my own personal style into the manicures. I love nail stamping, and I originally thought that having to use crackle polish would mean that I wouldn't be able to do a lot of nail stamping for an extended period of time. However, as the challenge progressed it became more and more apparent to me that rather than being limited in the types of nail art I could do, having to use crackle polish actually gave me more options in some cases, by providing me with one more tool that I could use for my stamping manicures.

Not only did I still manage to do some nail stamping for the majority of the crackle manicures, I even got to execute some ideas that I had in mind for ages. 'Crazy Decal Mani', 'Dragonfly Mani', and 'Graffiti Mani' were all ideas I had quite some time ago - this challenge gave me the opportunity to do them, and a tool with which to make them better than I had originally envisioned. In addition, I even had a nail stamping epiphany that will make me a better stamper going forward:  I learned that the value of negative space nail stamping images lies in the fact that they enable you to turn an intricately patterned backgrounds into intricately patterned objects by stamping a the negative space background image over the pattern. This realization has breathed new life into my nail stamping!

Finally, this challenge has also reinforced a piece of wisdom that we sometimes take for granted: Just because something isn't popular, it doesn't mean that it is not good. There are all kinds of underrated concepts, people, places, and things in life - but for now, let's just stick to nail polish! Right now, I can only think of one major brand still making new bottles of crackle polish. This is a major contrast to how things were at the height of the crackle fad, when pretty much every single polish company had at least one crackle line, if not several variations of crackle polish to offer (metallic, neons, glitter, pastels etc.). I feel that the reason why crackle polish is virtually nowhere to be seen right now, is because it has suffered from the uber-popularity it enjoyed a few years ago. When something becomes too big of a fad, there is usually a reaction against it when the fad is over.

I'm realizing now just how unfortunate that is, because crackle polish is a wonderful top coat option - just like glitter top coat, matte top coat, glow-in-the-dark top coat, shimmer top coat, tinted top coats, high-gloss top coat etc. I think it's important not to throw the baby out with the bathwater. Yes, a full set of traditional crackle nails is not always the most creative, inventive manicure out there, but with surprising colour choices, and/or used with interesting techniques, crackle topcoat can be used to create beautiful works of nail art. Creative tools shouldn't be stigmatized, or deemed unfashionable in and of themselves. The result you get all depends on what you do with them. With a little effort and imagination, any polish can be used to make amazing nail art.

From what I remember, the crackle polish fad started with the popularity of OPI's 'Black Shatter' from their spring 2011 Katy Perry collection. Over the next 2 years or so, the fad spread to other brands, gathered momentum, reached its peak, and then slowly fizzled out. That 2 or 3 year period must have translated into millions of bottles of crackle polish sold. That means there must still be a lot of crackle polish out there in people's collections - some perhaps even gathering dust, just like mine were. For those of you in that situation, I challenge you to take them out, and play around with them. Have fun, and see what you come up with!

Sunday, April 5, 2015

Light Pink and Mint Green Easter Manicure

Happy Easter to all those celebrating!

Today, I have an Easter manicure to share:

Pastel pink and green nail stamping manicure. Left hand has light green base polish on thumb, pinky and index. Pinky and index are stamped in with tribal geometric design, and thumb is stamped with Happy Easter (all stamping is in gold). Ring finger has light pink polish with suspended glitter, and middle finger has a light pink creme polish. I made dots of green and gold polish on the middle finger.  Right hand is the opposite (switching light green for pink in all cases).
Light Pink and Mint Green Easter Manicure

Polishes Used:
Sally Hansen Color Foil 'Yellow Gold'
Nicole by OPI 'Selena' from the Selena Gomez Collection
Nicole by OPI 'Alex by the Books' from the Modern Family Collection
NCLA 'Lavish Spender'
NCLA 'Posh and Privileged'

Plate Used:
Moyou London Festive Collection Plate 14

Sally Hansen Color Foil 'Yellow Gold', Nicole by OPI 'Selena' from the Selena Gomez Collection, Nicole by OPI 'Alex by the Books' from the Modern Family Collection, NCLA 'Lavish Spender', and NCLA 'Posh and Privileged'
Polishes Used
For me, one of the best things about this manicure was getting to use 4 untried polishes that I've been really looking forward to using! 'Selena' and 'Alex by the Books' were both purchased last summer during a big sale one of my local drug store chains was having, clearing out the Nicole by OPI 'Modern Family', and 'Selena Gomez' collections. I remember that these two colours were sold out at the 2 super convenient locations that I most frequently go to, so I had to go hunting at a few other locations.  I also remember being so pumped when I finally found them, that I bought backups!

The story behind the other 2 polishes was kind of the opposite scenario. They are both from an NCLA collection called 'Duchess of L.A.'. I remember seeing another polish from the collection somewhere on line, and instantly being mesmerized by its beauty. The colour was called 'Let Them Eat Cake', and was a milky lilac based polish with purple, blue, silver, and white glitters. That started me on researching the collection, and eventually being taken with 'Lavish Spender', and 'Posh and Privileged' too. Now, I'm generally a pretty frugal shopper, and try to get most things on sale or clearance. That preference, along with the higher price of this indie brand, kept me from actually making the purchase for quite some time. Eventually, after months of price-watching to no avail, shortly after the holidays, I decided to go ahead and splurge on the polishes as a belated Christmas gift for myself!

Now that the Crackle Polish Challenge that I've been doing for the last two and a half months is over, I decided to celebrate my new-found freedom from crackle nail polish by using some of my most anticipated untried polishes. The fact that these were all pastels worked perfectly for the occasion, so I jumped at the chance to use them for this mani!

Overall, I really love the finished look of the mani! It reminds me of decorated, and speckled Easter Eggs. I also like how the polishes work so well together. It was also fun to do a manicure where I actually intended to design different versions on each hand, that complimented each other!

Friday, April 3, 2015

Crackle Polish Challenge #21 - Blue Patchwork Base Crackle Mani

2015 Crackle Polish Challenge Manicure #21

Featured crackle application:
Using a multi-coloured base underneath crackle polish

Featured crackle polish:
Sally Hansen Crackle Overcoat 'Distressed Denim'

Crackle manicure using multiple shades of blue as the base layer, and topped with royal blue crackle topcoat

Polishes Used:
Sally Hansen Crackle Overcoat 'Distressed Denim'
Sally Hansen Complete Salon Manicure 'Tulle Kit'
Essie 'Borrowed & Blue'
Essie 'Smooth Sailing'
Lise Watier 'Blue-tiful'
Borghese Rapido 'Capriccio Blue'
China Glaze 'Water You Waiting For'
Nicole by OPI 'Top of My World' (from the Justin Bieber Collection)

Sally Hansen Crackle Overcoat 'Distressed Denim', Sally Hansen Complete Salon Manicure 'Tulle Kit', Essie 'Borrowed & Blue', Essie 'Smooth Sailing', Lise Watier 'Blue-tiful', Borghese Rapido 'Capriccio Blue', China Glaze 'Water You Waiting For', and Nicole by OPI 'Top of My World'
Polishes Used
Today, I am so pleased to present the 21st and final manicure of the 2015 Crackle Polish Challenge! After two and a half months of using predominantly crackle polishes, I'm really excited about being free to use other polishes, styles, and techniques again!

For this manicure, I started with a base coat of the sheerest base polish - 'Tulle Kit'. Then, I applied the 5 other base polishes randomly on sections of each nail. I called this a patchwork base mani because the sections I used were uniform: I divided each nail into six parts, and each part was filled with a stroke of a different polish. The end result reminded me of a patchwork quilt!

collage showing how the blue patchwork base layer was created for the 'patchwork base crackle mani'
Base Layers
Next I applied the crackle polish in short, slightly spaced out, strokes. Then I topped everything off with an iridescent blue glitter topcoat, and then a layer of a glossy, quick dry topcoat. I'm quite happy with the results. I like how the use of different colours, sheens, and textures for the base coat transformed the crackle polish look into an abstract pattern.

I'm planning to do one final 'Crackle' post in which I sum up the challenge, and I also hope I'll be able to squeeze in an Easter Mani at some point.  Stay tuned!