Showing posts with label Decals. Show all posts

Sunday, October 16, 2022

Red, Black and Gold Glitter Mani

Now that the summer is over and I've been spending less time in the garden, I managed to get some nail art done! 

Red, Black and Gold Glitter Mani

The inspiration for this mani all started with me wanting really bright red nails.  After scouring my collection for the brightest reds, I finally settled on Essie's 'Fifth Avenue'.  I then came across Pure Ice 'Studette', a gold glitter polish with small amounts of red glitter mixed in.  I decided to pair the two by making a gold glitter decal in a fun shape, and applying it over the red polish on my ring finger to accent the nail... I really just wanted to do a simple look after not having done a lot of nail art for a couple months!

I decided to go with a thin gold glitter triangle that stretched from the tip to the base of the nail. I executed the design perfectly, and was in awe at the stunning accent! Unfortunately, I would only be able to enjoy the design for a few minutes - while it was drying, I accidentally smudged my nail while reaching for something!  I was so disappointed! I decided to try to salvage what I could, and to take the opportunity to push the design further. 

Luckily, the decal itself wasn't ruined, just the red portion on one side of the decal was smudged. I carefully removed the red polish from that side, and masked the (now dry) unblemished portion of the nail. Then I added a black polish, 'Never Have Too Mani Friends!' from the original OPI 'Hello Kitty' collection. It worked, and looked even better than the original design! I'm glad I didn't give up! Inspired by the new improved accent, I then went on to add more black and gold accents to the rest of the nails to tie everything together. In the end, I am so pleased with how the final look turned out!

Red, Black and Gold Glitter Mani - Polishes


The final look reminds me of the face cards in a deck of cards - it's all of the bold geometric shapes and the combination of red, black and gold. This mani would be a great look for a poker tournament! If I wanted to run with the playing card theme, a matte topcoat, and maybe a club, diamond, heart or spade nail stamp on the thumb instead of the gold and black circle would have been a nice touch... Wow, looks like once those creative juices start flowing, they never want to stop - here I am still designing the mani, after it's already complete! 😂  

Above, I have a collage of the polishes used, and below, I have a collage with some additional shots of the manicure.

Red, Black and Gold Glitter Mani

Tuesday, September 7, 2021

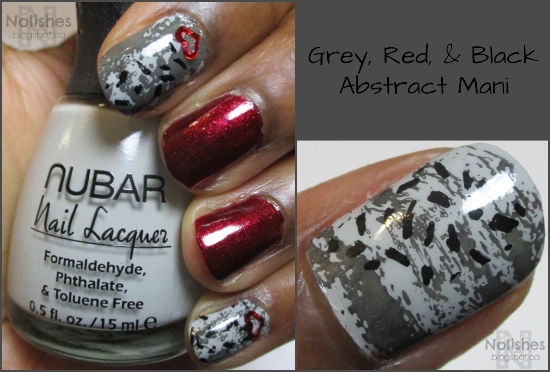
Grey, Red and Black Abstract Mani

I wanted to do a fun abstract pattern to go with a black, white and grey tie-dye dress that I wore today. This is what I came up with:

Grey, Red, and Black Abstract Mani

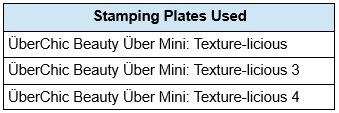
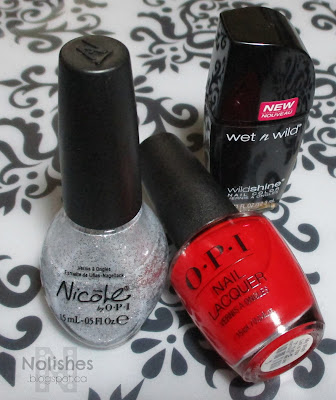
For this manicure, I used Nubar Citadel, a light gray creme polish, as the base for the stamped fingers. I then stamped an abstract texture pattern over it using a dark gray creme polish, OPI's "Liv" in the Gray.  The texture patters used were from ÜberChic Beauty Über Mini plates 'Texture-licious', and 'Texture-licious 3'. The two accent nails are painted red with OPI 'Let Your Love Shine'. I also added some cute red heart decals over my stamped index and pinky fingers, to tie the look together.

I also did a slight modification of the mani on my other hand: 

Grey, Red and Black Abstract Mani

It's essentially the same design, but I double-stamped the nail stamped fingers with another texture pattern in black - Bundle Monster 'Straight Up Black' stamping polish. The texture pattern I used to top the design was from ÜberChic Beauty Über Mini plates 'Texture-licious' 4. This design more closely resembled the tie-dyed dress that I used as inspiration, but I liked both versions and couldn't bring myself to just pick one! 😄

Grey, Red and Black Abstract Mani - Polishes Used


I really enjoyed creating this manicure! It was a lot of fun to design, and a lot of fun to wear!

Sunday, August 9, 2020

Polish Cutout Decal Mani: Version 3

Today I have another polish cutout Decal manicure to share:

 Polish Cutout Decal Mani, Version 3

I still had some sheets of polish leftover from my decal making manicures that I shared on the blog a few posts ago: the 'Polish Cutout Decal Mani' version 1, and version 2. I didn't wan't to waste the sheets of polish, so I came up with a quick abstract mani using strips of polish I cut from the sheets using my pinking shears, and regular scissors. I topped the manicure with a matte glitter topper called 'Can I Get an Untz Untz' from China Glaze's iconic 'Summer Nights' collection that they released in Summer 2015.

Label Shot: 'Can I Get an Untz Untz'

The finished look isn't exactly as I had envisioned, but I kind of like the chaotic, random vibes that this manicure gives off! Cutting up the nail polish strips and applying them directly to the nail was a great way to use up more of the sheets of polish.  There still are more odds and ends left, so if I feel up to it, I may be able to do one more version of the 'Polish Cutout Decal Mani', but we'll see...

Polishes Used - Sally Hansen Polishes

Monday, August 3, 2020

Polish Cutout Decal Mani, Version 2

Polish Cutout Decal Mani, Version 2

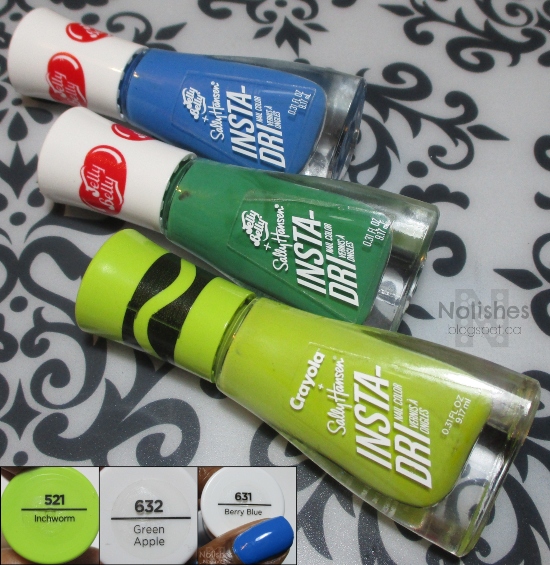
Today, I have another polish cutout decal mani using the leftover materials from my last post. This time I used 'Green Apple' as my base polish and added cutouts I made with pinking shears, and a hole punch from dried sheets of 'Inchworm' and 'Berry Blue'. I really like how this mani came out. I love the geometric shapes, and the fun colours.


Polish Cutout Decal Mani, Version 2

Sunday, August 2, 2020

Polish Cutout Decal Mani

Polish Cutout Decal Mani

Today I have a quick nail art manicure to share. Recently when organizing my stationery, I found a bunch of materials I bought to make nail polish decals: decorative shears (pinking, scalloping, etc) and novelty shaped hole punches (stars, hearts, butterflies, dragonflies etc...). I decided to do a quick manicure to play with all of the materials!

For this manicure, I used the scalloping shears to make the layered waves on my middle finger, and I used the star shaped hole punch to make the star decals on my ring finger. Below, I've included a picture of the materials that I used.

Polish Cutout Decal Mani: Materials used

For the decals, I decided to go with some quick drying, opaque and super-pigmented polishes, so my Sally Hansen Insta-Dri polishes fit the bill for the job. I spread out a layer of each of the 3 polishes I chose on my born pretty nail art mat, and added a second coat after those had dried. Then I went to work creating some fun shapes to add to my nails. I always over-estimate how much polish I will need for the decals, so I had a bunch of polish sheets left over. I plan to do another decal mani or two to use up a bit more of the sheets. Stay tuned for more decal fun!


Polish Cutout Decal Mani: Polishes Used

Sunday, November 11, 2018

Remembrance Day Manicure - 2018

Today is remembrance day in Canada. This remembrance day in particular is quite special, in that Novermber 11th, 2018 is the 100th anniversary since the end of the first world war. Today, I have a remembrance day manicure to share:

red white and black poppy themed manicure for remembrance day


Polishes Used
Stamping Plates Used
OPI 'My Wishlist is You'
Messy Mansion Plate MM78XL
Wet n' Wild Wildshine 'Black Crème'
Clear Jelly Stamper Stamping Plate:
Nicole by OPI 'Scandal, Secrets...
   'True North Strong' Plate CjSLC-08
          & Sparkle'


I really like the completed manicure. It is very understated, and tasteful. Here is a shot of the polishes that I used to create the manicure:

opi 'My Wishlist is You', Nicole by OPI 'Scandals, Secrets, and Sparkle', Wet and Wild Wildshine 'Black Creme'


Here's a link to the last Remembrance day Manicure that I did, back in 2014.  And below are additional shots of this years manicure.

red white and black manicure

Wednesday, October 24, 2018

Autumn Leaves Mani using China Glaze 'Aut-umm I Need That'

I recently purchased China Glaze's 'Aut-umm I Need That' from the Fall 2018 'Ready to Wear' collection. I normally am not drawn to brown polishes, but Aut-umm...'s beautiful shimmer that seems to reflect all of the greens, oranges, reds and golds of the changing fall leaves, caught my eye, and compelled me to purchase it!  Not only that, I also decided that I simply must do a 'fall leaves' manicure using this polish as soon as possible!

This manicure is the result:

Brown manicure using advanced stamping technique to apply coloured leave decals to accent some of the fingers. Amber coloured gems are used on accents for the other fingers.
Autumn Leaves Mani
I used 'Aut-umm I Need That' as the base colour for all of my nails, and then I used bundle monster plate BM-S321 (from the 'Botanicals Collection') to create fall leaf decals using the advanced stamping technique. The leaves are outlined in gold, and then filled in with various autumn colours.

First, here's a close up bottle shot of 'Aut-umm I Need That' which shows the beautiful shimmer:

Close up Bottle shot of China Glaze 'Aut-umm I Need That', nail polish


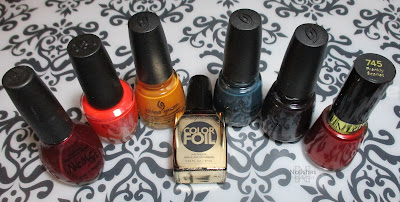
And here's a shot of all seven polishes I used to create this manicure:

Nicole by OPI 'Boys 'N Berry', OPI 'Atomic Orange', China Glaze 'Accent Piece', Sally Hansen 'Liquid Gold', China Glaze 'Baroqe Jungle', China Glaze 'Aut-umm I Need That', Revlon 'Frankly Scarlet'
Polishes Used

Polishes Used
Nicole by OPI 'Boys 'N Berry'
OPI 'Atomic Orange'
China Glaze 'Accent Piece'
Sally Hansen Color Foil 'Liquid Gold'
China Glaze 'Baroque Jungle'
China Glaze 'Aut-umm I Need That'
Revlon 'Frankly Scarlet' (745)

 I'm so happy with the way the manicure turned out! After applying the 6 leaf decals I created to 3 fingers on each hand, I applied amber coloured nail gems to the other two fingers to accent the look. Below I have included a couple of shots of my left hand.


Just for fun, I've included a link to my 'Fall Colours Mani' from 2014 where I used the 'Leadlight Technique to colour in a full nail stamping image from a different bundle monster plate, BM-H11.

Wednesday, September 12, 2018

Blue and Gold Mani with Water Marble Decal Accent

Well, hello!  It's been a while, but I'm finally back.  I really can't believe how quickly time flies - one minute you're in the groove of updating your blog, and the next, over 2 years have passed since you last posted! As I explained in my 'Nail Polish Declutter' post, I had been taking a hiatus from nail art. I recently decided to try to get back into it again, so I'm restarting this blog to journal my journey.

Manicure with electric blue and gold nail polish, and purple, grey, teal, and blue, water marble decal accent nail with gold and electric blue dots.
Blue and Gold Mani with Water Marble Decal Accent

The picture above is a quick manicure I did using two Orly polishes from my collection that caught my eye ('Luxe' and 'Sweet Peacock'), and one of the water marble decals I made in my 'Water Marbling Made Easy' post over 3 years ago (yes, it was one of the exact same decals I made that long ago - they really hold up well when carefully stored away between sheets of paper towel!). To jazz up the look, I made a diagonal stripe of gold on the thumbnail, and used a dotting tool to make contrasting dots and rings on some of my nails. Not bad for my first attempt at nail art in what feels like ages!

I actually did this look a few weeks ago, but it took me a while to post it. I'm working with all different equipment from the last time I posted, so it took some time to get all my files, gear and programs together to be able to start blogging again.

Orly 'Luxe' and 'Sweet Peacock'
Polishes Used: Orly polishes 'Luxe' and 'Sweet Peacock'
All in all, I'm happy with the way this look turned out. I'm also really looking forward to posting new looks in the future!

Monday, May 4, 2015

'May the Fourth Be With You' Mani

In honour of May the 4th, I decided to rework my previous mani into a space themed galaxy manicure:

Space themed manicure featuring  black nails with gold and holographic glitter, stamped with orbiting planets in silver on the thumb, and a grey and silver rocket ship with red and orange flames trailing it is stamped on the ring finger.
May the Fourth be with Your Manicure!
There is so much wear and tear on this manicure, that it's not even funny! The base for this manicure was only supposed to be an impromptu weekend manicure, that was hastily applied on top of the manicure I wore for most of last week - it's unbelievable how many layers of polish are on my nails right now! The plan was originally to do a new manicure on Sunday night, so that everything would be fresh for Monday morning, but then I came up with the idea to re-purpose the mani, since I already had the galaxy framework that I could build upon to create a May the Fourth Mani.

My previous mani featured a black base of Wet n Wild 'Black Crème', and a black, gold, and holographic glitter, Sally Hansen Complete Salon Manicure 'Midnight Glitz'. That combination already looked very 'spacey' so I just emphasized that by adding a cute spaceship from one of my Moyou London 'Sci Fi' plates, and some planets in orbit from my Messy Mansion 'Space Themed' plate. I made the rocket ship decal using advanced stamping technique.

Here are the details of the polishes and plates that I used to create this look:

Polishes Used:
Plates Used:
Wet n Wild Wild Shine ‘Black Crème’

OPI ‘Romantically Involved’
Messy Mansion ‘Space Themed’ MM33
Essie ‘No Place Like Chrome’

Sally Hansen C.S.M. ‘Midnight Glitz’
Moyou London Sci-Fi Collection - 03
OPI ‘Atomic Orange’

OPI ‘Embrace the Gray’


Wet n Wild Wild Shine ‘Black Crème’, OPI ‘Romantically Involved’, Essie ‘No Place Like Chrome’, Sally Hansen Complete Salon Manicure ‘Midnight Glitz’, OPI ‘Atomic Orange’, and OPI ‘Embrace the Gray’
Polishes Used
All in all, I think it is a super cute manicure (minus the tip wear, and bulky, multi-layered polish application!). I really like how the space-ship decal turned out, and how cool it looks floating on the background of the black and holo-glitter 'space'.

Friday, April 17, 2015

Water Marbling Made Easy

Today's post is all about making water marble decals. This is an awesome water marbling technique that I recently learned about. It's mentioned on a number of other blogs, and there are even some great YouTube videos about it, but I just wanted to share my experience with the technique here.

Nail polish water marble pattern using orange, teal, grey, and bright blue polishes to make a flower

I've always wanted to try water-marbling, but prior to finding out about this method, I had only seen it done the traditional way - and that method seemed like so much trouble! Basically, several drops of nail polish are dropped into a container to form a bullseye pattern, a design is drawn into the rings of the bullseye using a pointed object, the nails are dunked into the wet design, and the excess polish is gathered from the surface and discarded before the nails are removed. 

Although this method produces very beautiful multi-coloured patterns, I was discouraged from trying it due to the large amount of wasted polish, and the huge mess created by dunking your hand into wet polish (you can tape off your fingers, or use liquid latex - but still...). The water marble decal technique starts out the exact same as the regular method, except instead of dunking your fingers, you allow the polish to harden on the surface of the water, and then lift out the water marble decal, and lay it on some paper towel to dry until you are ready to use it. When you are ready, you can then cut the decal into nail sized sections, and attach them to your manicure using topcoat!

For me, this method is such an improvement. It greatly reduces the waste factor since you have more control over which sections, and how much of the pattern you use. Also, it's way less messy because there's no dipping - just cutting and pasting! You also have more control as to exactly what you use on the nail, and where you put it. The only drawback I've noticed is that you have to be really careful when lifting the hardened decal from the water. You want to avoid ripping the decal, or having the decal fold over onto itself. I just used my fingers, but I find it helps to grasp it by at least two separate points, so you have a little more control. I've had a pretty high success rate this way, with only a few partially ruined decals.

Shot of about 20 or so finished nail polish water marble decals in a variety of colours and patterns
Decals Galore!!!
Polishes Used:
NYC 'Times Square'
NYC 'Spring Street'
NYC 'Lexington Yellow'
NYC 'Times Square', NYC 'Spring Street', NYC 'Lexington Yellow', NYC 'High Line Green', NYC 'NY Blues', NYC 'Water Street Blue', NYC 'Prince Street', NYC 'Lincoln Square Lavender', NYC 'Lafayette Pink', and NYC 'Sidewalkers'NYC 'High Line Green'
NYC 'NY Blues'
NYC 'Water Street Blue'
NYC 'Prince Street'
NYC 'Lincoln Square Lavender'
NYC 'Lafayette Pink'
NYC 'Sidewalkers'


Another tip is that I chose to use inexpensive polishes that come in bright, fun colours. The line of polishes that I used retails for approximately a dollar to a dollar fifty at discount department stores, and I had a complete rainbow of colours in my collection. Even though there is less waste than with traditional water marbling, there is still some waste, so I just feel more comfortable using my cheaper stuff.

Another reason for this is that it's super fun to do, so you may find that once you start, you may keep going until you have a bunch of decals.  When I had finished playing, the fill line of my previously unused polishes had gone down by about an eight of an inch! Now that is not really all that much polish in the grand scheme of things, especially considering the large amount of decals that I made, however it's not every day that you use that much polish in one sitting!

Below I have a brief pictorial tutorial to show the steps in the process (sorry for the lack of continuity - I never snapped pictures of a single decal all the way through the steps, so each shot features a random decal!):

Steps: Make traditional water marble decal, but leave to harden; lift out of water and let dry; tools used; cut decal into desired shape; apply to nail with topcoat; finished product

On a final note, I just wanted to mention that this is my 100th post! I'm so excited to have reached this milestone. Thanks for stopping by!
Monday, February 16, 2015

Crackle Polish Challenge #13 - Dragonfly Double Crackle Mani

2015 Crackle Polish Challenge Manicure #13

Featured crackle application:
Layering a crackle decal over a crackle background to achieve a 'crackle on crackle' effect

Featured crackle polish:
Sally Hansen Crackle Overcoat 'Vintage Violet'

Skittles Manicure. The thumb and ring finger feature custom purple and iridescent teal dragon fly decals over a metallic green and gold crackle base. The middle finger has a purple, gold, green and blue chunky holographic glitter. The pinky and pointer fingers are covered in a shimmery purple polish with a subtle blue glass fleck.
Dragonfly Double Crackle Mani
Polishes Used
    Crackle Decal:
        Sally Hansen Crackle Overcoat 'Vintage Violet'
        Wet n Wild Wild Shine 'Bijou Blue' (also used as base coat under glitter)
    Glitter:
        Finger Paints 'Daubigny's Garden'
    Crackle Background:
        Sally Hansen Color Foil 'Minted Metal'
        Nicole by OPI 'Gold Texture'
    Solid Nails:
        Nicole by OPI 'Canadian Star', from the Justin Bieber Collection

I chose dragonfly themed colours for this manicure. They are are a combination of cool, shimmery and iridescent polishes. Here's a picture of the bottles.

Sally Hansen Crackle Overcoat 'Vintage Violet', Nicole by OPI 'Canadian Star', Wet n Wild Wild Shine 'Bijou Blue', Finger Paints 'Daubigny's Garden', Nicole by OPI 'Gold Texture', and Sally Hansen Color Foil 'Minted Metal'
Polishes Used
This was quite an elaborate manicure to do. The most time consuming part was making the nail polish decals.  To do this, I spread a large swath of (an inexpensive) nail polish over a flat piece of plastic. I used one of the flat sides from one those annoyingly difficult to open transparent rigid plastic packages that pretty much everything you buy these days seems to come encased in. It was great to find a use for them other than accidentally cutting myself, and frustrating me to no end! LOL!

After the polish was completely dry, I put a few different crackle polishes over the swath. When that was completely dry, I attempted to remove the polish from the plastic. At first, I was trying to peel the polish away from the plastic. I had a little difficulty with this method, so I added a layer of topcoat, to try to make it a bit more pliable. I was then able to peel and lift the polish when it dried.

I actually made two crackle sheets, using different base polishes. Due to all of the problems I had with the first sheet, I tried a different removal method for the second sheet. For that one, I tried bending the plastic backwards, along the edge of the dried polish. It worked like a charm - the polish lifted easily and cleanly without topcoat.

The next step was to cut the dried polish into shapes using hole punches. I made heart shapes, and dragon fly shapes since those are the 2 decorative punches that I have. After that, the decals were ready to be applied. I also have a bunch left over, for future manicures.

I've included a pictorial tutorial below:

Visual tutorial showing how the nail polish decals were made

Here is another collage showing different pictures of the manicure. The thumb close up shots give a better view of the green and gold crackle background, under the decal.

Collage showing base polishes before embellishments, close up of thumbs, and alternate view of the fingers.

This manicure was a lot of fun to do, and I really like how it turned out! So far, this is one of my favourites from the challenge!