Showing posts with label Do-over. Show all posts

Monday, December 3, 2018

Christmas Glitter Mani

Today's manicure represents one of the few times that I've recreated a manicure in the last few years. I've actually been planning to recreate this mani for almost one year now. I'll get in to that later, but first, here is the picture:

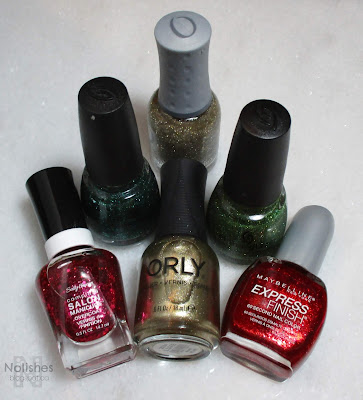
Glitter mani in traditional Christmas colours using Sally Hansen CSM 'Strawberry Shields', China Glaze 'Pine-ing For Glitter', Orly 'Halo', Orly 'Luxe', China Glaze 'This is Tree-mendous', and Maybelline 'Red Comet'


Polishes Used
Sally Hansen Complete Salon Manicure 'Strawberry Shields'
China Glaze 'Pine-ing For Glitter'
Orly 'Halo'
Orly 'Luxe'
China Glaze 'This is Tree-mendous'
Maybelline Express Finish 'Red Comet'


I wore this look to my office holiday gathering last year, and received lots of compliments. At the time, I wasn't updating my blog and as a result, I didn't have all of my equipment ready to even take a picture that could be used for the blog at a later time. I hoped to get everything set up again so that I could post the mani, but of course, during the busy holiday season I didn't get a chance to do that. 

So, I decided that I would try to recreate the mani at a later time and post it then. Originally I was hoping for right after Christmas, but then I was busy with all of the Boxing Week sales. By the time things settled down, it was too late to do a Christmas manicure that season! I decided to put the polishes aside, and wait until next Christmas to recreate and post the mani. So finally, after a year of anticipation - I've completed my mission! LOL!  

Sally Hansen CSM 'Strawberry Shields', China Glaze 'Pine-ing For Glitter', Orly 'Halo', Orly 'Luxe', China Glaze 'This is Tree-mendous', Maybelline 'Red Comet'

Even though it is essentially a basic glitter mani, I really like how it turned out. It's fun and funky because of the colourful glitters, yet there's a classic charm to it as well due to the traditional Christmas colours.

As for the technical aspects of the mani, I used 3 coats of the dark green glitter 'Pine-ing For Glitter' on my pointer finger, one coat of orly 'Luxe' as a base and one coat of Orly 'Halo' on my middle finger, two coats of Maybelline 'Red Comet' as a base, and once coat of Sally Hansen -Strawberry Shields' on my thumb and ring fingers, and two coats of China Glaze 'This is Tree-mendous' on my pinky.  I used a peel off base coat to aid with removal, and a glossy quick-dry top coat on top to smooth and shine the glitters.

Photos of Christmas Glitter Manicure using traditional Christmas colors

Now that I've completed the mani, I can finally put the polishes away... but now that I've blogged about this and have the details here, I'm inspired to maybe try to make this my Christmas tradition mani going forward!  We'll see how that works out, and how long the polishes last, but that definitely sounds like a fun tradition to start, especially after the quirky story of why I've worn the same manicure two Christmas seasons in a row!
Saturday, August 1, 2015

Pink and Blue Double Stamped Mani

Blue jelly polish base stamped with navy blue floral outline pattern, and then with a pink abstract heart pattern. Accent ring finger is covered with pink matte glitter instead of the second stamping of pink over the blue base.

Today's manicure is a reconfiguration of a manicure that I did earlier this year. During the 2015 Crackle Polish Challenge, I did a manicure called the 'Shattered Heart Mani'. It featured a crackle polish decal, glitter, and double stamping over a translucent polish base. Even though the main concept behind the manicure was to showcase the crackle polish decal, the feature that I ended up liking the most was the double stamped design that I used on my thumbnails. I even mentioned in that post that "I may have to do an entire mani like this!". Well, I finally ended up doing it!

Polishes Used
Plates Used
Nfu-Oh NFU JS30 (Royal Blue)
Bundle Monster Secret Garden Collection:
OPI ‘On Pinks & Needles’
BM-721
OPI ‘I Saw… U Saw… We Saw… Warsaw’
Pueen Love Elements Collection:
Sally Hansen Insta-Dri ‘Presto Pink’
PUEEN41

Nfu-Oh NFU JS30 (Royal Blue), OPI ‘On Pinks & Needles’, OPI ‘I Saw… U Saw… We Saw… Warsaw’, and Sally Hansen Insta-Dri ‘Presto Pink’

In order to switch things up a bit, I used a blue jelly polish from Nfu-Oh's Jelly Syrup Series as the base, and a dark blue polish ('I Saw...' from OPI's Spring 2013 Euro Centrale Collection) for the first layer of the stamping design. Also, for the first layer of stamping, I used a different stamping plate from the one I used the first time around. The polish and plate that I used for the top layer of stamping were the exact same as the original manicure.

I wanted to do something a little different for my ring finger, so instead of stamping the pink top layer over the blue base, I used an awesome pink matte glitter polish from OPI's Brights 2015 Collection called 'On Pinks and Needles'. The shade of pink of the glitters, and of the stamping polish are almost a perfect match!

I really love how this look turned out! I don't like to repeat looks, but I don't think I'm quite done with this particular style just yet. I would like to try a version with brighter colours, and perhaps experiment a bit more with different combinations of patterns that will work well together! 
Collage featuring extra shots of the manicure

Sunday, February 22, 2015

Crackle Combo Mani #2

So I gave in to temptation and re-did the Crackle Combo Mani from my last post! Here's the Do-Over:

Nail stamping manicure featuring a light blue base covered with red and blue strokes of crackle polish, and then topped with a white negative space circle pattern stamping image
Crackle Combo Mani #2
Polishes Used:
Essie 'Mint Candy Apple'
Sally Hansen Crackle Overcoat 'Cherry Smash'
OPI 'Navy Shatter'
Konad Special Polish in White

Essie 'Mint Candy Apple', Sally Hansen Crackle Overcoat 'Cherry Smash', OPI 'Navy Shatter', and Konad Special Polish in White
Polishes Used
I like the overall look of this mani much better, due to the lighter colours. However, I noticed that the stamping image doesn't stand out as much on this one as it did in the last version. If you look closely at the pinky, you may be able to see a bit of Sally Hansen 'Silver Sweep' nail polish outlining a portion of some of the circles. I tried stamping the image using silver polish on that nail, to see if the pattern would stand out more. It didn't make much difference, so I just stamped over it again with white so that the nails would be consistent.

I did a side-by-side before and after collage to show the differences between the manicures.


Stay tuned for my next post, where I will continue with the rest of the 2015 Crackle Polish Challenge!

Wednesday, November 26, 2014

Mondrian Mani 2 - Using Moyou London Artist Plate 16

Today I have another instalment of the Moyou London Artist Collection Design Challenge:

Nail stamping manicure inspired by the artwork or Piet Mondrian. Designed using Moyou London Artist collection plate 16, and white, black, red, blue, and yellow polishes from China Glaze, Essie, Konad, and Nfu Oh.Nail stamping manicure inspired by the artwork or Piet Mondrian. Designed using Moyou London Artist collection plate 16, and white, black, red, blue, and yellow polishes from China Glaze, Essie, Konad, and Nfu Oh.

This manicure was done using Plate 16 from the Moyou London Artist Collection, and is the second last manicure in my challenge!

When I did my original 'Mondrian Inspired Mani' a few months ago, I mentioned that I wanted to try it again with a darker blue jelly nail polish. I've since acquired China Glaze's 'Ride the Waves', a beautiful deep blue jelly, so I'm happy that I now have the opportunity to use it as I revisit the same theme with a different plate.

Polishes Used:
Essie 'Jelly Apple'
Nfu Oh NFU JS19
China Glaze 'Ride the Waves'
China Glaze 'White on White'
Konad Special Polish in Black

With this manicure, I used the decal method of nail stamping (aka advanced nail stamping technique) to colour in the multi-coloured accent nails. I decided to use the decal method because when I did the first version of this mani, I tried colouring with the 'leadlight' technique and found that it was hard to keep the highly pigmented jelly polishes from going over the black lines.

The black lines are supposed to be crisp, and clean, and they are an important part of the design. When they are partially obscured with polish, the look does not have the same visual impact.  You can see an example of this in the picture of my right hand, above. On my right ring finger, I had to leadlight the larger section of blue to correct a small boo-boo caused when I was applying the decal to my nail. The blue polish covers a bit of the black line, and takes a bit away from the look.

Now, these are things that are barely noticeable when wearing the manicure in real life, but of course they are a lot more noticeable in close-up still photos with flash! 

Another thing I changed this time around, was that I tried to tone the look down a bit by adding white and black nails. I actually like this version a lot better because of this simplification. The contrast between the multi-coloured, and neutral nails makes the look more interesting, and also helps the multi-coloured nails stand out more.

I really can't believe the challenge is almost over! Currently, there are a total of 17 plates in the Artist Collection. Right now, I own 14 of them: all except for plates 6, 8, and 15. This manicure based on plate 16 is the 14th manicure that I've completed for the challenge (I did two manicures using plate 4 because I wasn't fully satisfied with my first one - you can check out both versions here and here). My next post will be the 15th and final manicure in the challenge, using plate 17. Stay tuned!

Monday, November 10, 2014

Blue Striped Movember Mani

As promised during my last post, here is my revised Movember Manicure:

Blue Striped Movember Manicure using Essie 'I'm Addicted', and China Glaze polishes 'Scandalous Shenanigans', 'New Birth', and 'Five Rules'. Stamped with Moyou London Pro XL plates 01, and 08
Blue Striped Movember Manicure
The inspiration for the blue stripes came from the logo for 'Prostate Cancer Canada', one of the Canadian beneficiary partners of the Movember campaign. Their logo is a tie that is striped in 2 shades of blue. You can check out the logo for yourself, and learn a bit more about the Movember campaign on their website.

The background of my accent finger was reused from the previous version of the manicure 'Muted Movember Mani', I simply stamped the moustache decal over it.

Polishes Used:
China Glaze 'The Giver' Collection: 'New Birth', and 'Five Rules'
Konad Special Polish in Black
Essie 'I'm Addicted'
China Glaze 'Scandalous Shenanigans'

Stamping Plates Used:
Moyou London Pro XL Collection 01 (stripes)
Moyou London Pro XL Collection 18 (background pattern on ring finger)
Moyou London Rebel Collection 05 (moustache)

I really like how this manicure turned out. The bold stripes in vivid blue shades were a really fun look, and I even got a few compliments on the manicure!

Monday, October 27, 2014

Pink and White Pink Ribbon Mani

A few posts ago, I did a 'Navy Pink Ribbon Mani' in support of Breast Cancer Awareness Month. In that post, I mentioned that I wanted to do yet another, more traditional, pink ribbon mani later in the month. Well, I finally got around to doing it!

Here is the finished manicure:

Pink and White Pink Ribbon Nail Stamping Manicure using OPI 'Mod About You' and 'The Power of Pink', stamped with Bundle Monster BM-321, Vivid Lacquer VL 001, and Moyou London Hipster Collection Plates 05 and 06
Pink and White Pink Ribbon Mani

The polishes I used were:
OPI polishes 'Mod About You', and 'The Power of Pink' from the 'Pink of Hearts' 2014 Duo
Sally Hansen Insta-Dri in 'Presto Pink'
China Glaze 'White on White'
Konad Special Polish in White

OPI 'Pink of Hearts' 2014 Duo (boxed) containing OPI 'Mod About You', and 'The Power of Pink'
OPI 'Pink of Hearts' 2014 Duo
The image plates I used were:
Bundle Monster plate BM-321 (full nail design on my thumb)
Vivid Lacquer plate VL 001 (pink ribbon on my middle finger)
Moyou London Hipster Collection plates 05 and 06 (plaid print on index and pinky fingers)

I also used a few nail art rhinestones in various shades of pink on my thumb

Pink and White Pink Ribbon Nail Stamping Manicure (Thumb Only) using Sally Hansen Insta-Dri 'Presto Pink' and China Glaze 'White on White' stamped with Bundle Monster BM-321. Also featuring a few nail art rhinestones in various shades of pink
Pink and White Pink Ribbon Mani - Left Thumb

I really like how this manicure turned out. I especially like the pink plaid! I followed the same double stamping technique that I used for the 'Clueless Inspired' yellow plaid manicure that I did a couple months ago. I'm totally enamoured with the plaid designs on the Moyou London Hipster plates, and I can see myself using these quite often as parts of future 'skittles' manicures.

As for what's coming up on the horizon, I'm going to postpone the Moyou London Artist Collection Design Series for a bit, as I have a few Halloween ideas I'd like to do before October is through. I may only be able to do one Halloween manicure, as there are only 5 days left in the month, and really like the mani I just created, so I hope to wear it for at least a day or two! We'll see what I can squeeze in. Since Halloween is on a Friday this year, I guess I can sort of count the weekend as part of it, which gives me a full week to work with!

Saturday, October 18, 2014

Verdigris Mani

Today’s manicure was inspired by ‘rusting’ copper. If you've ever found an old penny that had been exposed to a winter’s worth of melted snow and rock salt, perhaps on the ground or on the floor of a car, you may have noticed the pretty shade of light blue-green patina that forms on its surface.  This is called verdigris, and it’s one of nature’s more beautiful forms of destruction! I've always loved the combination of copper and light blue because of this phenomenon.  Here’s the manicure I created based on it:

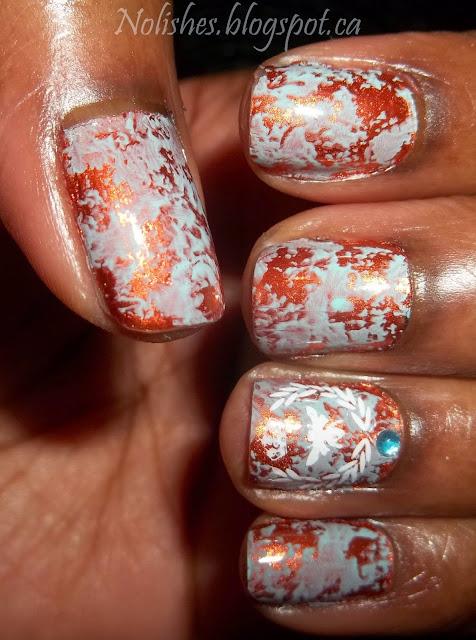
Verdigris inspired Nail Stamping Manicure using Copper and Light Blue Nail Polishes (Revlon 'Captivate', and Color Club 'Blue Ming'). Stamped using Bunny Nails Plate HD-C, and Messy Mansion Plate MM18. Also featuring a blue Nail Art Rhinestone.
Verdigris Manicure
To create this look, I used Revlon Brilliant Strength in ‘Captivate’ as the copper base coat, Color Club ‘Blue-Ming’ as the verdigris, and Konad Special Polish in White as an accent. To create the ‘splotch’ effect on my nails, I used a full nail image from Bunny Nails' (Halloween-themed) plate HD-C, and the crest on my ring finger was done with a decal image from Messy Mansion plate MM18, ‘Shabby Chic’.

Revlon 'Captivate' and Color Club 'Blue-Ming'
Polishes Used:
Revlon 'Captivate' and Color Club 'Blue-Ming'
This is my favourite verdigris manicure to date. Around 3 years ago, I tried to do a similar mani using China Glaze’s Crackle Glaze in ‘Crushed Candy’, a blue crackle polish, and Zoya’s ‘Penny’. I actually went back and found the picture to do a comparison.  Unfortunately, it doesn't look like I took a picture while it was fresh, so the one I found has major chipping and wear. Also, this was well before I had started stamping, and learned very many nail art techniques. 

Side by Side Comparison of the Original Verdigris Manicure using China Glaze Crackle Glaze Nail Polish in 'Crushed Candy' (c. 2011), and the newer nail stamping version using Revlon 'Captivate' and Color Club 'Blue Ming' stamped with Bunny Nails Plate HD-C, and Messy Mansion Plate MM18
Verdigris Manicure Comparison: Original vs Current Versions

Back then, I remember being thrilled about the manicure, which is why I wore it so long, and took a picture! Over the years, I've always remembered it as one of my favourite looks from the past.  I’m so happy to be able to improve upon it with some of the techniques I've learned over the last few years (but mainly in the last 10 months or so since I started stamping).  Who knows, as I continue practicing and picking up more skills and techniques, maybe I’ll have to revisit this mani in a few years time to showcase even more improvements! 

Friday, September 26, 2014

White and Silver Cherub Mani - Slightly Modified

Just wanted to do a quick post to show a small change that I did to the Cherub mani that I had on:

White and Silver Nail Stamping Cherub Mani, version 2. Stamped with Moyou London Artist Collection Plate 10. Polishes Used: Sally Hansen 'Silver Sweep', Konad Special Polish in 'White', and OPI 'Don't Touch My Tutu'.
White and Silver Cherub Mani - Slightly Modified

Previously, I had a glittered nail polish (Essie's 'Hors d'Oeuvres') on my pinky. I simply changed the accent nail to a different stamped image from the same Moyou London Artist Collection 10 plate that I used for the other fingers. I just wanted to pare the look down a little bit to make it softer.

Once again, the nail polishes used were: Sally Hansen Insta-Dri in 'Silver Sweep', Konad Special Polish in 'White', and OPI 'Don't Touch My Tutu'.

Tuesday, September 9, 2014

Navy, Taupe, and Gold Mani - Using Moyou London Artist Plate 04

This is my second attempt at designing a manicure using Moyou London's Artist collection plate 04:

Navy, Taupe, and Gold Nail Stamping Manicure - Using Moyou London Artist Plate 04. Polishes Used: OPI 'Did You 'Ear About Van Gogh', Sally Hansen Color Foil in 'Liquid Gold', and Pure Ice nail polish in 'Party Hard'
Navy, Taupe, and Gold Mani - Left

This time around, I wanted to try to incorporate multiple images from the plate, since I only used one image during my first attempt. The final manicure looks a little busy, but I like it! Just before I did this manicure I had to cut my nails even shorter than they already were, due to a few chipped nails. I was really disappointed about having to do that, because it's so hard for me to grow my nails out. However, one positive thing about cutting them is that with shorter nails, I find that you can get away with a lot more patterns and colours. With less surface area, the 'busy-ness' doesn't seem as overwhelming!

Navy, Taupe, and Gold Nail Stamping Manicure - Using Moyou London Artist Plate 04. Polishes Used: OPI 'Did You 'Ear About Van Gogh', Sally Hansen Color Foil in 'Liquid Gold', and Pure Ice nail polish in 'Party Hard'
Navy, Taupe, and Gold Mani - Right

The polishes I used for this manicure were: OPI 'Did You 'Ear About Van Gogh', Sally Hansen's Color Foil in 'Liquid Gold', and Pure Ice nail polish in 'Party Hard'. Honestly, every time I use 'Liquid Gold' for stamping, I fall a little more in love with it! I think it looks so stunning when stamped - like intricately cut gold foil. I also really like the way that the dark blue base colour on my thumbs and ring fingers serves as a great background to showcase the gold stamping - it really helps it stand out.

OPI 'Did You 'Ear About Van Gogh', Sally Hansen's Color Foil in 'Liquid Gold', and Pure Ice nail polish in 'Party Hard'

Now that I'm finished with this plate, I'm really excited about moving on to the next plate in my Moyou London Artist Collection Design Series. Artist Collection 05 is gorgeous, and presents so many possibilities! Stay tuned...

Sunday, August 24, 2014

Flamingo Themed Mani - 2nd Attempt

Since I wasn't fully satisfied with the execution of my last flamingo manicure, I decided to try again. This time, I had the idea to use the cover of the Moyou London Tropical Collection image plates as the inspiration for the mani. Here's a picture of the cover:

Moyou London Tropical Collection Sleeve
And here's the finished manicure:

Flamingo Themed Nail Stamping Manicure Version 2 - Left Hand. Polishes Used: Essie 'Turquoise and Caicos', Sally Hansen Xtreme Wear 'Mint Sorbet', DRK nails Metallic Brown stamping polish, China Glaze's 'Flip Flop Fantasy', and a dark green nail polish. Plates Used: Moyou London Plates:  Sailor Collection 04, Tropical collection 02 and 06, Time Traveller Collection: Back to the 80's 04; and Winstonia plate W210.
Flamingo Themed Mani Version 2 - Left Hand

Flamingo Themed Nail Stamping Manicure Version 2 - Right Hand. Polishes Used: Essie 'Turquoise and Caicos', Sally Hansen Xtreme Wear 'Mint Sorbet', DRK nails Metallic Brown stamping polish, China Glaze's 'Flip Flop Fantasy', and a dark green nail polish. Plates Used: Moyou London Plates:  Sailor Collection 04, Tropical collection 02 and 06, Time Traveller Collection: Back to the 80's 04; and Winstonia plate W210.
Flamingo Themed Manicure Version 2 - Right Hand

I used a lot of materials for this mani - a total of 5 image plates, and 5 nail polishes (not including base and top coat). For the base colour, I used Essie's 'Turquoise and Caicos'. All fingers except for my middle fingers were stamped with Sally Hansen Xtreme Wear in 'Mint Sorbet', using a wave image from Moyou London's Sailor Collection plate 04. I stamped my middle fingers with the flamingo pattern image from Moyou London's Tropical collection plate 06, using China Glaze's 'Flip Flop Fantasy'.

On my thumbs, I used the flamingo decal image from Winstonia plate W210, as well as one of the palm trees from Moyou London's Time Traveller Collection: Back to the 80's plate 04. On my ring fingers, I used the same flamingo decal from W210, but this time paired it with a tropical leaf image which was a part of one of the full nail images from Moyou London's Tropical collection - 02. I used DRK nails Metallic Brown stamping polish to colour the palm tree trunk, and coconut details on my thumbs and ring fingers.

***Edit: I realized well after publishing this post, that I forgot to include the name of the dark green polish I used for the palm leaves.  Unfortunately, I no longer remember which polish I used.***

Here are some images of the final result paired with the original piece it was inspired from:

Moyou London Tropical Collection Sleeve and the Manicured Thumbs they inspired

Moyou London Tropical Collection Sleeve and Manicured Thumb it inspired

I'm finally satisfied with my flamingo manicure! It took me a couple tries, but I'm glad I persevered.