Featured crackle application:
Using crackle polish for a dotted manicure
Featured crackle polish:
OPI 'Blue Shatter'
 |
| Blue Crackle Dotticure |
Konad Special Polish in Black
OPI 'Blue Shatter'
Essie 'Rock the Boat'
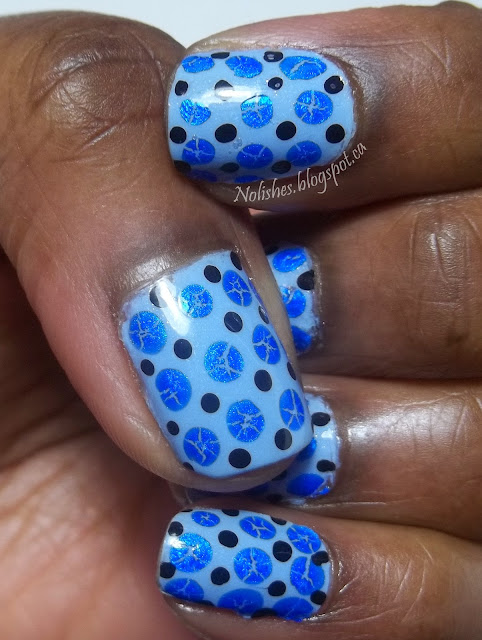
I'm really pleased with the way this dotted crackle effect turned out! The cracks on the blue shimmery dots kind of resemble the edges of the facets on the surface of a cut blue sapphire. It's like there are small gemstones all over my nail!
The only thing I was a little disappointed with is that I had trouble getting the crackle polish to work on 2 of my nails. The very first attempt with crackle dotting was done on the 3 fingers prominently displayed in the picture above. I was originally going to do something else with my other two fingers, but changed my mind (more on that later). When I went back to dot the remaining 2 fingers, for some reason, I couldn't get the polish to crack any more! I even went back and started from scratch 3 separate times, but could not recreate the effect.
When I first tried it, I didn't put much thought into it - I was experimenting, so I didn't pay too much attention to my technique. I just put a small blob of polish on the back of a piece of plastic, and started dotting. It worked fine. When It came out beautifully, and I later decided that wanted to continue doing it, I just could not recreate the results. It was so frustrating! I may have to try again with a different polish. Here are some additional shots of the manicure:
On my left hand, I did a different crackle mani using the same colours. Originally, my plan for both hands was to do a stamped hounds-tooth design (from Bundle Monster plate BM-322) on my middle and ring fingers, and use the dot design only for the thumb, index and pinky fingers. I painted my nails with 'Rock the Boat', and did the crackle stamping on the accent fingers of both hands. I started doing the dots on the right hand. When I finished, I didn't like the way the 2 designs looked together, so I decided to nix the hounds-tooth and just do the same dot design on the ring and middle fingers (as mentioned above, this is where it all started to go wrong!).
When I got to my left hand, I didn't want to remove the hounds-tooth because I liked the way it looked, so I just decided to do another design on the remaining three fingers that worked with the hounds-tooth pattern. Here's the finished result:
 |
| Alternate Version Blue Crackle Mani Using BM-322 |
2015 Crackle Polish Challenge Manicure #20.5 - Blue Houndstooth Crackle Manicure:
Featured crackle application:
The 'Crackle Curve' technique
Featured crackle polish:
OPI 'Blue Shatter'
Stay tuned for my next post which will be the final instalment of the 2015 Crackle Polish Challenge!


No comments:
Post a Comment