Monday, December 29, 2014

Red, Green, and Gold Ornament Mani

Today I have yet another Christmas Mani to share with you.

Nail stamping manicure with red and dark green horizontal striped nails. The ring finger accent nail has 3 images of Christmas ornaments stamped in gold.
Red, Green, and Gold Ornament Mani

Polishes Used:
China Glaze 'Tip Your Hat'
Sally Hansen Complete Salon Manicure 'On Pines and Needles'
Sally Hansen Color Foil 'Liquid Gold'

Plates Used:
Moyou London Pro Collection XL - 01
Moyou London Festive Collection - 18

China Glaze 'Tip Your Hat', Sally Hansen Complete Salon Manicure 'On Pines and Needles', and Sally Hansen Color Foil 'Liquid Gold'
Polishes Used
I'm pleased that the stripes came out cleanly in this mani. I used a squishy stamper, and the 'press' technique (as opposed to rolling the image on my nails). I also learned that with the stripe images on the pro collection plate, it helps to scrape parallel to the lines in order to fill the grooves of the plate more consistently.

When I used this same plate to do the stripes for my 'Blue Striped Movember Mani', I didn't do any of these things: I used a hard stamper, I rolled the image, and I scraped in a direction perpendicular to the lines on the image plate. You can see a major difference in the cleanliness of the lines! Although in the Movember Mani, the lines didn't look quite so bad in real life (no close-ups!), I'm really impressed that for this new mani, the results look great both near and far!

Sunday, December 28, 2014

The First Noel Mani

Although Christmas is now over, I have another Christmas mani to share with you:

Nail stamping manicure featuring 4 nails painted with a sheer white base polish containing white and silver glitter, and an accent nail with a silver base stamped with a verse of the lyrics to 'The First Noel' in white.
The First Noel Mani
Polishes Used:
Orly 'Peaceful Opposition'
Sally Hansen Insta-Dri 'Silver Sweep'
Konad Special Polish in White

Plate Used:
Moyou London Festive Collection 17

Orly 'Peaceful Opposition', Sally Hansen Insta-Dri 'Silver Sweep', and Konad Special Polish in White
Polishes Used
My nails have been through a lot this past week, with all of the shopping, cooking, cleaning, decorating, and other preparations I had to do this holiday season.  I ended up having to cut and file down several broken nails! I didn't even get a chance to do as many manicures as I would have liked.

This is the main reason why I wanted to continue sharing a few Christmas manicures - to use some ideas I was really excited to try out, but didn't get a chance to do before Christmas. I really didn't want to have to wait a whole year to try these ideas out.  And besides, I figure that if I had actually done a Christmas-themed mani on, or just before Christmas, I would most likely still be wearing it until as late as December 30th (at which point I would probably switch to a New Year's manicure). So either way, I would still be wearing a Christmas manicure after Christmas! LOL!

Nail stamping manicure featuring silver base with the lyrics to 'The First Noel' stamped over the base in white.
The First Noel Mani - Accent Nail

Wednesday, December 24, 2014

Christmas 'Splotch' Test - Mini Post

I was thinking about doing a two-colour irregular splotch mani, similar to my 'Verdigris Mani' from a couple months ago, but this time in Christmas colours. I decided to do a test nail, to see if the look would work or not.  Here is the result:

one nail with shimmery green base colour stamped with a splotchy red distressed pattern.
Christmas Colour 'Splotch' Test
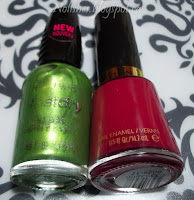
For this test, I used Wet n Wild Fast Dry 'Sage in the City', and Revlon 'Bewitching'. The plate I used was Bunny Nails plate HD-C.

Wet n Wild Fast Dry 'Sage in the City', and Revlon 'Bewitching'
Polishes Used
Although I like the effect, I'm not quite sure that it really reads 'Christmas'. I've decided not to do this as a full manicure, but I just wanted to do a quick post to share the results.

Monday, December 22, 2014

Candy Cane Mani

Today I have a candy cane themed manicure to share:

Nail stamping manicure featuring red and white striped nails, and ring finger accent nail with sparkly silver base colour, with 2 candy canes arranged in a heart shape, with a red nail art rhinestone in the centre of the candy-cane heart.
Candy Cane Mani
Polishes Used:
China Glaze 'Define Good...'
China Glaze 'White on White'
Sally Hansen Xtreme Wear 'Celeb City'
Konad Special Polish in White

Plate Used:
MoYou London Festive Collection - 03

Other than a few issues with getting my lines straight, I love this manicure! Incidentally, I discovered a great tip for getting my lines straight, just as I was finishing up the manicure. Just before I was about to put polish on the image plate to stamp the last unfinished nail, it suddenly dawned on me that instead of my trustee hard Konad stamper, I should try using my larger, squishy stamper. With my Konad stamper, not only were some of my lines becoming crooked during the process of rolling the images onto my nail, but also, at times I was having problems with a little bit of polish bleeding onto the negative space of the image when I tried to pick it up.

When I tried the squishy stamper, not only did the image pick up beautifully, with no bleeding, but I found it was also much easier to transfer this particular image cleanly by pushing my nail onto the stamper, than it was to roll the image onto my nail as I had been doing with the hard stamper. I realized that this is because when I roll an image onto my nail, I don't always use one smooth, continuous motion. In areas where I stop momentarily, or my hand moves a bit too fast, I end up with a crooked bit of the image. Pushing my nail onto the image with the squishy stamper solves this. It also makes it a bit easier to line up the image exactly how you want it on your nail.

You'll notice in the above picture that my index finger turned out perfectly straight, and the angle looks great. That's because I used the squishy stamper for that finger. I used my trusty hard Konad stamper for all of the other striped nails - you can probably see the difference!

 I love using the hard stamper because it's really great at picking up every detail of very fine images, whereas many times I have problems getting detailed images transferred onto the squishy stamper. Also, when I first started stamping, I only owned hard stampers, so when I'm gathering my mani materials, I often instinctively reach for them out of habit.

This experience really helped drive home the message that I really have to take the time to evaluate which is the right tool for the job, before I begin. As a basic guideline: the squishy stampers are better at picking up images with thicker lines and/or larger, open spaces of polish, while the hard stampers are better at picking up detailed images.

Sally Hansen Xtreme Wear 'Celeb City', China Glaze 'White on White', China Glaze 'Define Good...', and Konad Special Polish in White
Polishes Used
Now, I just want to take a moment to talk about how beautiful 'Define Good' is.  I think I mentioned before that I'm normally not the biggest fan of red nail polish, simply because it is so common, however this red polish is gorgeous! It's dark and sultry with blue undertones, and has this magnificent shimmery metallic finish to it. It also stamps really well, which is a big plus. I'm so happy I bought it! This is a red that I probably wouldn't even mind wearing on it's own (sans nail art) - now that's a big deal!

Sunday, December 21, 2014

Snowy Pine Forest Mani

Today I have another holiday themed manicure to share.

nail stamping manicure featuring forest green pine trees over white background with silver snowflakes - left handnail stamping manicure featuring forest green pine trees over white background with silver snowflakes - right hand

Polishes Used:
China Glaze 'White on White'
China Glaze 'I'd Melt for You' (2014 Holiday Twinkle Collection)
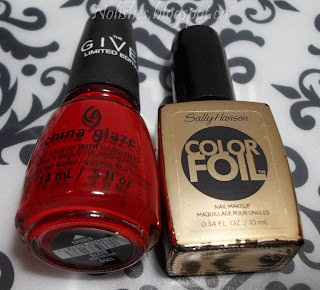
China Glaze 'The Outer Edge' (Limited Edition 'The Giver' Collection)
Maybelline Color Show 'Walk in the Park'

Plate Used:
Cheeky Jumbo Plate 6 'Happy Holidays'

China Glaze 'White on White', China Glaze 'I'd Melt for You', China Glaze 'The Outer Edge', and Maybelline Color Show 'Walk in the Park'
Polishes Used
This look was inspired by a beautifully decorated Christmas tree I saw in a mall I visited recently. It was covered in large spherical ornaments, some in solid white and the rest in solid silver. They also had these gorgeous silver-coloured sculptures of grazing reindeer circled all around it. The entire scene was so elegant - I really wish I had taken a picture!

I really like how this manicure turned out. However, I do have one small regret with my left thumb. I put a coat of 'The Outer Edge', a silver and white micro-glitter, over the finished nail, before I realized that the accent nails look better without it. I also used way too much, not realizing how dense the glitter particles were.  It ended up almost completely obscuring the tree! I was in no mood to start all over again, so I tried to carefully double stamp another tree directly on top of the old one. It seemed to turn out alright, so I just went with it. I ended up getting a couple of compliments on this manicure, (which is always nice!) so I guess the boo-boo wasn't that big of a deal after all.

This is the first time that I used 'I'd Melt for You', a silver metallic polish from China Glaze's recent holiday line. I love it!!!  This might be a new replacement for Sally Hansen Insta-Dri 'Silver Sweep' as my go-to silver!  Ever since Sally Hansen changed the formula of 'Silver Sweep' I was really worried about finding a replacement - and my last bottle of the old formula 'Silver Sweep' is about two-thirds empty. So I'm really glad this polish came along when it did.

I do have other silver polishes, but what I really love about 'Silver Sweep' (and now also 'I'd Melt for You') is that they don't dry lightning fast like some other metallic silver polishes. With some of my highly reflective silver polishes, you have to work really quickly, so the polish doesn't dry in the grooves of the image plate, before you get a chance to pick it up with your stamper!

I ended up wearing this manicure way longer than I wanted to - I wore it for 5 days! I love the mani, but I have so many ideas that I'd like to get in before Christmas, that I probably shouldn't have worn this more than a couple days! I had a really hectic week, and most evenings, I honestly didn't feel like doing my nails.

Anyways, I'm gaining even more inspiration and motivation to crank out holiday manicures now that we're getting even closer to Christmas, so stay tuned to see what I come up with!

Saturday, December 20, 2014

Christmas Skittles Mani

Today I have a holiday themed manicure to share:

Christmas Themed Nail stamping manicure using light and dark green, red, gold, and white nail polishes. Stamped with images of presents, candy canes, bells, and trees.Christmas Themed Nail stamping manicure using light and dark green, red, gold, and white nail polishes. Stamped with images of presents, stockings, bells, and trees.


Polishes used:
OPI 'You Are So Outta Lime!', Sally Hansen 'On Pines and Needles', Revlon 'Bewitching', OPI 'Honey Rider', Sally Hansen Color Foils 'Liquid Gold', and Konad Special Polish in White.

Plate used:
Cheeky Jumbo Plate 6 'Happy Holidays'.

OPI 'You Are So Outta Lime!', Sally Hansen 'On Pines and Needles', Revlon 'Bewitching', OPI 'Honey Rider', Sally Hansen Color Foils 'Liquid Gold', and Konad Special Polish in White.
Polishes Used
Truthfully, this manicure didn't really turn out the way I had envisioned. I think it probably would have looked better to have put another dark green nail stamped with metallic gold on my ring finger, instead of the textured gold accent polish I used.

On a positive note, I really love the way my index fingers turned out!  I used the decal stamping method, and I really love how the 4 colours work together.

Sunday, December 14, 2014

Swatches from my Black Friday Dollar Polish Haul!!!

Today I have some polish swatches to share from my big 'Black Friday' haul a couple of weeks ago. Originally, I planned not to do a haul post, because sometimes they can be a bit boring. However, I changed my mind because I recently decided to swatch all of the colours that I got during the sale, so I thought that I might as well post the swatches!

As I mentioned in my 'Black Friday Mani' post, I purchased some polishes at Sally Beauty Supply for only one dollar each.  I purchased 23 bottles in total: 5 Finger Paints, 6 China Glazes, and 12 Orlys. Here are pictures of the bottles, and the swatches grouped by brand. The polish names correspond to the bottles' order in the picture from left to right.

Finger Paints:
'Hollywood Decadence', 'Tails of Love', 'Margarita Mambo', 'Mistful Thinking', and 'Kitchy Tangerine'.

Finger Paints Polish from left to right: 'Hollywood Decadence', 'Tails of Love', 'Margarita Mambo', 'Mistful Thinking', and 'Kitchy Tangerine'.

'Hollywood Decadence' is a muted, matte glitter with silver pink and blue, 'Tails of Love' is a textured teal polish, 'Margarita Mambo' is a shimmery lime green, 'Mistful Thinking' is a soft greenish yellow with a matte finish, and 'Kitchy Tangerine' is a slightly reddish orange.

I just love the three bright citrus colours on the right side of the nail wheel: the shimmery lime green, lemon yellow and tangerine orange are all colours that I will definitely enjoy using.  The muted, matte glitter, 'Hollywood Decadence', and the textured teal 'Tails of Love', are a bit off the beaten path compared to my regular tastes, but these kinds of sales are a great opportunity for me to try new things with minimal investment. The glitter might make a nice accent finger for a grey or silver manicure, while the teal reminds me of a mermaid's tail. That could be interesting for an ocean themed mani.

China Glaze:
'Stop that Train!', 'Seeing Red', 'Intelligence, Integrity & Courage', 'But of Corpse', 'Rest in Pieces', and 'Getting to Gnaw You'.

Left to right: 'Stop that Train!', 'Seeing Red', 'Intelligence, Integrity & Courage', 'But of Corpse', 'Rest in Pieces', and 'Getting to Gnaw You'.

China Glaze: 'Stop that Train!' is a metallic red, 'Seeing Red' is a slightly orangey deep red, 'Intelligence, Integrity & Courage' is a soft grey, 'But of Corpse' is a matte textured light green with black speckles, 'Rest in Pieces' is a copper black and holo glitter, and 'Getting to Gnaw You' is a copper glitter with a translucent black base.

For this set of swatches, I know the reds and grey will get a lot of use. I'm also really excited to have obtained the more adventurous Halloween shades on the left at this amazing price. I originally passed on the shades during their initial release, because they aren't polishes that I would use on their own on a regular basis, so I could't justify paying full price for them. However they will be great for nail art, so I'm so happy to have them now! 

With Christmas coming, I can see myself using the green, 'But of Corpse', as a textured tree or wreath. The glitter, 'Rest in Pieces', reminds me of crumpled leaves, and bits of sticks - like if you dropped something on a forest floor in autumn, the little bits of stuff that would stick to it! That might come in handy in a fall themed mani. The last shade, 'Getting to Gnaw You', might actually pass as an edgy, sophisticated year round look with lots of topcoat to even the surface.  It also would look nice as wood, soil, or other natural textures in nail art - like tree trunks, pine cones, acorns, etc.

Orly:
  Darks and Purples
    'Goth', 'Wild Wisteria', 'Royal Velvet', 'Darkest Shadow', 'Close Your Eyes', and 'Blend'

Left to Right: Goth, Wild Wisteria, Royal Velvet, Darkest Shadow, Close Your Eyes, Blend

Goth is a black polish with small silver pieces of glitter, Wild Wisteria is a dark blurple, Royal Velvet is a medium purple/shimmery light blue duotone, Darkest Shadow is a black polish with a dark red fleck, Close Your Eyes is a shiny medium purple/plum, Blend is a greyish, purpley, brown mixed shade

I love all of these colours, and I know they will get a lot of use.  The only one I would normally not buy if it weren't for the great price is 'Close Your Eyes', the medium purple/plum second from the right.  I normally avoid wearing medium purples for a full mani, because I don't think that they compliment my skin tone very well. However, purple is a great colour for nail art, and it will incorporate nicely into a variety of colour schemes.

  Neutrals
     'Pink Nude', 'Orly Platinum', and 'Highlight'

Orly Neutrals: Pink Nude, Orly Platinum, Highlight'Pink Nude' is a sheer light pink, 'Orly Platinum' is a softly metallic white, and 'Highlight' is a light taupe

I don't think you can ever go wrong with neutrals.  On their own, they are timeless, elegant, and great for any occasion.  Also, they are a great foundation for nail art.  

  Brights
     'Hawaiian Punch', 'Hot Tropics', and 'Hook Up'

Hawaiian Punch, Hot Tropics, and Hook Up'Hawaiian Punch' is a fuchsia polish, 'Hot Tropics' is a purply magenta with silver micro-glitters, 'Hook Up' is a bright yellow with a soft metallic finish

The yellow polish, 'Hook Up', will be fantastic either as a full mani, or incorporated into nail art. I'm more likely to use the pinks in nail art though, just because I find them a little boring on their own. That's not to knock the polishes, because they are nice shades. However, I generally find it hard to get excited about dark pinks and reds simply because they are probably the most common nail polish colours. Don't get me wrong, they will get used - it's just that I prefer to use more creative approaches with these colours in order to freshen up the look.

And so, that's the end of of what is probably one of my longest ever posts! And here we have yet another reason why I'm not usually a big fan of haul posts - they take so long to do! LOL!

Anyways, I'm planning to do holiday-themed nail art for the next couple of weeks. Stay tuned to see what I come up with!

Monday, December 8, 2014

Golden Snowflakes over Darkest Shadow

This is an impromptu mani that I wore last Thursday and Friday, following my 'Red and Gold Heart Mani'. I fell a bit behind with my posts, so I'm only putting it up now.

Nail stamping manicure featuring gold snowflake and nordic sweater prints, stamped over a black polish with deep red flecks of shimmer.
Golden Snowflakes over Darkest Shadow

The base colour I used for this manicure was Orly 'Darkest Shadow' from their fall 2014 Smoky collection. This was one of the polishes that I picked up in my Black Friday haul for only a dollar. The stamping polish was my go-to gold, Sally Hansen Color Foil 'Liquid Gold'. The stamping plate I used for the full nail designs was Moyou London Festive Collection plate 06, and the snowflake decals were from Moyou London Festive Collection plate 02.

Here's the story behind my colour choice for this manicure. I was in the mood to use some of my wintry/holiday plates, but at the time, I wasn't completely ready to go full Christmas just yet. I usually don't get into the holiday spirit until it's about 2 or 3 weeks before Christmas.  So I chose to use my Moyou London sweater-themed plate, but instead of using the typical grey, white, and blue for a winter sweater, or red and green for a Christmas sweater, I decided to try something a little different.

Orly 'Darkest Shadow', and Sally Hansen Color Foil 'Liquid Gold'
Polishes Used
The first polish I decided on was 'Darkest Shadow', which I chose because I wanted to try out one of my new polishes. Then, I picked 'Liquid Gold' to stamp with because it was a contrasting colour that would look nice with the first polish. It's funny how much of an impact the colour choice has, because the end result doesn't feel wintry, Christmas-y, or even Sweater-y! I'm not even sure what it reminds me of... perhaps it looks a little like the type of pattern you would see on a fancy ornament? Or maybe ninja stars floating through the night?

I'm kind of indifferent to the end result. I don't hate it, but I'm not in love with it either. It's fun experimenting, but sometimes you walk away from an experiment with knowledge not to try something again! I think that these plates really do need appropriate colour schemes to bring out the best in the designs - ie you can't avoid winter/Christmas/sweater colour schemes. I think that instead of 'Darkest Shadow' with its deep red fleck in a black base, if I had just used a deep red polish, that would even be an improvement. It would make it more reminiscent of an ornament, and then the designs would make sense in the context of that colour scheme.

One good thing that came of this is that now I'm in the mood for Christmas nails!!!  I think I just may do only Holiday designs from here on out. I'm so excited!

Sunday, December 7, 2014

Red and Gold Heart Mani

Today I'm finally getting around to posting the manicure I had on about 5 days ago. I usually like to finish the post for the manicure while I'm still wearing it, so everything is still fresh in my mind. However, I've had a pretty hectic week. I had time for a couple impromptu polish changes, but every time I sat down to work on my posts about them - I fell asleep!

This is the manicure that I followed up my 'Cream Knit Mani' with. The Cream Knit Mani started chipping a bit, so that prompted this impromptu mani:

Nail stamping manicure featuring a red nail polish stamped with gold heart themed designs from Messy Mansion plate MM31
Red and Gold Heart Mani

I remember it took a while for me to decide what to do for this manicure. I always find it difficult to choose a theme for a manicure without inspiration. When my decision to do a mani comes about because I'm 'over' my old one, as opposed to because I have a great idea for the next one, I find it very easy to get overwhelmed by options.

That's why I tend to do basic nail stamping mani's for these situations. I usually try to use something new. Sometimes, I'll use a polish or plate that I haven't used before, because I'm always trying to decrease the amount of 'untrieds' in my collection. Other times, I'll try out a new tool or technique, because I'm also trying to improve my nail art skill set. For this manicure, both the red polish I used as my base colour, and the heart-themed stamping plate were previously untried.

China Glaze 'Seeing Red', and Sally Hansen Color Foil 'Liquid Gold'
Polishes Used
The polishes I used were China Glaze's 'Seeing Red' from The Giver Limited Edition Collection, and Sally Hansen Color Foil in 'Liquid Gold'. 'Seeing Red' was one of the polishes I picked up last week for only a dollar during Sally Beauty Supply's 'Black Friday' sale! The plate I used was Messy Mansion plate MM31, 'Valentine's Day'.

I also did another yet un-posted impromptu manicure following this one.  Stay tuned to hear about that in my next post.

Saturday, December 6, 2014

December 6th Manicure

Today is the 25th anniversary of a very tragic event in Canadian history.  On December 6th, 1989, 14 young women were gunned down at the École Polytechnique in Montreal, just because they were women. The gunman's act of violence was targeted at what he perceived to be 'feminists' - women in an engineering school.

The anniversary of this day has become a time not only to remember the victims of the École Polytechnique Massacre, but also all victims of gender-based violence. In 1991, Canadian Parliament designated December 6th as the National day of Remembrance and Action on Violence against Women. The day is also known as 'White Ribbon Day'.

Today's manicure is simple, but fitting for the occasion:

Nail stamping Manicure featuring translucent white nails with a subtle white and silver glitter, and a translucent black ring finger accent nail stamped with a white ribbon
December 6th Manicure

OPI 'Don't Touch My Tutu', OPI 'Pirouette My Whistle', Sally Hansen 'Big Smoky Top Coat', and Konad Special Polish in WhitePolishes Used:
OPI 'Don't Touch My Tutu'
OPI 'Pirouette My Whistle'
Sally Hansen 'Big Smoky Top Coat'
Konad Special Polish in White
Plate Used:
VL001

I want to close this post with a link to a memorial page for the 14 victims on the CBC website:

Sunday, November 30, 2014

Cream Knit Mani

Today I have a quick and easy nail stamping manicure to share with you.


Nail Stamping manicure featuring Stockinette Stitch Knitting Pattern print and ring finger accent nail with nordic snowflake knit sweater print
Cream Knit Mani

To achieve this look, I used Vivid Lacquer plate VL004 for the stockinette stitch pattern on all of my fingers except my ring finger.  For the ring finger, I used Winstonia plate W120 for the Nordic fair isle star pattern.

When I first saw this Vivid Lacquer plate I knew I had to have it. I love knitting and I love nail stamping - so this plate was perfect for me!  I bought it in the summer, so I never really had the urge to try it out until now that we're in sweater season.

Essie 'Urban Jungle', and China Glaze 'Release'
Polishes Used
The nail polishes I used for this look were Essie's 'Urban Jungle', which served as the base colour, and for the stamping polish I used China Glaze's 'Release' from the limited edition 'The Giver' Collection. I chose these polishes because I wanted to use two colours that would give a realistic shadow effect when paired together.

I can't get over just how realistic the Vivid Lacquer knitting pattern looks on the nail! In real life, looking at this manicure from a couple feet away gives a bit of a trompe l'oeil effect. It almost looks like a thin, tiny swatch of knitted fabric has been placed on my nails!  Of course the effect would be a little more realistic with a matte topcoat, but for this manicure I chose this image more for the pattern, and not so much for the effect.  Now that I see how realistic it can look, perhaps I'll try it again with different colours and a matte top coat.

Friday, November 28, 2014

Black Friday Mani

It's Black Friday! Of course, I had to do an appropriately themed mani:

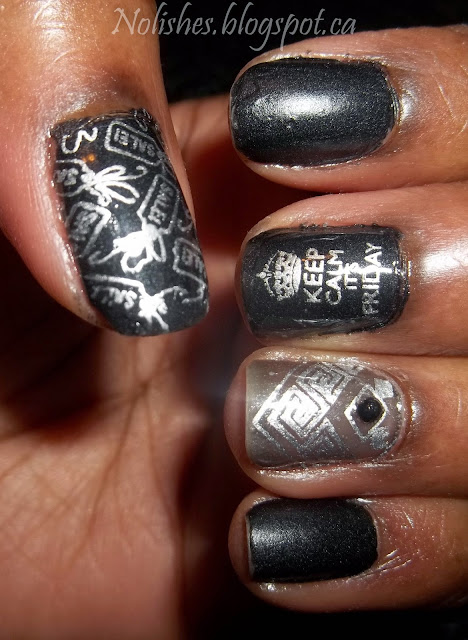
Black Friday themed nail stamping manicure using semi-matte black, silver, and sheer black nail polishes from OPI and Sally Hansen
Black Friday Mani

Polishes Used:
OPI '4 in the Morning'
Sally Hansen 'Big Smoky Top Coat'
Sally Hansen Insta-Dri 'Silver Sweep'

Plates Used:
Moyou London Artist Collection plate 17
Moyou London Rebel Collection plate 05
Cheeky 'Summer Collection' plate CH55

To achieve this look, I reused my ring finger accent nail from my previous mani, and painted my remaining nails black using '4 in the Morning'. I stamped the sale tag image on my thumb using plate CH55. Then, I stamped the 'Keep Calm it's Friday' image from Rebel plate 05 on my middle finger, as a second accent.
OPI '4 in the Morning', Sally Hansen 'Big Smoky Top Coat', and Sally Hansen 'Silver Sweep'
Polishes Used
Overall, I really like the end result. I love how the ring finger accent nail stands out from the look, but also really fits in with the look. The best part is that since I reused part of my previous manicure to create this one, I was able to put this look together really quickly!

It was also really fun shopping for black Friday nail polish deals while wearing my black Friday mani!  My huge score for the day was getting bottles of Orly, China Glaze, and Finger Paints polishes at Sally Beauty Supply for only one dollar each! I truly felt like a kid in a candy store!

Thursday, November 27, 2014

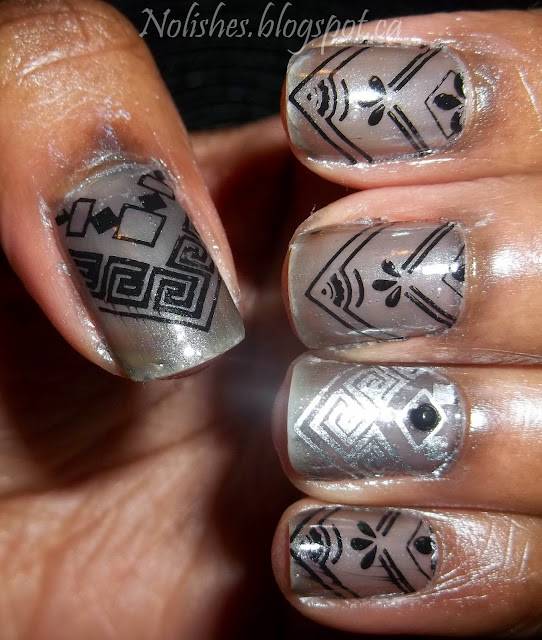
Sheer Black Manicure with Black and Silver Chevrons - Using Moyou London Artist Plate 17

After close to 3 months, my Moyou London Artist Collection Design Series is finally coming to an end. Here is the final manicure of the challenge, featuring Artist Collection plate 17:

Nail Stamping manicure with a sheer black base, stamped with a variety of chevron designs in black and silver nail polish.
Sheer Black Manicure with Black and Silver Chevrons
Polishes Used:
Sally Hansen 'Big Smoky Top Coat'
Konad Special Polish in Black
Sally Hansen 'Silver Sweep'

This was a relatively easy manicure to do. I used a the 'Big Smoky Top Coat' as my base coat, and simply stamped the images over the sheer base. The hardest part of the process was trying to line up the patterns to centre them on each nail. To make this a little easier, I used a large squishy stamper so that I could simply press my nail onto the image, rather than roll the image onto my nail (as I would usually do with the smaller, harder stampers that I usually use). I finished the look off with top coat, and then placed a small black nail art stud on each ring finger.

Picture of thumbnail manicured with sheer black base nail polish, and stamped with a black chevron greek key image. Inside that chevron, is a smaller one made up of a symmetrical chain of geometric shapes.
Sheer Black Mani - Left Thumb
I think that this type of manicure would look great with a black french tip to frame the look. However, since my nails are kind of short, and the image is long enough to take up the majority of my nail, if I did a french tip it would either touch, or partially cover the tip of the chevron - which to me, is a crucial element of this design. However, even without the french tip, I still really like the way this manicure turned out.

And so here I am, officially at the end of my design challenge! I really enjoyed creating these manicures, and I'm glad that I've forced myself to jump right in and not delay in using these amazing plates from my collection.

Sally Hansen 'Big Smoky Top Coat', Konad Special Polish in Black, and Sally Hansen 'Silver Sweep'
Polishes Used
As I mentioned in my last post, out of the 17 plates currently in the Artist collection, there are 3 that I don't own. I have no plans to get them, but if that changes, or if new plates are released that I end up purchasing, I'll probably continue with the challenge. For now however, I'm going to take some time to enjoy the freedom of designing manicures using whatever plate I feel like, whenever I want to! 


Wednesday, November 26, 2014

Mondrian Mani 2 - Using Moyou London Artist Plate 16

Today I have another instalment of the Moyou London Artist Collection Design Challenge:

Nail stamping manicure inspired by the artwork or Piet Mondrian. Designed using Moyou London Artist collection plate 16, and white, black, red, blue, and yellow polishes from China Glaze, Essie, Konad, and Nfu Oh.Nail stamping manicure inspired by the artwork or Piet Mondrian. Designed using Moyou London Artist collection plate 16, and white, black, red, blue, and yellow polishes from China Glaze, Essie, Konad, and Nfu Oh.

This manicure was done using Plate 16 from the Moyou London Artist Collection, and is the second last manicure in my challenge!

When I did my original 'Mondrian Inspired Mani' a few months ago, I mentioned that I wanted to try it again with a darker blue jelly nail polish. I've since acquired China Glaze's 'Ride the Waves', a beautiful deep blue jelly, so I'm happy that I now have the opportunity to use it as I revisit the same theme with a different plate.

Polishes Used:
Essie 'Jelly Apple'
Nfu Oh NFU JS19
China Glaze 'Ride the Waves'
China Glaze 'White on White'
Konad Special Polish in Black

With this manicure, I used the decal method of nail stamping (aka advanced nail stamping technique) to colour in the multi-coloured accent nails. I decided to use the decal method because when I did the first version of this mani, I tried colouring with the 'leadlight' technique and found that it was hard to keep the highly pigmented jelly polishes from going over the black lines.

The black lines are supposed to be crisp, and clean, and they are an important part of the design. When they are partially obscured with polish, the look does not have the same visual impact.  You can see an example of this in the picture of my right hand, above. On my right ring finger, I had to leadlight the larger section of blue to correct a small boo-boo caused when I was applying the decal to my nail. The blue polish covers a bit of the black line, and takes a bit away from the look.

Now, these are things that are barely noticeable when wearing the manicure in real life, but of course they are a lot more noticeable in close-up still photos with flash! 

Another thing I changed this time around, was that I tried to tone the look down a bit by adding white and black nails. I actually like this version a lot better because of this simplification. The contrast between the multi-coloured, and neutral nails makes the look more interesting, and also helps the multi-coloured nails stand out more.

I really can't believe the challenge is almost over! Currently, there are a total of 17 plates in the Artist Collection. Right now, I own 14 of them: all except for plates 6, 8, and 15. This manicure based on plate 16 is the 14th manicure that I've completed for the challenge (I did two manicures using plate 4 because I wasn't fully satisfied with my first one - you can check out both versions here and here). My next post will be the 15th and final manicure in the challenge, using plate 17. Stay tuned!

Saturday, November 22, 2014

Bronze/Green Duochrome Manicure with Black Geometric Print

Today I have an impromptu mani to share:

nail stamping manicure using OPI 'Just Spotted the Lizard' a bronze and green duochrome nail polish as the base colour, and stamped with a diamond and line print in black
Bronze/Green Duochrome Manicure
with Black Geometric Print

The nail polish I used for the base colour is ‘Just Spotted the Lizard’ by OPI.  I bought this a couple of years ago, but never got around to trying it. It was from 'The Amazing Spider-Man' collection that OPI came out with for summer 2012. The bronze/green duochrome is a gorgeous colour, and it is very mesmerizing to look at both in the bottle, and on the nails - I almost felt bad stamping a design over it!

There really was no rhyme or reason for the stamping pattern selection – I pretty much just chose a random pattern I liked on an untried plate – Cici & Sisi plate 04. I stamped the image with Konad special polish in black. 

OPI 'Just Spotted the Lizard' and Konad Special Polish in Black
Polishes Used
After seeing how beautiful '...Lizard' is, I'm inspired to try a couple of looks that will allow the polish to really shine. Perhaps a snakeskin, or something with very subtle stamping. This is one of the main reasons why I love making the effort to use things in my collection that I haven't used before - I'm always rewarded with new ideas on ways to put things together. It's so easy to keep using your favourites, or the old standby's, but sometimes it really pays off to fight the urge to stick with the familiar, and try something new!

Sunday, November 16, 2014

Gold and White Klimt Inspired Mani - Using Moyou London Artist Plate 14

This is my 3rd last manicure from my Moyou London Artist Collection Design Series. It has been a lot of fun to do, but honestly, I'm glad that it is almost over! It will be great to not have any sort of obligation to do a particular manicure, and to just be free to create based on how I'm feeling. On the other hand, it has been a welcome change having a bit structure, and I've enjoyed giving myself the opportunity to use plates that I otherwise might have delayed using.

Today's manicure is very toned down and simplified compared to the majority of my other 'Artist Collection' manicures. I just needed a bit of a change from the multi-coloured, decaled, skittles manicures that I have been doing lately! Here is the finished mani:

Nail stamping manicure with white Gustav Klimt inspired images (from Moyou London Artist 14) stamped over a gold/pink duochrome base. Gold solid ring finger accent nail, embellished with a touch of rose gold glitter.Nail stamping manicure with white Gustav Klimt inspired images (from Moyou London Artist 14) stamped over a gold/pink duochrome base. Gold solid ring finger accent nail, embellished with a touch of rose gold glitter.

Polishes Used:
Deborah Lippmann 'Sugar Daddy'
Maybelline Color Show 'Gilded Rose'
Konad Special Polish in White

Deborah Lippmann 'Sugar Daddy', Mabelline Color Show 'Gilded Rose', and Konad Special Polish in White
Polishes Used - 'Sugar Daddy', 'Gilded Rose', and Konad White Special Polish

I used 'Sugar Daddy' as the base colour for all of my nails. Using the Gustav Klimt inspired Moyou London Artist Collection 14 plate, I stamped 8 different images in white over the rose/gold duochrome base. I left my ring fingers solid, but embellished the tips with a touch of 'Gilded Rose', a rose gold glitter.

This is my first time using a Deborah Lippmann polish. I've owned 'Sugar Daddy' for a few months now, but I never got around to using it. I'm quite pleased with the consistency and the coverage - for this manicure, I'm only wearing one coat! I also love how cute the bottle is!

I also really love how well 'Sugar Daddy', and 'Gilded Rose' go together. 'Gilded Rose' is practically the glitter version of 'Sugar Daddy'!  Because of this, using it on the tip of my accent finger kept the look monotone, but gave a bit of texture. I just adore the effect.

In the pictures above, the images of my thumbs are upside down, and partially obscured by the flash of my camera, here's a better look at them:

Nail stamping manicure with white Gustav Klimt inspired images (from Moyou London Artist 14) stamped over a gold/pink duochrome base. Nail stamping manicure with white Gustav Klimt inspired images (from Moyou London Artist 14) stamped over a gold/pink duochrome base.

All in all, I really love this manicure. The best part about it is that it was relatively quick and easy to do! Stay tuned for the final two instalments of the design series!

Saturday, November 15, 2014

Gaudí Inspired Mani - Using Moyou London Artist Plate 13

After several interruptions, I’ve finally managed to get back to my Moyou London Artist Collection Design Series! With Thanksgiving, Breast Cancer Awareness, Halloween, Movember and Remembrance Day I had a bunch of themed manicures to get done in a short period of time, so there weren’t really a lot of opportunities to continue the series until now.

Today’s manicure was completed using Moyou London Artist Collection plate 13. The plate is inspired by the work of Spanish architect Antoni Gaudí. Here is the finished manicure:
Nail Stamping manicure created using Moyou London Artist 13, in green, blue, navy, purple and gold.
Gaudí Inspired Manicure
Polishes Used:
Sally Hansen Insta-Dri 'I-rush Luck'
Sinful Colors 'Endless Blue'
Maybelline Color Show 'Midnight Blue'
Maybelline Color Show Holographic 'Bold Gold'
Sally Hansen Insta-Dri 'Grape Going!'
Konad Special Polish in Black

Other than the gold accent polish, I tried to choose colours in the same colour family, with medium to dark intensity. However, the flash on my camera is making the nail polish on my index finger, 'Endless Blue', look a lot brighter in the picture than it does in real life. It's actually more of a slightly-darker-than-medium blue.

Nail Stamping manicure created using Moyou London Artist 13, in green, blue, navy, purple and gold.

On my ring finger, I used the decal method to add colour to the lizard and mosaic tile stamp for the accent nail. It might be fun to try this lizard again doing a multi-coloured mosaic tile look, by painting each of the sections with a different colour of nail polish. It would be very time-consuming, but I think it would look pretty cool!

Overall, I'm happy with the way that this manicure turned out. I rarely do 5 different base colours, so I was a little nervous about whether or not this mani would have a unified look at the end - I think it does! The accent nail does a good job of tying everything together.

I only have 3 more plates to do from the Moyou London Artist Collection (I don't have the entire collection), so I hope to finish up with the challenge in the coming weeks - stay tuned!

Nail Stamping manicure created using Moyou London Artist 13, in green, blue, navy, purple and gold.
Gaudí Inspired Manicure