Today I have an impromptu holiday-themed manicure to share.
I did this manicure very quickly. I didn't have time to remove my old polish and start from scratch, but I also didn't want to continue with my old manicure since it had started to show some wear and tear. I ended up painting right over my old manicure. As a result, you can see the bumpiness of the glitter I was wearing underneath the red metallic polish on my index and pinky fingers.
Unfortunately, I don't recall which polishes I used right now, because I was in such a rush that I didn't even think about taking a picture of the polishes. Basically I used three metallic polishes to create this look - a red, a green, and a gold.
On the middle finger, I made a Christmas Tree by using scotch tape to mask off the top corners of the nail, leaving an exposed triangle in the middle. Along the border of the exposed triangle, I used the edge of the tape cut by the metal teeth on the scotch tape holder. That edge was bordered with small triangles, similar to fabric cut with pinking shears. I thought that this was perfect to represent the jagged boughs of the Christmas tree. I then filled in the exposed area with a beautiful metallic green polish, and then dotted gold polish on top to represent ornaments and the star on the top of the tree.
My ring finger features an abstract design made using a dotting tool, and splotches of nail polish.
Overall, I really like the techniques that I used in this manicure, even though the execution was not perfect. Sometimes that's just the way it goes - necessity is the mother of invention, so this is one of those times when I had to come up some ideas really quickly to cover up an old chipping mani with something presentable. They turned out to be pretty cool ideas that I hope to use again in the future!
Sunday, December 23, 2018
Red Metallic Christmas Mani
Labels:
Dotting,
Impromptu Mani,
Occasion,
red,
tape technique
Sunday, December 16, 2018
Ice Crystal Mani using Nicole by OPI 'Rich in Spirit' and China Glaze 'Snow Globe'
Today I have another 'Project Polish' manicure to share. This mani uses 2 of my 'Project Polish' polishes: Nicole by OPI 'Rich in Spirit' and China Glaze 'Snow Globe'. I'm calling it the 'Ice Crystal' Mani:
Polishes
Used
|
Stamping
Plate Used
|
Nicole
by OPI 'Rich in Spirit'
|
Bundle
Monster Winter Kingdom -
|
China
Glaze 'Snow Globe'
|
Plate
BM-XL485
|
Konad
white stamping polish (not shown)
|
 |
| Ice Crystal Mani - Thumb Close-up |
 |
| Ice Crystal Mani - Ring, Middle, and Index fingers |
Labels:
Basic Stamping,
blue,
Bundle Monster,
China Glaze,
glitter,
Konad,
Nail Stamping,
Nicole by OPI,
Project Polish,
Seasonal
Sunday, December 9, 2018
Reveal Mani with Multi-Coloured Shatter Base
Today I have what I like to call a 'Reveal Mani' to share. I use the term reveal mani, to describe a manicure where I start with a base decorated with an abstract print or pattern, and then stamp a negative space image over it to reveal the patterned base as abstract patterned shapes.
Below, I have a cool close-up shot of the Holographic glitter polish that I used, 'Afterhours'. The lighting and angles that I used for the manicure photos above didn't capture the beauty of the polish, so I wanted to share a photo that did.
For this manicure, I started with a white base and then used 3 different shatter polishes in turquoise, gold, and blue, to create a multi-coloured abstract look. Then, to add a bit of sparkle, I added a holographic glitter polish to my ring finger. Below I have a picture of the base before the stamping.
I stamped over this base using black stamping polish and 2 different negative space images form Messy Mansion's Lily Anna Plate LA07. Overall, I really like how the circle and square pattern on my index and middle fingers turned out, but I had a little bit of trouble with the star image. Images with lots of negative space can be tricky to pick up since there's so much more area to fill with polish, which increases the chances of not picking all of it up cleanly. I wasn't in the mood to try multiple times to ensure perfect image transfers, so I just left well enough alone. For the most part, the star images look pretty good, but they are not as clean and crisp as I would like.
 |
| Polishes Used |
|
Polishes
Used
|
|
China
Glaze 'White on White'
|
|
OPI
'Turquoise Shatter'
|
|
Nicolie
by OPI 'Gold Texture'
|
|
OPI
'Blue Shatter'
|
|
Maniology
'Straight Up Black' Stamping Polish
|
|
Urban
Outfitters 'Afterhours'
|
|
Plate
Used: Lily Anna Plate LA07
|
 |
| Close shot of 'Afterhours' |
Labels:
Basic Stamping,
Bundle Monster/Maniology,
China Glaze,
Holographic,
Lily Anna,
multi-coloured,
Nicole by OPI,
OPI
Wednesday, December 5, 2018
Glitter Mani using Nicole by OPI 'Rich in Spirit'
Today I have a quick glitter mani to share using one of my 'Project Polish' polishes: Nicole by OPI's 'Rich in Spirit', and a glitter polish that I'm thinking of adding to the project:
For a simple gliter mani, I kind of like the way the colours work together!
The glitter is called 'Paparazzi', and it's by Claire's Cosmetics, from their Splatter Effect Collection. I used the teal version of this polish called 'Flashing Lights' in my 'Blue and White Splatter Manicure'.
 |
| Polishes Used: 'Paparazzi' and 'Rich in Spirit' |
Labels:
blue,
Claire's Cosmetics,
glitter,
Nicole by OPI,
Project Polish
Monday, December 3, 2018
Christmas Glitter Mani
Today's manicure represents one of the few times that I've recreated a manicure in the last few years. I've actually been planning to recreate this mani for almost one year now. I'll get in to that later, but first, here is the picture:
|
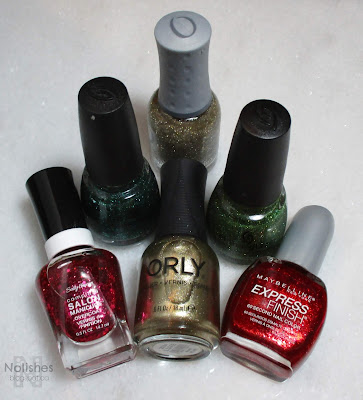
Polishes
Used
|
|
|
Sally
Hansen Complete Salon Manicure 'Strawberry Shields'
|
China
Glaze 'Pine-ing For Glitter'
|
|
Orly
'Halo'
|
Orly
'Luxe'
|
|
China
Glaze 'This is Tree-mendous'
|
Maybelline
Express Finish 'Red Comet'
|
I wore this look to my office holiday gathering last year, and received lots of compliments. At the time, I wasn't updating my blog and as a result, I didn't have all of my equipment ready to even take a picture that could be used for the blog at a later time. I hoped to get everything set up again so that I could post the mani, but of course, during the busy holiday season I didn't get a chance to do that.
So, I decided that I would try to recreate the mani at a later time and post it then. Originally I was hoping for right after Christmas, but then I was busy with all of the Boxing Week sales. By the time things settled down, it was too late to do a Christmas manicure that season! I decided to put the polishes aside, and wait until next Christmas to recreate and post the mani. So finally, after a year of anticipation - I've completed my mission! LOL!
Even though it is essentially a basic glitter mani, I really like how it turned out. It's fun and funky because of the colourful glitters, yet there's a classic charm to it as well due to the traditional Christmas colours.
As for the technical aspects of the mani, I used 3 coats of the dark green glitter 'Pine-ing For Glitter' on my pointer finger, one coat of orly 'Luxe' as a base and one coat of Orly 'Halo' on my middle finger, two coats of Maybelline 'Red Comet' as a base, and once coat of Sally Hansen -Strawberry Shields' on my thumb and ring fingers, and two coats of China Glaze 'This is Tree-mendous' on my pinky. I used a peel off base coat to aid with removal, and a glossy quick-dry top coat on top to smooth and shine the glitters.
Now that I've completed the mani, I can finally put the polishes away... but now that I've blogged about this and have the details here, I'm inspired to maybe try to make this my Christmas tradition mani going forward! We'll see how that works out, and how long the polishes last, but that definitely sounds like a fun tradition to start, especially after the quirky story of why I've worn the same manicure two Christmas seasons in a row!
Labels:
China Glaze,
Do-over,
glitter,
Maybelline,
multi-coloured,
Occasion,
Orly,
Sally Hansen
Subscribe to:
Comments (Atom)


