Showing posts with label Orly. Show all posts

Sunday, December 26, 2021

Christmas Glitter Mani 2021

I fell behind with posting, but I really wanted to get this Christmas Mani up on the blog (even though there are a few older manis that I have yet to post! 😅), as it's becoming a bit of a tradition for me to do this same mani at Christmas-time:

Christmas Glitter Mani 2021

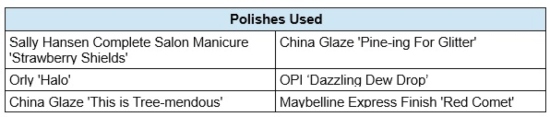
Polishes Used Christmas Glitter Mani 2021

I talked about the first two times that I did this manicure in this post from December 2018. I'm pretty sure that this is actually the fourth time I re-created this mani, as I distinctly remember wearing it during the holidays in 2019, however, it looks like I didn't take any pictures of it that year.

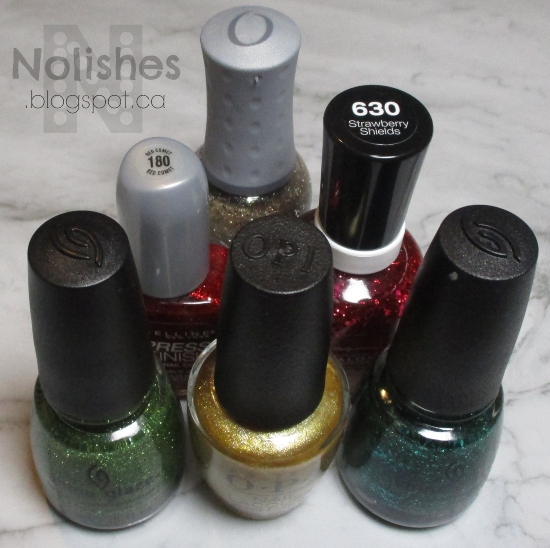
One change that I made from the original version, is that I am using a different gold base polish for my middle finger. In the first two versions I used Orly 'Luxe' as the base coat, which is a bit more of a true gold colour. This year (and I think last year too), I started using OPI 'Dazzling Dew Drop', which is a bit more of a brassy, yellow-toned gold. I think that this shade of gold works a little better with this bright, playful look. For both versions, I used Orly 'Halo' as the glitter topper over the gold polishes.

Christmas Glitter Mani 2021 - Polishes

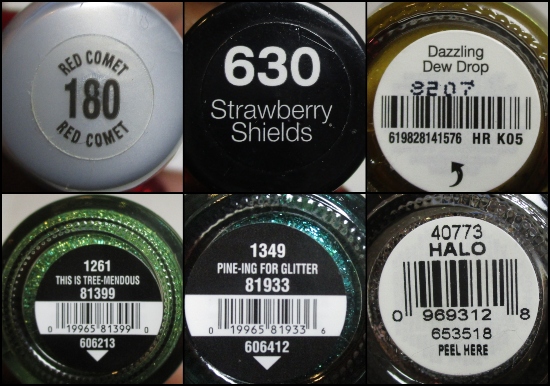
Polishes Used - Label Shots

Once again, I love how it turned out! This manicure was so much fun to wear, as it instantly put me in a festive mood!  

Happy Holidays to all!

Wednesday, July 15, 2020

Blue, Gold and Orange Skittles Mani featuring Sally Hansen Pacific Blue


As discussed in my last post, I managed to do another skittles manicure! This mani features the iconic original version of Sally Hansen Xtreme Wear 'Pacific Blue'. This polish caused quite a stir in the nail polish world when it was reformulated back in 2014. The original version was super popular, and much beloved in nail polish circles, and has now become somewhat of a collector's item. I've had the bottle in the photo above for several years now - I'm estimating that I may have purchased it anywhere between 7 to 10 years ago!

In the manicure, I used Pacific blue on both my thumb and ring finger. I chose complementary shades of light blue, gold and orange to complete the look.

Morgan Taylor ‘No Filter Needed’,  Sally Hansen Xtreme Wear ‘Pacific Blue’,  Rimmel 60 Seconds ‘Dazzle’  and Orly ‘Melt Your Popsicle’

Polishes Used
Morgan Taylor ‘No Filter Needed’
Sally Hansen Xtreme Wear ‘Pacific Blue’
Rimmel 60 Seconds ‘Dazzle’
Orly ‘Melt Your Popsicle’

I really like how this manicure turned out. The colour combination is fun and energetic, and works really well for the summer! I'm happy I was able to throw a neon polish into the look, with Orly's neon orange 'Melt Your Popsicle', as well as a bit of bling with Rimmel's gold shimmer polish 'Dazzle'. 

Morgan Taylor ‘No Filter Needed’,  Sally Hansen Xtreme Wear ‘Pacific Blue’,  Rimmel 60 Seconds ‘Dazzle’  and Orly ‘Melt Your Popsicle’

Monday, July 13, 2020

Metallic (Partial) Rainbow Skittles Mani

Metallic Rainbow Skittles Mani created using Orly 'Crawford's Wine', Orly 'Flicker', Revlon 'Hypnotize', Sally Hansen 'Emerald City', and Sally Hansen 'Blue It'

It's been a while since I got a chance to feature some new nail art on this blog. It's been difficult lately to find time to sit down and create a design and then execute it. As a result, I've been doing a lot of simple (one-polish) manicures. I decided to try to dip back into creativity, with one of the simplest forms of nail art - the skittles mani.  I wanted to do something bright and cheery, so I decided on the Metallic Rainbow Skittles mani photographed above.

Bottle shot of the 5 polishes used for the Metallic Rainbow Skittles Mani: Orly 'Crawford's Wine', Orly 'Flicker', Revlon 'Hypnotize', Sally Hansen 'Emerald City', and Sally Hansen 'Blue It'

Polishes Used
Orly 'Crawford's Wine'
Orly 'Flicker'
Revlon Brilliant Strength 'Hypnotize'
Sally Hansen Xtreme Wear  'Emerald City'
Sally Hansen Xtreme Wear  'Blue It'

I love how this mani turned out - it is so fun and colourful, that I'm inspired to do more! However, I think I may just stick with skittles manicures for the time being, because they are relatively quick and easy to accomplish. Who knows, maybe I'll even be able to throw in the odd manicure with other embellishments, and/or some stamping here and there... we'll see where this goes!

Label shots of the 5 polishes used for the Metallic Rainbow Skittles Mani: Orly 'Crawford's Wine', Orly 'Flicker', Revlon 'Hypnotize', Sally Hansen 'Emerald City', and Sally Hansen 'Blue It'

Thursday, July 9, 2020

Swatch: Orly 'Torrid'

 Ruby red shimmer metallic polish Orly 'Torrid'

Orly 'Torrid' is truly one of the most gorgeous red polishes that I own! It is the perfectshade of ruby red, with a finely milled shimmer that makes the polish appear to glow from within. This polish is a classic, and can be worn year-round. During the holidays it can be quite festive, however, during the rest of the year it gives such a sophisticated, yet subtly edgy look to a manicure. 

Orly 'Torrid' - Label Shot

As you can see from the metallic red comparison swatches below, 'Torrid' (#6) is very similar to CoverGirl 'Forever Festive' (#5), and A England 'Perceval' (#7). Perceval is actually a tad cooler toned, but they are still quite close. 

1) China Glaze - Mommy Kissing Santa 2) OPI - I'm Not Really a Waitress 3) Zoya - Isla 4) China Glaze - Long Kiss 5) Cover Girl - Forever Festive 6) Orly – Torrid 7) A England - Perceval 8) OPI - An Affair in Red Square 9) OPI - A Little Guilt Under the Kilt 10) China Glaze  - Cranberry Splash 11) China Glaze  - Just Be-Claws 12) Sinful Colors - Sugar Sugar

Cover Girl 'Forever Festive', Orly 'Torrid', and A England 'Perceval'

Overall, I would have to say this is an excellent nail polish. The shade is gorgeous, the finish is mesmerizing, and it performs quite well in terms of application and dry-time. I absolutely adore it!

Monday, December 3, 2018

Christmas Glitter Mani

Today's manicure represents one of the few times that I've recreated a manicure in the last few years. I've actually been planning to recreate this mani for almost one year now. I'll get in to that later, but first, here is the picture:

Glitter mani in traditional Christmas colours using Sally Hansen CSM 'Strawberry Shields', China Glaze 'Pine-ing For Glitter', Orly 'Halo', Orly 'Luxe', China Glaze 'This is Tree-mendous', and Maybelline 'Red Comet'


Polishes Used
Sally Hansen Complete Salon Manicure 'Strawberry Shields'
China Glaze 'Pine-ing For Glitter'
Orly 'Halo'
Orly 'Luxe'
China Glaze 'This is Tree-mendous'
Maybelline Express Finish 'Red Comet'


I wore this look to my office holiday gathering last year, and received lots of compliments. At the time, I wasn't updating my blog and as a result, I didn't have all of my equipment ready to even take a picture that could be used for the blog at a later time. I hoped to get everything set up again so that I could post the mani, but of course, during the busy holiday season I didn't get a chance to do that. 

So, I decided that I would try to recreate the mani at a later time and post it then. Originally I was hoping for right after Christmas, but then I was busy with all of the Boxing Week sales. By the time things settled down, it was too late to do a Christmas manicure that season! I decided to put the polishes aside, and wait until next Christmas to recreate and post the mani. So finally, after a year of anticipation - I've completed my mission! LOL!  

Sally Hansen CSM 'Strawberry Shields', China Glaze 'Pine-ing For Glitter', Orly 'Halo', Orly 'Luxe', China Glaze 'This is Tree-mendous', Maybelline 'Red Comet'

Even though it is essentially a basic glitter mani, I really like how it turned out. It's fun and funky because of the colourful glitters, yet there's a classic charm to it as well due to the traditional Christmas colours.

As for the technical aspects of the mani, I used 3 coats of the dark green glitter 'Pine-ing For Glitter' on my pointer finger, one coat of orly 'Luxe' as a base and one coat of Orly 'Halo' on my middle finger, two coats of Maybelline 'Red Comet' as a base, and once coat of Sally Hansen -Strawberry Shields' on my thumb and ring fingers, and two coats of China Glaze 'This is Tree-mendous' on my pinky.  I used a peel off base coat to aid with removal, and a glossy quick-dry top coat on top to smooth and shine the glitters.

Photos of Christmas Glitter Manicure using traditional Christmas colors

Now that I've completed the mani, I can finally put the polishes away... but now that I've blogged about this and have the details here, I'm inspired to maybe try to make this my Christmas tradition mani going forward!  We'll see how that works out, and how long the polishes last, but that definitely sounds like a fun tradition to start, especially after the quirky story of why I've worn the same manicure two Christmas seasons in a row!

Sunday, October 7, 2018

Navy Blue and Gold Mani using OPI 'Holidazed Over You'

This manicure was created using various images from Lina Nail Art Supplies Stamping Plate 'You're a Damasque! - 01'.  I really like how the look turned out:

Images from Lina Nail Art Supplies 'You're a Damasque - 01' stamped in gold over navy blue jelly base, OPI 'Holidazed Over You'

I'm starting to realize that I don't really enjoy wearing dark polishes on their own these days. However, I really love how dramatic they look when paired with silver or gold metallic stamped images. The dark base provides the perfect high contrast background for the beautiful metallic images.

I did something similar with my 'Burgundy and Gold Mani', as well as my 'Navy and Silver Dot Design Mani'.

Here are some more images of the finished look:

various shots of blue and gold manicure

For this manicure, I got to use yet another untried polish - OPI 'Holidazed Over You'. 'Holidazed...' is a very dark navy blue jelly from the OPI 2017 Holiday collection: 'Love OPI, XOXO'. The polish is absolutely stunning. I love the finish! The highly pigmented navy blue hue combined with the transparent jelly formula give the polish so much dimension. It looks super squishy and super shiny - like polished onyx, or a pool of ink.  

Orly 'Luxe', Sally Hansen Color Foil 'Liquid Gold', and OPI 'Holidazed Over You'
Polishes Used

Polishes Used
Orly 'Luxe'
Sally Hansen Color Foil 'Liquid Gold'
OPI 'Holidazed Over You'

Wednesday, September 12, 2018

Blue and Gold Mani with Water Marble Decal Accent

Well, hello!  It's been a while, but I'm finally back.  I really can't believe how quickly time flies - one minute you're in the groove of updating your blog, and the next, over 2 years have passed since you last posted! As I explained in my 'Nail Polish Declutter' post, I had been taking a hiatus from nail art. I recently decided to try to get back into it again, so I'm restarting this blog to journal my journey.

Manicure with electric blue and gold nail polish, and purple, grey, teal, and blue, water marble decal accent nail with gold and electric blue dots.
Blue and Gold Mani with Water Marble Decal Accent

The picture above is a quick manicure I did using two Orly polishes from my collection that caught my eye ('Luxe' and 'Sweet Peacock'), and one of the water marble decals I made in my 'Water Marbling Made Easy' post over 3 years ago (yes, it was one of the exact same decals I made that long ago - they really hold up well when carefully stored away between sheets of paper towel!). To jazz up the look, I made a diagonal stripe of gold on the thumbnail, and used a dotting tool to make contrasting dots and rings on some of my nails. Not bad for my first attempt at nail art in what feels like ages!

I actually did this look a few weeks ago, but it took me a while to post it. I'm working with all different equipment from the last time I posted, so it took some time to get all my files, gear and programs together to be able to start blogging again.

Orly 'Luxe' and 'Sweet Peacock'
Polishes Used: Orly polishes 'Luxe' and 'Sweet Peacock'
All in all, I'm happy with the way this look turned out. I'm also really looking forward to posting new looks in the future!

Sunday, July 19, 2015

Modified Anniversary Mani

Today I have a modified version of my 'First Blog Anniversary' manicure from my last post:

Manicure featuring neutral tones jazzed up with stamping in gold on the middle finger, and gold/silver glitter combo on the ring and pink fingers. There is also a clear rhinestone accenting the ring finger.

I toned-down the manicure by changing the thumb, index, and middle fingers to a neutral polish, and then I stamped a design on the middle finger in gold, to tie the whole look together.

Polishes Used
Plate Used
Essie ‘Brides to Be’
Messy Mansion Leadlight Lacquer
Orly ‘Halo’
                           - Plate A01
Sally Hansen Color Foil ‘Liquid Gold’


Essie ‘Brides to Be’, Orly ‘Halo’, and Sally Hansen Color Foil ‘Liquid Gold’

The neutral polish that I used was 'Brides to Be' from Essie's 2015 Bridal Collection. It's a beautiful creamy taupe colour, that looks like a lighter shade of the same colour of my natural nail bed. The glitter polish is Orly 'Halo' from their 2012 'Naughty or Nice' holiday collection. It contains a mix of gold and silver glitter particles. The metallic gold polish that I used for stamping is one of my most used polishes - Sally Hansen Color Foil 'Liquid Gold'.

Overall, I'm really happy with the way that this manicure turned out. It gives a nice 'muted bling' effect that looks both casual, and elegant all at once. Also, it's always nice to be able to get two looks out of one manicure!

Tuesday, July 14, 2015

My First Blog Anniversary!

Today, I decided to do an extra sparkly manicure to celebrate the first anniversary of this blog!

Extra sparkly glitter polish manicure using Orly's 'Halo'
First Anniversary Mani!
The polish I used for this manicure was Orly's 'Halo'. I also added a rhinestone to accent my ring finger. It's a pretty simple look in terms of techniques and embellishments, but this polish delivers so much in the way of sparkle and shine, that the finished look is still really high impact. I absolutely love it!

manicured hand holding the polish used: Orly's 'Halo'
Orly's 'Halo'
I really can't believe that it's already been one year since I started chronicling my passion for nail polish and nail art! It has been so much fun to share something I really enjoy doing with all of you! Thanks so much to anyone who has ever dropped by to check this blog out - I hope that you have enjoyed reading it as much as I have enjoyed writing it!

Sunday, December 28, 2014

The First Noel Mani

Although Christmas is now over, I have another Christmas mani to share with you:

Nail stamping manicure featuring 4 nails painted with a sheer white base polish containing white and silver glitter, and an accent nail with a silver base stamped with a verse of the lyrics to 'The First Noel' in white.
The First Noel Mani
Polishes Used:
Orly 'Peaceful Opposition'
Sally Hansen Insta-Dri 'Silver Sweep'
Konad Special Polish in White

Plate Used:
Moyou London Festive Collection 17

Orly 'Peaceful Opposition', Sally Hansen Insta-Dri 'Silver Sweep', and Konad Special Polish in White
Polishes Used
My nails have been through a lot this past week, with all of the shopping, cooking, cleaning, decorating, and other preparations I had to do this holiday season.  I ended up having to cut and file down several broken nails! I didn't even get a chance to do as many manicures as I would have liked.

This is the main reason why I wanted to continue sharing a few Christmas manicures - to use some ideas I was really excited to try out, but didn't get a chance to do before Christmas. I really didn't want to have to wait a whole year to try these ideas out.  And besides, I figure that if I had actually done a Christmas-themed mani on, or just before Christmas, I would most likely still be wearing it until as late as December 30th (at which point I would probably switch to a New Year's manicure). So either way, I would still be wearing a Christmas manicure after Christmas! LOL!

Nail stamping manicure featuring silver base with the lyrics to 'The First Noel' stamped over the base in white.
The First Noel Mani - Accent Nail

Sunday, December 14, 2014

Swatches from my Black Friday Dollar Polish Haul!!!

Today I have some polish swatches to share from my big 'Black Friday' haul a couple of weeks ago. Originally, I planned not to do a haul post, because sometimes they can be a bit boring. However, I changed my mind because I recently decided to swatch all of the colours that I got during the sale, so I thought that I might as well post the swatches!

As I mentioned in my 'Black Friday Mani' post, I purchased some polishes at Sally Beauty Supply for only one dollar each.  I purchased 23 bottles in total: 5 Finger Paints, 6 China Glazes, and 12 Orlys. Here are pictures of the bottles, and the swatches grouped by brand. The polish names correspond to the bottles' order in the picture from left to right.

Finger Paints:
'Hollywood Decadence', 'Tails of Love', 'Margarita Mambo', 'Mistful Thinking', and 'Kitchy Tangerine'.

Finger Paints Polish from left to right: 'Hollywood Decadence', 'Tails of Love', 'Margarita Mambo', 'Mistful Thinking', and 'Kitchy Tangerine'.

'Hollywood Decadence' is a muted, matte glitter with silver pink and blue, 'Tails of Love' is a textured teal polish, 'Margarita Mambo' is a shimmery lime green, 'Mistful Thinking' is a soft greenish yellow with a matte finish, and 'Kitchy Tangerine' is a slightly reddish orange.

I just love the three bright citrus colours on the right side of the nail wheel: the shimmery lime green, lemon yellow and tangerine orange are all colours that I will definitely enjoy using.  The muted, matte glitter, 'Hollywood Decadence', and the textured teal 'Tails of Love', are a bit off the beaten path compared to my regular tastes, but these kinds of sales are a great opportunity for me to try new things with minimal investment. The glitter might make a nice accent finger for a grey or silver manicure, while the teal reminds me of a mermaid's tail. That could be interesting for an ocean themed mani.

China Glaze:
'Stop that Train!', 'Seeing Red', 'Intelligence, Integrity & Courage', 'But of Corpse', 'Rest in Pieces', and 'Getting to Gnaw You'.

Left to right: 'Stop that Train!', 'Seeing Red', 'Intelligence, Integrity & Courage', 'But of Corpse', 'Rest in Pieces', and 'Getting to Gnaw You'.

China Glaze: 'Stop that Train!' is a metallic red, 'Seeing Red' is a slightly orangey deep red, 'Intelligence, Integrity & Courage' is a soft grey, 'But of Corpse' is a matte textured light green with black speckles, 'Rest in Pieces' is a copper black and holo glitter, and 'Getting to Gnaw You' is a copper glitter with a translucent black base.

For this set of swatches, I know the reds and grey will get a lot of use. I'm also really excited to have obtained the more adventurous Halloween shades on the left at this amazing price. I originally passed on the shades during their initial release, because they aren't polishes that I would use on their own on a regular basis, so I could't justify paying full price for them. However they will be great for nail art, so I'm so happy to have them now! 

With Christmas coming, I can see myself using the green, 'But of Corpse', as a textured tree or wreath. The glitter, 'Rest in Pieces', reminds me of crumpled leaves, and bits of sticks - like if you dropped something on a forest floor in autumn, the little bits of stuff that would stick to it! That might come in handy in a fall themed mani. The last shade, 'Getting to Gnaw You', might actually pass as an edgy, sophisticated year round look with lots of topcoat to even the surface.  It also would look nice as wood, soil, or other natural textures in nail art - like tree trunks, pine cones, acorns, etc.

Orly:
  Darks and Purples
    'Goth', 'Wild Wisteria', 'Royal Velvet', 'Darkest Shadow', 'Close Your Eyes', and 'Blend'

Left to Right: Goth, Wild Wisteria, Royal Velvet, Darkest Shadow, Close Your Eyes, Blend

Goth is a black polish with small silver pieces of glitter, Wild Wisteria is a dark blurple, Royal Velvet is a medium purple/shimmery light blue duotone, Darkest Shadow is a black polish with a dark red fleck, Close Your Eyes is a shiny medium purple/plum, Blend is a greyish, purpley, brown mixed shade

I love all of these colours, and I know they will get a lot of use.  The only one I would normally not buy if it weren't for the great price is 'Close Your Eyes', the medium purple/plum second from the right.  I normally avoid wearing medium purples for a full mani, because I don't think that they compliment my skin tone very well. However, purple is a great colour for nail art, and it will incorporate nicely into a variety of colour schemes.

  Neutrals
     'Pink Nude', 'Orly Platinum', and 'Highlight'

Orly Neutrals: Pink Nude, Orly Platinum, Highlight'Pink Nude' is a sheer light pink, 'Orly Platinum' is a softly metallic white, and 'Highlight' is a light taupe

I don't think you can ever go wrong with neutrals.  On their own, they are timeless, elegant, and great for any occasion.  Also, they are a great foundation for nail art.  

  Brights
     'Hawaiian Punch', 'Hot Tropics', and 'Hook Up'

Hawaiian Punch, Hot Tropics, and Hook Up'Hawaiian Punch' is a fuchsia polish, 'Hot Tropics' is a purply magenta with silver micro-glitters, 'Hook Up' is a bright yellow with a soft metallic finish

The yellow polish, 'Hook Up', will be fantastic either as a full mani, or incorporated into nail art. I'm more likely to use the pinks in nail art though, just because I find them a little boring on their own. That's not to knock the polishes, because they are nice shades. However, I generally find it hard to get excited about dark pinks and reds simply because they are probably the most common nail polish colours. Don't get me wrong, they will get used - it's just that I prefer to use more creative approaches with these colours in order to freshen up the look.

And so, that's the end of of what is probably one of my longest ever posts! And here we have yet another reason why I'm not usually a big fan of haul posts - they take so long to do! LOL!

Anyways, I'm planning to do holiday-themed nail art for the next couple of weeks. Stay tuned to see what I come up with!
Monday, December 8, 2014

Golden Snowflakes over Darkest Shadow

This is an impromptu mani that I wore last Thursday and Friday, following my 'Red and Gold Heart Mani'. I fell a bit behind with my posts, so I'm only putting it up now.

Nail stamping manicure featuring gold snowflake and nordic sweater prints, stamped over a black polish with deep red flecks of shimmer.
Golden Snowflakes over Darkest Shadow

The base colour I used for this manicure was Orly 'Darkest Shadow' from their fall 2014 Smoky collection. This was one of the polishes that I picked up in my Black Friday haul for only a dollar. The stamping polish was my go-to gold, Sally Hansen Color Foil 'Liquid Gold'. The stamping plate I used for the full nail designs was Moyou London Festive Collection plate 06, and the snowflake decals were from Moyou London Festive Collection plate 02.

Here's the story behind my colour choice for this manicure. I was in the mood to use some of my wintry/holiday plates, but at the time, I wasn't completely ready to go full Christmas just yet. I usually don't get into the holiday spirit until it's about 2 or 3 weeks before Christmas.  So I chose to use my Moyou London sweater-themed plate, but instead of using the typical grey, white, and blue for a winter sweater, or red and green for a Christmas sweater, I decided to try something a little different.

Orly 'Darkest Shadow', and Sally Hansen Color Foil 'Liquid Gold'
Polishes Used
The first polish I decided on was 'Darkest Shadow', which I chose because I wanted to try out one of my new polishes. Then, I picked 'Liquid Gold' to stamp with because it was a contrasting colour that would look nice with the first polish. It's funny how much of an impact the colour choice has, because the end result doesn't feel wintry, Christmas-y, or even Sweater-y! I'm not even sure what it reminds me of... perhaps it looks a little like the type of pattern you would see on a fancy ornament? Or maybe ninja stars floating through the night?

I'm kind of indifferent to the end result. I don't hate it, but I'm not in love with it either. It's fun experimenting, but sometimes you walk away from an experiment with knowledge not to try something again! I think that these plates really do need appropriate colour schemes to bring out the best in the designs - ie you can't avoid winter/Christmas/sweater colour schemes. I think that instead of 'Darkest Shadow' with its deep red fleck in a black base, if I had just used a deep red polish, that would even be an improvement. It would make it more reminiscent of an ornament, and then the designs would make sense in the context of that colour scheme.

One good thing that came of this is that now I'm in the mood for Christmas nails!!!  I think I just may do only Holiday designs from here on out. I'm so excited!

Thursday, August 28, 2014

Peach and Copper Glitter Gradient Mani

After all of the bright colours of my last two 'Flamingo Themed Mani's', I was in the mood for a change. I decided that I wanted this manicure to be soft and pretty. This is what I came up with:

Peach and Copper Glitter Gradient Nail Stamping Manicure (Right), stamped with and image from Cici and Sisi Plate 02. Polishes used: Sally Hansen Triple Shine 'Dream Sequins', and Sally Hansen Color Foil 'Rose Copper'
Peach and Copper Glitter Gradient Mani - Right

This was my fist time doing a glitter gradient, and I have to say that I am quite pleased with the results! I definitely want to try this again.

The glitter that I used for the gradient, and the accent nail, was Sally Hansen Triple Shine 'Dream Sequins' (I love that name!).  I also used Sally Hansen Color Foil 'Rose Copper' both as a base colour on my ring fingers, as well as for the stamped design on my middle fingers. The stamping image I used was from Cici & Sisi plate 02. I remember how in one of my earlier posts (for the 'Muted Mani Fail'), I tried to stamp with a 'Color Foil' and I was having a little trouble with it. I'm pleased to say that I had no such troubles with this manicure! The stamp came out perfectly! This just goes to show how temperamental stamping can be - results can change from plate to plate, and from polish to polish.

I used Orly 'First Kiss' as the base colour for all of my fingers except for my ring finger. Here's one last look at the manicure, this time using my left hand.

Peach and Copper Glitter Gradient Nail Stamping Manicure (Left), stamped with and image from Cici and Sisi Plate 02. Polishes used: Sally Hansen Triple Shine 'Dream Sequins', and Sally Hansen Color Foil 'Rose Copper'
Peach and Copper Glitter Gradient Mani - Left