Monday, March 30, 2015

Crackle Polish Challenge #20 - Blue Crackle Dotticure

2015 Crackle Polish Challenge Manicure #20

Featured crackle application:
Using crackle polish for a dotted manicure

Featured crackle polish:
OPI 'Blue Shatter'
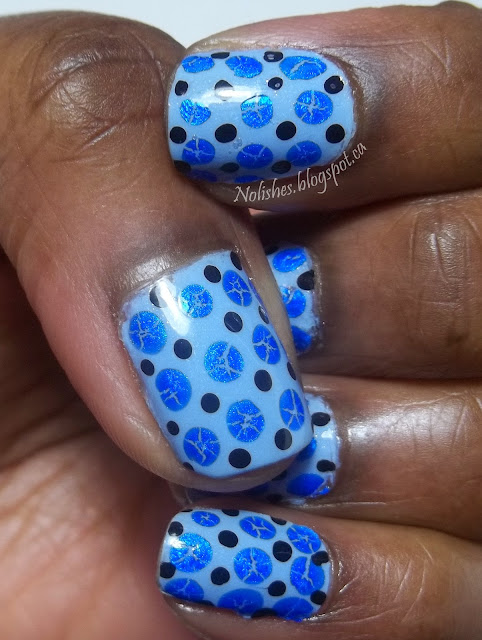
Manicure using a dotting tool to create dots in 2 sizes and 2 colours. The larger dots were made using blue crackle polish to give an interesting effect, and the smaller dots were made with black polish.
Blue Crackle Dotticure
Polishes Used:
Konad Special Polish in Black
OPI 'Blue Shatter'
Essie 'Rock the Boat'
Konad Special Polish in Black, OPI 'Blue Polish', and Essie 'Rock the Boat'

I'm really pleased with the way this dotted crackle effect turned out! The cracks on the blue shimmery dots kind of resemble the edges of the facets on the surface of a cut blue sapphire. It's like there are small gemstones all over my nail!

The only thing I was a little disappointed with is that I had trouble getting the crackle polish to work on 2 of my nails. The very first attempt with crackle dotting was done on the 3 fingers prominently displayed in the picture above. I was originally going to do something else with my other two fingers, but changed my mind (more on that later). When I went back to dot the remaining 2 fingers, for some reason, I couldn't get the polish to crack any more! I even went back and started from scratch 3 separate times, but could not recreate the effect.

When I first tried it, I didn't put much thought into it - I was experimenting, so I didn't pay too much attention to my technique. I just put a small blob of polish on the back of a piece of plastic, and started dotting. It worked fine. When It came out beautifully, and I later decided that wanted to continue doing it, I just could not recreate the results.  It was so frustrating! I may have to try again with a different polish. Here are some additional shots of the manicure:

Manicure using a dotting tool to create dots in 2 sizes and 2 colours. The larger dots were made using blue crackle polish to give an interesting effect, and the smaller dots were made with black polish.

On my left hand, I did a different crackle mani using the same colours.  Originally, my plan for both hands was to do a stamped hounds-tooth design (from Bundle Monster plate BM-322) on my middle and ring fingers, and use the dot design only for the thumb, index and pinky fingers.  I painted my nails with 'Rock the Boat', and did the crackle stamping on the accent fingers of both hands. I started doing the dots on the right hand. When I finished, I didn't like the way the 2 designs looked together, so I decided to nix the hounds-tooth and just do the same dot design on the ring and middle fingers (as mentioned above, this is where it all started to go wrong!).

When I got to my left hand, I didn't want to remove the hounds-tooth because I liked the way it looked, so I just decided to do another design on the remaining three fingers that worked with the hounds-tooth pattern. Here's the finished result:

Alternate Version Blue Crackle Mani
Using BM-322
Since this manicure also features a crackle polish technique that I am now using for the second time, I think I should go ahead and acknowledge it.  I'm calling it the 'Crackle Curve'. It's the sweep of crackle nail polish that starts at or near the base of one corner of the nail, and ends up at the top corner of the opposite side of the nail. The other time I used this technique was in the Pink, Red, and White Valentine's Day Mani. So to make it official:

2015 Crackle Polish Challenge Manicure #20.5 - Blue Houndstooth Crackle Manicure:

Featured crackle application:
The 'Crackle Curve' technique

Featured crackle polish:
OPI 'Blue Shatter'

Stay tuned for my next post which will be the final instalment of the 2015 Crackle Polish Challenge!
Sunday, March 29, 2015

Crackle Challenge Out-take: Dissolved Crackle Experiment

Today I have a failed crackle nail polish experiment to share:

Collage showing the results of a manicure experiment in which a manicure with an orange base covered in royal blue crackle top coat, was subjected to various attempts to remove sections of the polish (using nail polish remover), in a way that was pleasing to the eye - the experiment failed.
Failed Crackle Experiment:
Dissolved Crackle
As part of the 2015 Crackle Polish Challenge, I've been trying to find creative ways to use crackle polish, in order to find alternatives to the the traditional crackle combo (like the one pictured in the upper left quadrant in the collage above). Sometimes, the ideas work out, and result in beautiful manicures. Other times, the results aren't so pretty - today's manicure falls into this category!

Originally I wasn't going to post this, but I changed my mind. I still think dissolving parts of a crackle mani is a good idea, it just take some skill and technique to properly execute - which I haven't yet acquired! I'm going to have to do a bit of research to figure this out.

I tried to remove the polish using a cotton swab soaked in nail polish remover. I found it really hard to control the final shape of the dissolved area using this method, which is why the results are so messy looking. One thing I do like though, is how a border of the orange base colour is left around all of the clear sections where the polish was removed - it's a pretty interesting effect.

The polishes used for the experiment were Essie 'Capri', and Sally Hansen Crackle Overcoat 'Distressed Denim'.

Sally Hansen Crackle Overcoat 'Distressed Denim', and Essie 'Capri'
Polishes Used
There are only 2 more bottles of crackle polish left, in the Crackle Polish Challenge - I'm so excited to be almost at the finish line!

Tuesday, March 24, 2015

Crackle Polish Challenge #19 - Diagonal Stripe Themed Mani

2015 Crackle Polish Challenge Manicure #19

Featured crackle application:
Using manicure tape to mask areas of a crackle combo to create diagonal lines of clear polish.

Featured crackle polish:
OPI 'Red Shatter'

Nail stamping manicure featuring all nails covered with red shatter polish over a gold base. On the thumb and ring finger, pieces of nail art tape were used to mask randomly placed diagonal lines, so that when removed it would leave lines of clear polish. The remaining fingers are stamped with a nail stamping pattern featuring randomly place thin white lines.
Diagonal Stripe Themed Mani
Polishes Used:
Quo by Orly 'Filthy Rich'
OPI 'Red Shatter'
Konad Special Polish in White

Plate Used:
Moyou London Holy Shapes Collection - 07

Quo by Orly 'Filthy Rich', OPI 'Red Shatter',  and Konad Special Polish in White
Polishes Used
I like how my thumbnail turned out in this manicure. The tape removed cleanly, and the way it breaks the shatter polish into sections is a pretty cool effect.  Overall, I'm kind of on the fence about this manicure - I don't necessarily hate it, but I don't love it either. Oh well, the beautiful thing about nail polish is that you don't have to wear it forever!  LOL!

Monday, March 23, 2015

Crackle Polish Challenge #18 - See-Through Stripe Mani

2015 Crackle Polish Challenge Manicure #18

Featured crackle application:
Using manicure tape to section off strips of a crackle combo to create alternating stripes of clear polish, and crackle polish.

Featured crackle polish:
OPI 'Pink Shatter'

Crackle polish manicure featuring thick alternating stripes of sheer pink, and a light pink/medium pink crackle polish combo on thumb and ring finger. Index and pinky are solid sheer pink each with a pink nail art gemstone placed at the base of the nail. The middle finger is completely covered in the pink on pink crackle combo.
See-Through Stripe Mani
I'm back with another instalment of the 2015 Crackle Polish Challenge. It was really nice to have a little break from crackle manicures, but I'm really looking forward to finishing the last 4 manicures in this series (that's 4 including today's).

It seems to be a big trend right now in the nail art community to include sections of clear polish in manicures.  So to finish off the Crackle Challenge, I've been thinking of ways to combine today's trend with crackle polish, a big trend from about 4 years ago.

I like how this manicure turned out.  I really like the minimalism.  It doesn't feel like a crackle mani, it feels more like a clear mani with a little embellishment.  I think this really updates the crackle look by toning it down.

Polishes Used: 
China Glaze 'Pinking out the Window' (Spring 2015 'Road Trip' Collection)
OPI 'Pink Shatter'
Quo by Orly 'Soft Spot'
China Glaze 'Pinking out the Window', OPI 'Pink Shatter', and Quo by Orly 'Soft Spot'

Stay tuned for my next post, which will also feature a fusion of the clear polish trend of today, and the crackle polish trend of the recent past!

Wednesday, March 18, 2015

Chartreuse Mani

Today I have a post-St. Patrick's day mani to share with you. It features one of my favourite colours, chartreuse. Chartreuse is a combination of green and gold, so it lends itself perfectly to this subtle, elegant interpretation of St Patrick's day nails!

A manicure featuring chartreuse nail polish in 2 different ways. The thumb, index, and pinky are covered in a metallic chartreuse polish, while the ring finger and middle finger feature a chartreuse glitter polish.
Chartreuse Mani

Polishes Used:
Illamasqua 'Peruzzi'
Borghese Rapido 'Limoncello'
Illamasqua 'Peruzzi', and Borghese Rapido 'Limoncello'

Overall, I really like this mani. It's simple, but I love how well the two polishes match each other. I love having different versions of the same colour - it's such a nice, understated look to pair identical shades of polish in different finishes.

I plan to continue with the Crackle polish challenge for my next few manicures.  I have 4 crackle polishes left to complete the challenge: 2 blue crackles, a red one, and a pink one.  Stay tuned to see what I come up with!

Monday, March 16, 2015

St. Patrick's Day Manicure

For today's manicure, I ended up taking a little break from the Crackle Polish Challenge in order to squeeze in something for St Patrick's Day.

Nail stamping manicure featuring kelly green nails, stamped with gold, and forest green St Patrick's day related imagery.

Polishes Used:
Maybelline Color Show 'Walk in the Park'
Sally Hansen Color Foil 'Liquid Gold'
OPI 'Green-Wich Village'

Plate Used:
Moyou London Festive Collection - 21

Maybelline Color Show 'Walk in the Park', Sally Hansen Color Foil 'Liquid Gold', and  OPI 'Green-Wich Village'
Polishes Used
I really love how this manicure turned out! I can't believe how gorgeous the kelly green shade of the base polish ('Green-Wich Village') is, and I'm pleased with how the stamping turned out! Also, it was so much fun to be able to concentrate solely on what colours and images I wanted to use, and not having to worry about trying to work crackle texture into the design, as I've been doing for my last 17 manicures!

I really hope that I can get one more St Patrick's Day mani in before the 17th, because I have a couple other green polishes in mind that I think would be perfect!

Additional shots of the Green, and Gold St Patrick's Day Manicure
St Patrick's Day Mani - Additional Shots

Thursday, March 12, 2015

Crackle Polish Challenge #17 - Pink, Grey, and White-Gold Half-Moon Crackle Dotticure

2015 Crackle Polish Challenge Manicure #17

Featured crackle application:
Using crackle polish as the background texture for a dotticure

Featured crackle polish:
China Glaze Crackle Glaze 'Cracked Concrete'

A nail stamping manicure using crackle nail polish as the background for a dotticure to give a 'studded leather' effect. All nails except the ring finger feature pink half-moons at the base, and grey crackle polish over a pink base on the upper portion. The grey crackle polish is also covered in white gold dots. The ring finger features white gold glitter over the whole nail.

Polishes Used:
Essie 'Jiggle Hi Jiggle Low'
OPI 'Spark De Triomphe'
OPI 'Makes Men Blush'
China Glaze Crackle Glaze 'Cracked Concrete'

Essie 'Jiggle Hi Jiggle Low', OPI 'Spark De Triomphe', OPI 'Makes Men Blush', and China Glaze Crackle Glaze 'Cracked Concrete'

I really love the way 'Spark De Triomphe' and 'Jiggle Hi Jiggle Low' match each other. The white gold is such a beautiful colour, it's great to have it in both a glitter and a metallic version! If this weren't the crackle challenge, this manicure would look beautiful with 'Jiggle' covering the entire upper portion of the nail, above the pink half moons.

I used circular paper reinforcements to serve as a guide for the half-moons.  Next time, I may try lowering them a bit, as I feel the half-moons are just a touch too large.

Overall, I'm happy with the way this manicure turned out.  In real life, it looks pretty cool on my hands. The grey crackle with the dots over it reminds me of studded leather - it's a pretty cool effect!

Tuesday, March 3, 2015

Crackle Polish Challenge #16 - Blue and Bronze 'Barely There' Crackle Mani

2015 Crackle Polish Challenge Manicure #16

Featured crackle application:
Using wisps of crackle polish to embellish the nail

Featured crackle polish:
China Glaze Crackle Glaze 'Cracked Medallion'

Nail stamping manicure featuring light blue polish on all nails except for ring finger, stamped with a medium blue thin lattice pattern, and then embellished with wisps of bronze crackle polish. The ring finger is painted with bronze polish, and covered in bronze glitter.
Barely There Crackle Mani

China Glaze Crackle Glaze 'Cracked Medallion', China Glaze 'At Vase Value', OPI 'Brisbane Bronze', OPI 'Can't Find my Czechbook', and Essie 'Summit of Style'

Polishes Used:
China Glaze Crackle Glaze 'Cracked Medallion'
China Glaze 'At Vase Value'
OPI 'Brisbane Bronze'
OPI 'Can't Find my Czechbook'
Essie 'Summit of Style'

Nail Stamping Plate Used:
Konad m57


This manicure was really quick and easy to do.  The wisps of crackle polish didn't end up looking exactly as I had envisioned them, but I still think the end result works. Overall, there's not much else to say about this one, so I think I'll keep this post short and to the point!