Showing posts with label Misa. Show all posts

Sunday, August 4, 2019

Jelly Polishes for Leadlight Manicures

I started writing this post on January 29 2015, and it has been in my Draft folder ever since! I wanted to go through my entire collection and compile a large list of my jelly polishes and take pictures so that I could catalogue them for easy retrieval when needed. I realize now that I'm probably never going to get around to doing that! With my previous post on the Essie 'Glazed Days' Collection, I thought I would finally just publish this post, even though it is not a comprehensive list, as the information may still be useful, since some of these polishes are still available.

Collage featureing 8 different leadlight manicures that I have previously done on this blog

Today's post is all about polishes that can be used for Leadlight manicures. 'Leadlighting' is a nail stamping technique where coloured, translucent polishes (jellies, and tints) are painted over stamped outlines, usually in a dark colour, over a white or light coloured base. It allows for the creation of multi-coloured images on the nail. The pros of leadlighting are that compared to the decal method, the other popular method of creating multicoloured stamped images, it is much quicker, because the colours are applied directly to the nail, as opposed to a stamper.

I first learned this technique from a you-tube video posted by Messy Mansion in spring 2014. Back then, I only had a few jelly polishes in my collection.  I immediately started researching and store-hunting for a variety of jellies that I could use for this technique. Today, I want to share some of what I have found.

1) Create your own
A lot of people have shared that you can create jelly polishes by adding clear nail polish to other polishes already in your collection. They can be mixed as required by combining a few drops of each on a piece of saran wrap, plastic, or whatever un-needed flat surface you have handy. This way you do not have to mix up an entire bottle of jelly polish, if you only need a little bit for some nail art. I have never personally tried this technique, but I have seen it successfully done in manicure tutorials on-line.

2) OPI Sheer tints
This collection came out in spring or summer 2014, just as the leadlight technique was really catching on in the nail art community.  They are lightly pigmented, so although they work beautifully for the technique, the colours you get tend to be pastel shades.  You might be able to build the colour intensity with multiple coats, but, you may end up with a lumpy surface. The colours are 'I'm Never Aberrassed', 'Be Magentale with Me', 'Don't Violet Me Down', and 'I Can Teal You Like Me'.

3) NFU OH Jelly Syrup Series
I'm not sure exactly when, but a quick internet search leads me to believe that it was sometime in either late 2010 or early 2011, that Nfu Oh came out with an entire collection of jelly polishes, containing a whopping 45 shades of jelly awesomeness! From my experience with the polishes from this series that I have in my collection, these polishes are very pigmented, and are fantastic for use in the leadlight technique.

4) China Glaze Summer 2013 Sunsational Collection
This collection included 6 jelly polishes: 'You Drive Me Coconuts', 'Heat Index', 'Shell-O', 'Keepin' it Teal', 'Isle See You Later', and 'Are You Jelly?'. These are gorgeous, bright, fun shades. They are not perfectly translucent, as they have a translucent white base, but I've found that they still work well for leadlight manicures.

5) OPI Color Paints collection (Summer 2015)
I did a comprehensive review of these polishes in an earlier post. Click here to view it.

6) Essie Silk Watercolor collection (Summer 2015)
This was a collection of 8 jelly polishes and a white base. The colours were:
'Highest Bidder' - Crimson
'Blush Stroke' - Scarlet
'Love Sheen' - Rose
'Art New-Beau' - Orange
'Muse, Myself' - Citrus
'Pen & Inky' - Teal
'Point of Blue' - Blue
'No Shrinking Violet' - Violet
'White Page' - White base polish

7) Some examples of random Jelly Polishes sorted by colour:
Red:  Essie Jelly Apple Burgundy: China Glaze 'Ravishing, Dahling'
Orange: OPI Big Hair...Big Nails, OPI 'Y'all Come Back Ya Hear?'
Yellow: Deborah Lippmann 'Yellow Brick Road'
Turquoise: Zoya 'Frida'
Blue: China Glaze 'Ride the Waves', and 'Splish Splash'
Purple: Zoya 'Katherine', and China Glaze 'Creative Fantasy'
Pink: Misa 'Bed of Roses'
White: OPI 'Don't Touch My Tutu', and 'Funny Bunny'

8) Essie Glazed Days Collection, Summer 2019
I did a comprehensive review of these polishes in an earlier post. Click here to view it.

Sunday, April 26, 2015

Mani-Swap: Pink, Purple, and Glitter Combo

I recently did a mani-swap with an amazing friend of mine who is also a nail polish enthusiast. I designed a manicure for her to wear using polishes from her collection, and she designed one for me to wear using polishes from my collection. Here is the super-cute manicure she designed for me:

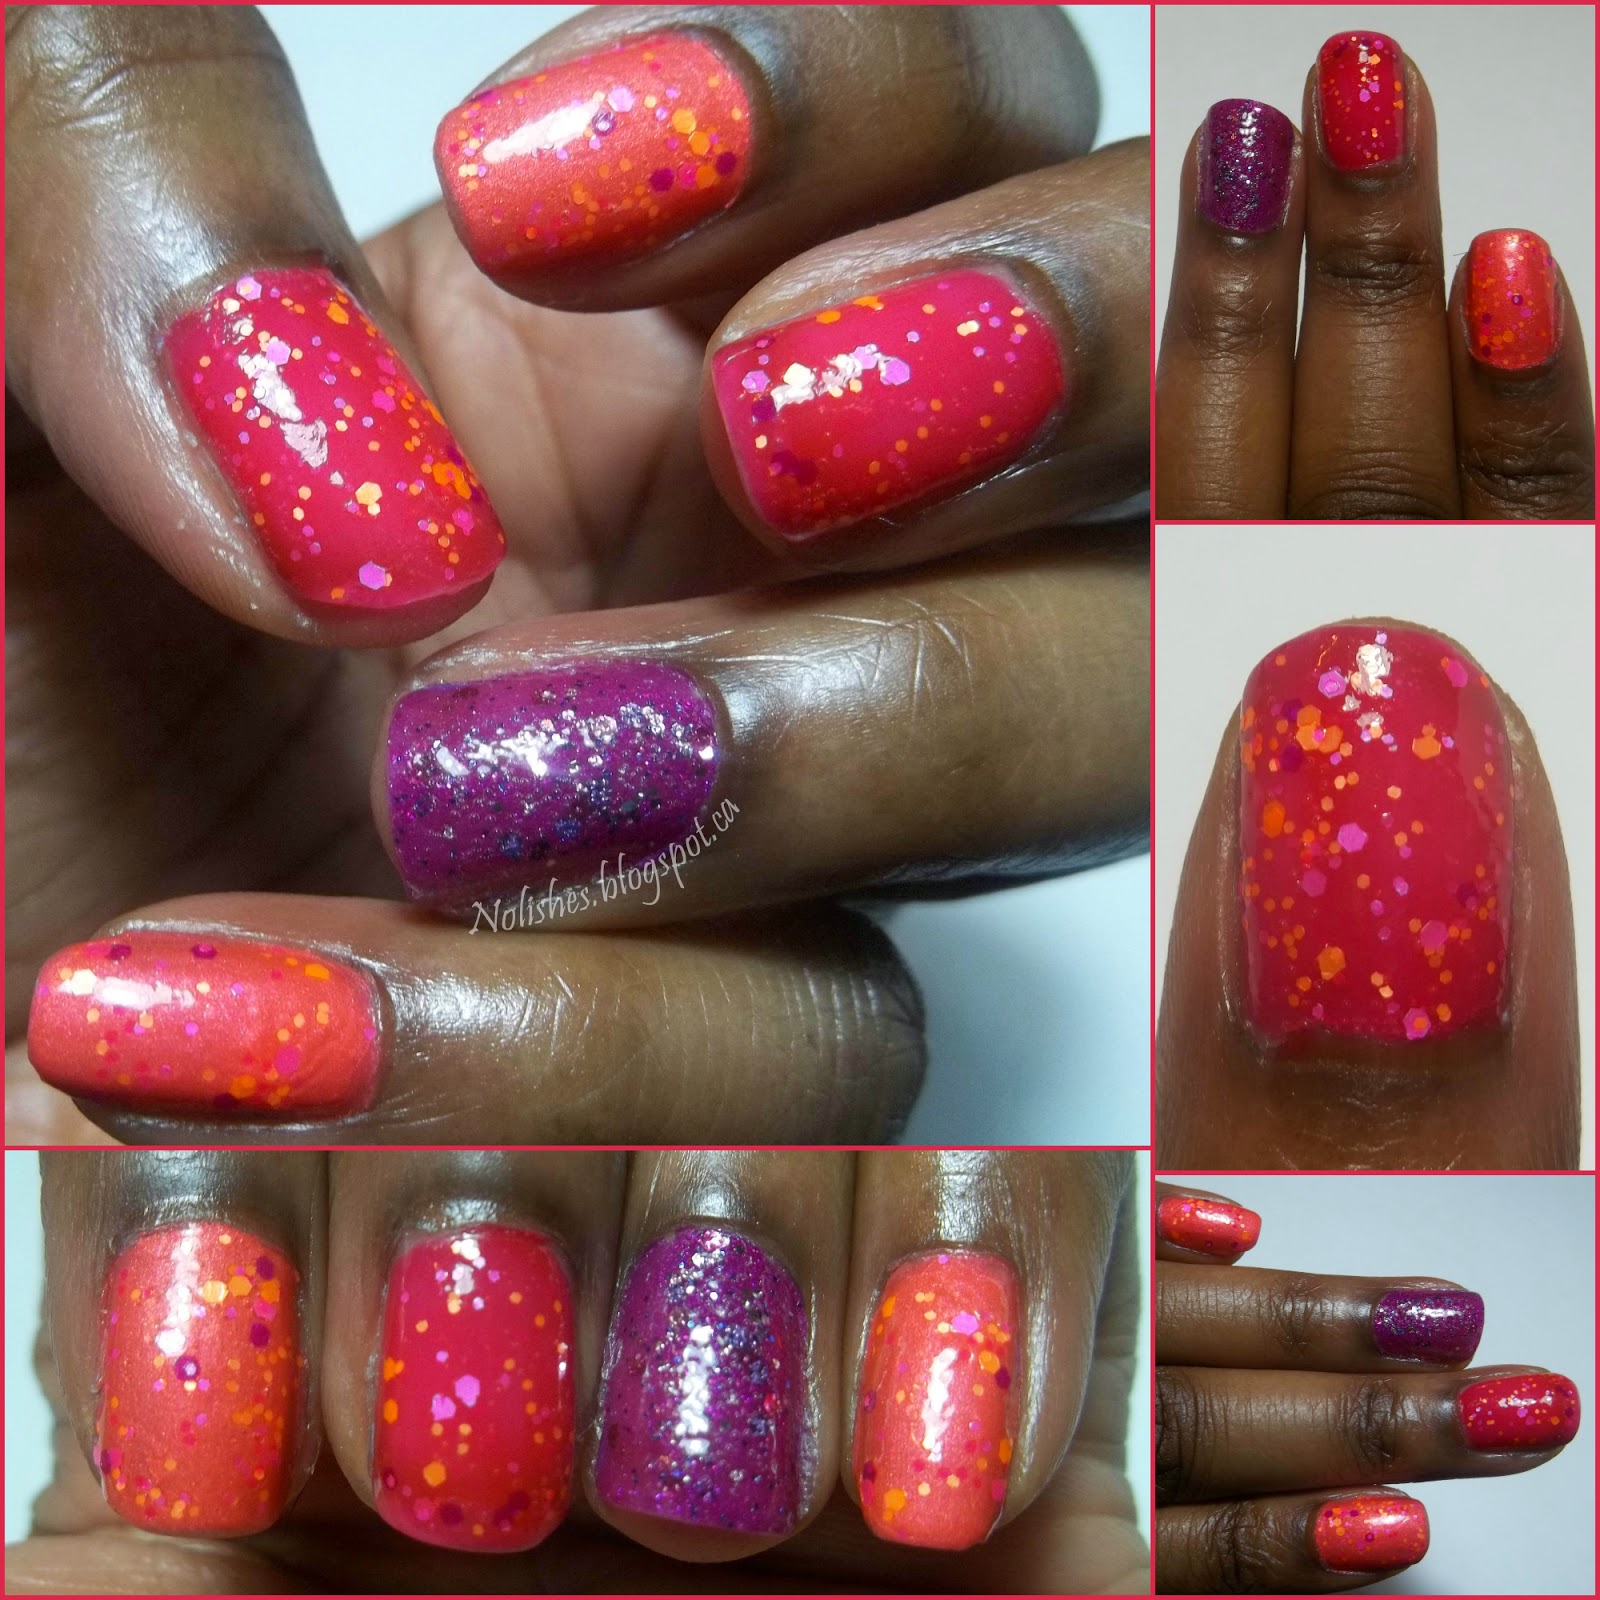
Skittles manicure with purple, fuchsia, and coral polishes covered in a purple, fuchsia,and orange glitter. Accent nail is covered with a traditional metallic glitter with lilac, pink, and plum tones.

It's so exciting to be exposed to different styles and combinations like this! This mani is so bright and fun - I love it! Also, I've really started embracing my glitters again, now that I have the peel-off base coat, so it's great to be able to do another glitter mani! I also really like how she used all of the colours from 'Let the Beat Drop' as the base colours for the manicure. Here are the polishes from my collection that she chose for the manicure:

Polishes Used:
Maybelline Color Show 'Pink Shock'
China Glaze 'Let the Beat Drop'
Essie 'Jamaica Me Crazy'
Misa 'Bubblepop'
OPI 'Blush Hour'

Maybelline Color Show ‘Pink Shock’, China Glaze ‘Let the Beat Drop’, Essie ‘Jamaica Me Crazy’, Misa ‘BubblePop’, and OPI ‘Blush Hour’

Another great thing about this manicure is that all of these polishes were previously 'untrieds' in my collection. Now, 'Bubblepop' and 'Let the Beat Drop' are pretty new - I've only owned them for about a month or less - but the others I've had for at least a year or two! It feels really great to get these off the untried list!

Now, as for my first impressions with the polishes - I'm really in love with both of the glitters! The main glitter, 'Let the Beat Drop' is from the new Summer 2015 China Glaze 'Electric Nights' Collection. I instantly snapped up all 3 of the neon matte glitters the moment I laid eyes on them at one of the beauty supply stores that I pretty much live in! LOL!!! I used one of them, 'Point me to the Party' in a previous mani, and I can't wait to try something out with the other, 'Can I Get an Untz Untz' (a blue, green and purple neon matte glitter).The other glitter in this manicure, 'Blush Hour' was from OPI's 'Spotlight on Glitters' collection which I believe was released around March 2014. It's so beautiful! I can't wait to play around with this one some more!

'Jamaica Me Crazy' is such a sassy, funky purplish-pink, and the cheeky name just takes the cake! This has always been a sentimental favourite for me, but now that I've tried the colour and love it, it's just a plain old favourite! 'Bubblepop' is such a summery, shimmery, gorgeous shade of coral, and 'Pink Shock' is a really nice super-pigmented fuchsia jelly. If you couldn't tell, I really love all of these colors!

Additional shots of the Mani Swap Manicure

This was such a fun experience! I just want to send a big shout out to my friend. Thanks for designing this gorgeous manicure!

Sunday, April 19, 2015

Grey, Orange, and Blue Water Marble and Stamping Mani

Due to the huge supply of water marble nail decals that I whipped up recently, today, I have yet another water marble manicure to share!


In addition to the water marble decal on my ring finger, I also did a little stamping and dotting on my middle finger. I can't even emphasize how much I really love this manicure. I like how toned down, yet fun and interesting the final look is. I would definitely say this is one of my favourite looks I've done so far this year.

NYC 'Water Street Blue', NYC 'Deep Breath', NYC 'Spring Street', NYC 'NY Blues', and NYC 'Sidewalkers'
Polishes Used:
NYC 'Water Street Blue'
NYC 'Deep Breath'
NYC 'Spring Street'
NYC 'NY Blues'
NYC 'Sidewalkers'

Plate Used:
Bundle Monster BM-212


I'm really excited about designing more mixed manicures like this one using my remaining water marble decals along with other nail art techniques. This has been so much fun, and I'm loving the results!

Saturday, April 18, 2015

Water Marble Decal Mani: Gold, Red, Blue, and Green

Today I have another water marble decal manicure to share:

Water marble decal mani using gold fleck base polish, and featuring sections of red, blue, and green water marble selectively placed on the nail.

My last manicure ended up looking very 60's, and funnily enough, this one is very 70's looking to me... apparently, I'm just moving my way along through the decades! Again, this wasn't intentional. I did the water marbling separately, and paired the gold base polish with it after the fact.

Polishes Used: 
NYC 'Times Square'
NYC 'Water Street Blue'
Misa 'Epiphany'
NYC 'NY Blues'
NYC 'High Line Green'

Misa 'Epiphany', NYC 'Times Square', NYC 'High Line Green', NYC 'NY Blues', and NYC 'Water Street Blue'

This manicure really highlights one of the benefits of making water marble decals over the traditional water marbling method: You have way more control with placement. With decals, you can cut the marbled polish sheets into any shape you want, and layer it over your base polish in creative ways. This also allows you to use a lot more of the decal sheet, since you can find use for even little scraps of marbled polish.

I made around 20 water marble decals during my experiment with this technique. I'm not sure how long they will last, so I'm going to attempt to use them up over the next several manicures. Stay tuned to see what I come up with!

Wednesday, July 30, 2014

Colourful Cartoon Mani - Version 2.0

I had to touch up some wear and tear on my 'Colourful Cartoon Mani', so I used the opportunity to revise it a bit to give it a different look. I had a tiny bit of tip wear, and I lost one of the gems I had placed on my middle finger. So I decided to repaint the worn tips on my accent nails with random splotches of colour, and to change the neutral nail polish shade for black polish.

Colourful Cartoon Nail Stamping Manicure using Lead Light Technique, and Moyou London Princess Collection Plate 11. Polishes used include: Misa 'Bed of Roses'; Nfu OH Jelly Syrup Series Polishes NFU JS20, NFU JS18, NFU JS17, NFU JS12; China Glaze 'Creative Fantasy'; OPI '4 in the Morning'; NYC 'French White Tip', and Rimmel 'Black Satin'
Colourful Cartoon Mani - Version 2.0

The black polish I used was OPI's '4 in the Morning' from their Gwen Stefani collection.  This was my first time using this particular polish.  I was on the fence about buying it for the longest time (truthfully, I had pretty much chosen to pass on it) until I decided on a whim yesterday to buy it to try it out with this manicure. This polish is really all about the formula. The semi-matte finish reminds me of black rubber! In the picture above, my index and middle fingers look slightly shinier than the polish looks in real life, because I had just applied some cuticle oil prior to taking the shot.  The pinky finger gives a more accurate depiction of how the polish actually looks.
  
After the first 2 changes, I decided the manicure needed a little something extra to tie it all together. I went ahead and stamped some other cartoon/doodle themed images, which were from the same image plate that I used for the accent nails (Moyou London Princess collection 11).  I used another polish I bought yesterday, China Glaze's 'Kiss my Glass'.  I was going for a subtle, monochromatic look in order to add a little more visual interest, but to not compete with the super colourful accent fingers. 

Colourful Cartoon Nail Stamping Manicure using Lead Light Technique, and Moyou London Princess Collection Plate 11. Polishes used include: Misa 'Bed of Roses'; Nfu OH Jelly Syrup Series Polishes NFU JS20, NFU JS18, NFU JS17, NFU JS12; China Glaze 'Creative Fantasy'; OPI '4 in the Morning'; NYC 'French White Tip', and Rimmel 'Black Satin'
Colourful Cartoon Mani - Version 2.0 (Closeup of Additional Stamping)

Because of how subtle the stamping was, it was really hard to get a picture that showed the stamping well enough! The photo above is the best I could do to show the gunmetal on black stamping, and the photo below is a photo of the entire look.

Colourful Cartoon Nail Stamping Manicure using Lead Light Technique, and Moyou London Princess Collection Plate 11. Polishes used include: Misa 'Bed of Roses'; Nfu OH Jelly Syrup Series Polishes NFU JS20, NFU JS18, NFU JS17, NFU JS12; China Glaze 'Creative Fantasy'; OPI '4 in the Morning'; NYC 'French White Tip', and Rimmel 'Black Satin'
Colourful Cartoon Mani - Version 2.0 (Additional Stamping)


Sunday, July 27, 2014

Colourful Cartoon Mani

Today I'm sharing another manicure using the 'leadlight' technique:

Colourful Cartoon Nail Stamping Manicure using Lead Light Technique, and Moyou London Princess Collection Plate 11. Polishes used include: Misa 'Bed of Roses'; Nfu OH Jelly Syrup Series Polishes NFU JS20, NFU JS18, NFU JS17, NFU JS12; China Glaze polishes 'Creative Fantasy' and 'Inner Beauty'; NYC 'French White Tip', and Rimmel 'Black Satin'
Colourful Cartoon Mani

I used several jelly polishes from the Nfu Oh 'Jelly Syrup' series, China Glaze, OPI, and Misa.  I don't remember exactly which ones because I didn't plan out the colours before I used them. I just laid out all of my jelly nail polishes, and grabbed whichever one I felt like using when filling in different parts of the image.  It was so much fun - just like a tiny colouring book!

Here are pictures of the 4 stamped fingers:

Colourful Cartoon Nail Stamping Manicure using Lead Light Technique, and Moyou London Princess Collection Plate 11. Polishes used include: Misa 'Bed of Roses'; Nfu OH Jelly Syrup Series Polishes NFU JS20, NFU JS18, NFU JS17, NFU JS12; China Glaze polishes 'Creative Fantasy' and 'Inner Beauty'; NYC 'French White Tip', and Rimmel 'Black Satin'
Close-Up of Accent Nails
Despite the haphazard manner I used for selecting colours, a few elements in the images stayed constant from finger to finger.  I tried to use the same colours for the Cat, the Snake, and the Giraffe-like creature.

For the cat I used Misa 'Bed of Roses' for the nose, and NFU JS20 for the fur. The snake in front of the cat was coloured using NFU JS18  for the face, and NFU JS17 for the body. The giraffe thingy behind the cat was coloured using NFU JS12 for the body, Misa 'Bed of Roses' for the snout, and China Glaze 'Creative Fantasy' for the neck fur fringe. I also used a white base of NYC 'French White Tip' , and Rimmel 'Black Satin' for the stamping. The image I used was from Moyou London Princess collection plate 11

The neutral nails were painted with China Glaze 'Inner Beauty'. I also used some purple, teal, and fuchsia nail art rhinestones on my middle fingers.

Overall, I really like the way this manicure turned out. This cartoon image was one of the main reasons that I bought this Moyou London plate.  That was way before I even knew about the leadlight technique - I love the way that this method of adding colour really brought this image to life.