Saturday, May 30, 2015

Vintage floral print mani

Today I have a quick and easy vintage-looking floral print nail-stamping manicure to share with you:


The base colour is OPI's 'Hands off my Kielbasa' from the Spring 2013 Euro Centrale Collection. I recently purchased this polish on clearance at a beauty supply store. It's a shimmery bronzy-pinky-tan colour, and I have nothing like it in my collection. It's not the type of colour that I would usually gravitate towards, but for the price, I thought I would give it a try. It's a very neutral, understated look on me, so it probably is going to get most of its use as a base for nail art.

For this manicure I paired '...Kielbasa' with a black polish using a floral print stamping image. The end result reminds me of a vintage, ornately-patterned, silk curtain or wallpaper!


Polishes Used
Plate Used
OPI ‘Hands off my Kielbasa!’
Messy Mansion MM46 ‘Flowers Theme’
Konad Special Polish in Black


If I had to do it again, the only thing that I would change about this look would be to add some sort of black or predominantly black accent nail - just to spice up the look a little!

Friday, May 29, 2015

Pastel Neon Paisley Skittles Mani

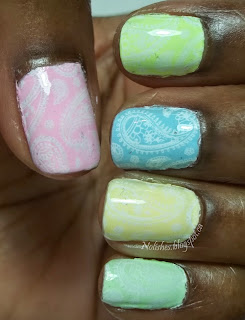
In my last post, I did a simple manicure using 'Hot-Hot-Hot Pants' one of the colours from the Color Club 'Poptastic Pastel Neons' collection. For this manicure, I decided to use the remaining colours that I owned from the collection to create this paisley-printed skittles mani:

Nail stamping manicure featuring light pink, yellow, green and blue pastel neon polishes, stamped with white paisley print

In my last post, I mentioned an embellishment idea that I had, to use with these bright pastel colours. The idea was to stamp over them with white stamping polish, as I have done in this manicure. White seems to be the perfect colour for combining with these 'Pastel Neon' colours - it keeps the look fun and light and doesn't overpower the already eye-catching colours.

Originally, I was thinking about using simple white stripes for the stamping image, however, I've already used my stripe plates for a few manicures, while so many other plates in my collection have gone unused. So I decided to try something else. I chose my paisley-themed Messy Mansion plate mainly because I just recently purchased it and was excited to give it a try!

Color Club ‘Feathered Hair out to There', Color Club ‘Disco’s not Dead’, Color Club ‘Under the Blacklight’, Color Club ‘Til the Record Stops’, Color Club ‘Meet me at the Rink’, and Konad Special Polish in White

Polishes Used
Plate Used
Color Club ‘Feathered Hair out to There’       

Color Club ‘Disco’s not Dead’

Color Club ‘Under the Blacklight’
Messy Mansion  MM48 ‘Paisley Theme’
Color Club ‘Til the Record Stops’

Color Club ‘Meet me at the Rink’

Konad Special Polish in White


I like the end result, but the only problem is that there isn't a lot of contrast with the delicate white lines of the paisley print stamped over the yellow and light green shades, so it's hard to see the details of the stamped image. In retrospect, a stamping image with thicker lines would have probably worked a little better. Polka dots would have been lovely as well!

Saturday, May 23, 2015

Pastel Neon Coral Manicure

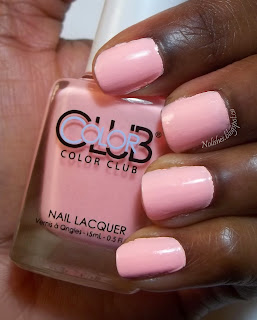
I recently bought 6 of the 7 polishes from Color Club's Poptastic Pastel Neons collection. I would have bought all of them, however the website that I bought them from didn't have the last colour. I was so excited when they arrived, because I had heard so much buzz about them on YouTube, and on various blogs - I just couldn't wait to try all of these gorgeous colours! I decided to start with the one that caught my eye the most: 'Hot-Hot-Hot Pants', a pretty shade of pastel coral.

Pastel Coral shade from the Color Club Poptastic Neon Pastel Collection
Color Club Poptastic Neon Pastel Collection:
Hot-Hot-Hot Pants
I really love this shade! It's been a long time since I've worn only one polish, with no glitter, accent nail, or nail art! I honestly was at a loss when trying to think of something to do to jazz this up. I think the colour already stands out, all on its own - so it doesn't need much in the way of embellishments. I did have one idea, but by the time I thought of it, I had already gotten used to the plain colour, so I've decided to save the idea for my next manicure!

Here is a picture of the remaining polishes that I own from the collection:

Feathered Hair out to There, Under the Blacklight, Disco’s Not Dead, Meet Me at the Rink, and ‘Til the Record Stops

Color Club Poptastic Neon Pastel Collection:
The Remaining Colours I Own (L-R)
Feathered Hair out to There
Under the Blacklight
Disco’s Not Dead
Meet Me at the Rink
‘Til the Record Stops

The polish that I am missing is a pastel purple shade called 'Diggin' the Dancing Queen'. I'm still keeping an eye out for it, so hopefully I will be able to complete the collection.

Wednesday, May 20, 2015

Pink and Silver Manicure

Here's a quick manicure I did to try out a new polish I bought on Tuesday:

Nail Stamping manicure using OPI 'Elephantastic Pink', Sally Hansen 'Silver Sweep', and Messy Mansion Bridal Nail Plate 05

Polishes Used
Plate Used
OPI ‘Elephantastic Pink’
Messy Mansion ‘The Bridal Nail’-
Sally Hansen Insta-Dri ‘Silver Sweep’
                          Plate 05

The polish I bought was OPI's 'Elephantastic Pink' from their Spring 2008 India Collection. This pink is very bright and summery, and in real life appears a touch more coral than it does in the picture above. Just to add a bit of visual interest, I added a little bit of nail stamping on my ring fingers using my go-to silver stamping polish, 'Silver Sweep' (original formula). 

OPI 'Elephantastic Pink', and Sally Hansen Insta-Dri 'Silver Sweep'
Polishes Used

Tuesday, May 19, 2015

Pale Translucent Grey and White Matte Glitter Mani

Today I have another 'Impromptu Mani' to share:

Soft Shade Glitter Manicure

Polishes Used
OPI ‘My Pointe Exactly’
OPI ‘Pirouette My Whistle’

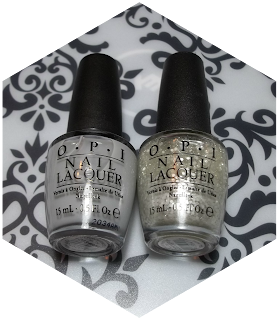
These two polishes have always been one of my favourite pairings from the OPI New York City Ballet Soft Shades Collection (originally from spring 2012). 'My Pointe Exactly' is quite unique, as I don't think I've seen very many translucent light grey jelly polishes. It adds a bit of personality and edge to the classic soft, sheer manicure.  And then there's 'Pirouette My Whistle', which is one of the most amazing glitters I've ever seen. It's so original! A muted, delicate glitter that adds sparkle, shine, and dimension without being eye-catching, or overpowering the finished look - OPI truly outdid themselves with this one!
OPI ‘My Pointe Exactly’ and OPI ‘Pirouette My Whistle’

Now that the nice whether is here, I've been really busy, and haven't had a lot of time to do anything super-elaborate with my nails. I may just be featuring a lot of quick and easy manicures for the next little while! Hopefully, I might be able to squeeze in some nail art here and there. I already have a few ideas lined up, but very little time in which to do them! Perhaps I can find some time on the weekends.

Saturday, May 16, 2015

Muted Rose and Black Glitter Mani

 Today I have a quick and easy 'impromptu mani' to share with you:

Muted Rose and Black Glitter Mani
Polishes Used:
OPI ‘Steady as she Rose’
L’Oréal Paris ‘Le Pastille’

This manicure took about 10-15 minutes to throw together. I wanted a quick polish update before meeting up with some friends for dinner, so I grabbed a couple nearby polishes, which both happened to be new un-trieds, and started polishing!

The base colour for the manicure is OPI's 'Steady as she Rose' from the Spring 2011 'Pirates of the Caribbean: On Stranger Tides' Collection. This was one of the ones that I didn't pick up at the time the collection first came out. Instead, I bought it on-line a few weeks ago. I'm so glad I finally got it! It is such an elegant, sophisticated, gorgeous colour! Unfortunately, the true awesomeness of the colour doesn't show in the finished manicure, because the other polish on top also has a crème base, which changes the hue. However, the bottle picture below does show a pretty accurate representation.

The topper polish I used was L'Oréal Paris' 'Le Pastille', a beautiful crème-based glitter polish from their Spring 2014 'Les Blancs' collection. I really love this polish as well! When I first put the base layer of 'Steady...' on, I almost stopped right there, because I was so taken with how great the colour looked. However, I decided to go through with the topper after all, because I was eager to see what that polish looked like as well. I'm so glad I did! The polish adds a bit of an artistic edge to the manicure. The finished look reminds me of a speckled bird's egg!

OPI ‘Steady as she Rose’, and L’Oréal Paris ‘Le Pastille’
Polishes Used
All in all, I feel that this is a very pretty spring-time manicure, and I loved the way it turned out. I'm also really happy with both of the polishes!

Friday, May 8, 2015

Noooooo!!!

This post is dedicated to the memory my bottle of OPI's 'Cement the Deal':

Broken bottle of grey nail polish, covered in polish and tissue

I have never in my life broken a bottle of nail polish - until yesterday! I broke my new bottle of OPI's 'Cement the Deal'. It was such a disaster - I ruined a portion of my carpet, I had polish all over me, and my entire bedroom smelled like nail polish! And the worst part is, not only had I not worn the polish, I had only owned it for 3 days!

I just bought the bottle of polish on Monday. That day, I went to one of my favourite nail polish stores specifically looking for it because I had purchased 3 others polishes from the OPI '50 Shades of Grey' collection on clearance at a different store over the weekend, and wanted to see if I could find the last one that I wanted.

The OPI '50 Shades of Grey' collection contains 6 polishes. A red crème polish called 'Romantically Involved', a silver metallic polish called 'My Silk Tie', a silver and blue glitter polish called 'Shine for Me', and 3 (not 50!) shades of grey crème polish: 'Dark Side of the Mood' (a dark grey); 'Embrace the Grey' (a medium grey); and 'Cement the Deal' (a slightly lighter medium grey). I had already purchased 'Romantically Involved', 'Dark Side of the Mood', and 'Embrace the Grey', and was hoping to find 'Cement the Deal'.

I remember how carefully I had to search the display at the store I went to in order to find it. 'Embrace the Grey', and 'Cement the Deal' look so similar in the bottles that I literally had to check the bottom of each bottle of polish in the display in order to find the right one. After flipping about 9 bottles of 'Embrace...' I was beginning to think 'Cement the Deal' was sold out. I continued flipping nevertheless, and lo and behold, after checking every single grey polish on the rack, the last bottle I flipped was the last bottle of 'Cement the Deal' they had out! I left feeling so ecstatic that my persistence had been rewarded, and I was now the proud owner of the polish I had gone looking for - for a relatively decent (for OPI) clearance price of $6.99. Little did I know then, that happy moment would culminate in an evening of frustration and annoyance, in just a mere three days!

16 shots of the broken bottle of polish, OPI's 'Cement the Deal', and a little bottle I used to store what was left of the polish.

On Thursday, I dropped a few polishes on my carpet while trying to select polishes for a manicure. Two of the bottles must have hit each other, breaking one of them. Now, breaking a bottle of nail polish is one of those unexpected events, that can easily derail every single plan you had for the next few hours.  It takes so much time to clean the area, do a quick manicure to use up some of the polish, try to salvage what's left by cleaning another almost empty polish bottle to store it in, carefully transfer the remaining polish into the freshly cleaned bottle, place an on-line order for a replacement bottle, and then air the house out.

It really bothered me to re-purchase the polish (at full price), but I knew I would feel a lot worse if I wasn't able to find it on clearance in any stores, and it sold out on-line, and I was never able to repurchase it. In retrospect, the colour wasn't really that unique so it probably wouldn't be hard to find a dupe - but you never really think these things through after an emotional event!

***Edit 2015-05-16:
Here is a picture of the new bottle of polish I ordered that night (first from left) along with the three others that I have from the collection, and what's left of the first bottle (top). The salvaged bottle looks deceptively full, but that's just because the polish has coated the sides of the bottle. The collage above gives a better idea of how much polish was left.

Top: salvaged 'Cement the Deal'. Bottom (Left to Right): new bottle of 'Cement the Deal', 'Embrace the Grey', 'Romantically Involved', and 'Dark Side of the Mood'

***

Tuesday, May 5, 2015

Cinco de Mayo Manicure 2015

Today I have a Cinco de Mayo manicure to share!

Nail stamping manicure featuring white base stamped in copper with Mexican themed images. The ring finger accent nail features a copper base topped with a white and silver micro-glitter mix, an emerald green glitter polish, a red glitter polish, and then stamped stamped with the words 'Viva Mexico' in white.
Cinco de Mayo Manicure
I kind of did this one in a rush, so there are so many things that I would change about it if I had to do it again! I do like the overall look though, and it also inspired another manicure idea which I hope to do shortly. Here are the polishes that I used to create this look:

Polishes Used:
Plates Used:
China Glaze ‘White on White’
Cheeky Jumbo Plate 1 ‘Viva Mexico’
L.A. Girl Glitter Addict ‘Animate’

Konad Special Polish ‘White’

L.A. Girl Glitter Addict ‘Purge’

China Glaze ‘The Outer Edge’

Essie ‘Penny Talk’


China Glaze ‘White on White’, L.A. Girl Glitter Addict ‘Animate’, Konad Special Polish ‘White’, L.A. Girl Glitter Addict ‘Purge’, China Glaze ‘The Outer Edge’, and Essie ‘Penny Talk’
Polishes Used
I absolutely love this Cheeky Beauty 'Viva Mexico' plate! The designs are so bold and intricate, and they look fantastic stamped on the nail. I really love how the white and copper stamping of the full nail images from this plate turned out. However, I would have loved to be able to spend a little more time designing the accent nail.

I ended up using 'Penny Talk' as a copper base coat,  and then topping it with three different glitters: 'The Outer Edge', a white and silver micro-glitter polish; 'Animate', a red glitter; and 'Purge', an emerald green glitter. I then covered everything with some top coat, and then stamped the script images. I like the idea of using the different glitters, but the way I used them, the individual glitter polishes get lost in the mix, and even worse, 'The Outer Edge', the most delicate glitter of the bunch, can barely be seen!

 I realized after the fact that I could have done a three colour glitter gradient to help the glitters really stand out, and also to be a little more reminiscent of the Mexican Flag. Then I could have stamped over the white part in the centre with the writing in black. I also don't think I would go with the copper base if I had to do it again. Here are some close-up shots of the accent nails:

Right and left ring finger accent nails featuring a copper base topped with a white and silver micro-glitter mix, an emerald green glitter polish, a red glitter polish, and then stamped stamped with the words 'Viva Mexico' (left), and 'Fiesta' (right) in white.
Accent Nails
The best thing about a manicure that doesn't turn out the way you had hoped, is that it is so easy to take what you learned and apply it to the next one!

Monday, May 4, 2015

'May the Fourth Be With You' Mani

In honour of May the 4th, I decided to rework my previous mani into a space themed galaxy manicure:

Space themed manicure featuring  black nails with gold and holographic glitter, stamped with orbiting planets in silver on the thumb, and a grey and silver rocket ship with red and orange flames trailing it is stamped on the ring finger.
May the Fourth be with Your Manicure!
There is so much wear and tear on this manicure, that it's not even funny! The base for this manicure was only supposed to be an impromptu weekend manicure, that was hastily applied on top of the manicure I wore for most of last week - it's unbelievable how many layers of polish are on my nails right now! The plan was originally to do a new manicure on Sunday night, so that everything would be fresh for Monday morning, but then I came up with the idea to re-purpose the mani, since I already had the galaxy framework that I could build upon to create a May the Fourth Mani.

My previous mani featured a black base of Wet n Wild 'Black Crème', and a black, gold, and holographic glitter, Sally Hansen Complete Salon Manicure 'Midnight Glitz'. That combination already looked very 'spacey' so I just emphasized that by adding a cute spaceship from one of my Moyou London 'Sci Fi' plates, and some planets in orbit from my Messy Mansion 'Space Themed' plate. I made the rocket ship decal using advanced stamping technique.

Here are the details of the polishes and plates that I used to create this look:

Polishes Used:
Plates Used:
Wet n Wild Wild Shine ‘Black Crème’

OPI ‘Romantically Involved’
Messy Mansion ‘Space Themed’ MM33
Essie ‘No Place Like Chrome’

Sally Hansen C.S.M. ‘Midnight Glitz’
Moyou London Sci-Fi Collection - 03
OPI ‘Atomic Orange’

OPI ‘Embrace the Gray’


Wet n Wild Wild Shine ‘Black Crème’, OPI ‘Romantically Involved’, Essie ‘No Place Like Chrome’, Sally Hansen Complete Salon Manicure ‘Midnight Glitz’, OPI ‘Atomic Orange’, and OPI ‘Embrace the Gray’
Polishes Used
All in all, I think it is a super cute manicure (minus the tip wear, and bulky, multi-layered polish application!). I really like how the space-ship decal turned out, and how cool it looks floating on the background of the black and holo-glitter 'space'.

Cinco de Mayo Manicure

Here's a manicure I did for Cinco de Mayo, 2014:

Cinco de Mayo Nail Stamping Manicure in Black, Gold, Red, White and Green. Stamped using Cheeky's Jumbo Plate 1 'Viva Mexico', and Moyou London's Pro XL Collection plate 06.
Cinco de Mayo Manicure
Unfortunately, I no longer remember exactly which polishes I used to create this look. I used black nail polish for the base colour on all of my fingers except for my ring fingers. I then stamped these fingers with gold nail polish using images from Cheeky's Jumbo Plate 1, 'Viva Mexico'. On my ring fingers, I used the same gold nail polish as the base colour.  I then stamped the ring fingers with the Aztec print image from Moyou London's Pro XL Collection plate 06. I created a red, white, and green gradient by filling the engraving with a drop of each colour before swiping and picking up the image.

I really like this manicure, but I especially love how the accent nails turned out.  You can barely recognize the Aztec print, instead, it looks like a distressed surface with bits of gold peaking through. So awesome! I definitely want to try this technique again!

Saturday, May 2, 2015

Black, Gold, and Holo Glitter Mani

Today I have a quick and easy weekend mani to share:

Glitter Manicure featuring black polish, covered with a gold and holographic glitter mix, and a nail stamped quatrefoil lattice pattern stamped in gold on the ring finger.
Black, Gold, and Holo Glitter Mani

Polishes Used:
Plate Used:
Wet n Wild Wild Shine ‘Black Crème’

Sally Hansen Complete Salon Manicure
                    ‘Midnight Glitz’
Moyou London Time Traveller Collection:
                   Back to the 60’s – Plate 04
Essie ‘Good as Gold’


Wet n Wild Wild Shine ‘Black Crème’, Sally Hansen Complete Salon Manicure ‘Midnight Glitz’, and Essie ‘Good as Gold’
Polishes Used
I got bored of my previous manicure, and decided to do a quick polish change for the weekend. I decided to do a simple glitter mani, but just as I finished, I had the idea to add a little stamping on my ring finger as an accent. I decided to use this quatrefoil stamping image that I originally intended to use a couple manicures ago, but didn't after changing my mind at the last minute.

I like this manicure - it's simple, and edgy. It's been a while since I wore a holographic glitter, so it was a lot of fun watching it sparkle, and reflect beautiful flashes of colour! I think that the next time I try this glitter, I would like to put it over a gold, sheer black, or dark blue base. There are black glitter particles in 'Midnight Glitz', so even though the holographic particles look really good on a black background, the black glitters get completely lost, so a black base probably isn't the best choice. I'll have to do a little more experimenting with this.

The base polish I used for this manicure was Wet n Wild 'Black Crème'. I did a review on the newly revamped Wet n Wild Wild Shine Polishes recently, and at the time, I didn't own this polish. After reviewing and liking the previous polishes I picked up, I went out and bought the black and white polishes to add to the set. So far I'm really liking 'Black Crème' too. I only used one thick coat of it for this mani, and I ended up with full coverage - and I was still wearing yesterday's manicure underneath, so that's saying a lot!

Friday, May 1, 2015

60's Print Mani Version 2.0

Hello! The manicure that I have to share with you today is a 'remix' of my last one:

60's Print Mani Version 2.0

Polishes Used
Plate Used
Sally Hansen Insta-Dri ‘Navy Fleet’
Moyou London Time Traveller Collection:
Sally Hansen Insta-Dri ‘Brisk Blue’
                 Back to the 60’s - 04
Nubar ‘Marble Tower’
Revlon ‘Spidey Sense’

Sometimes when you design a manicure, you see an alternate creative choice that you could have made after you have already gone in another direction. This is exactly what happened with the first version of this manicure. I even mentioned the changes that I wanted to make in my last post! Rather than save the idea for another day, I decided to modify the manicure for the second day of wear.

I really like this version! The intricate design reminds me of stained glass windows, and Fabergé eggs! I also really like how the tiny dots of metallic red polish make such a huge impact on the overall look of the manicure. The red polish I used was 'Spidey Sense' from Revlon's Limited Edition 'Amazing Spider Man 2' Electric Chromes collection that was released for Summer 2014.

Sally Hansen Insta-Dri 'Brisk Blue' and 'Navy Fleet', Nubar 'Marble Tower' and Revlon 'Spidey Sense'
Polishes Used